Stages of Labor Diagram Generator
Make modest stages of labor diagrams for prenatal classes and handouts: cervical dilation, effacement, and positions. Clinician review needed.
Create Your Stages of Labor Diagram
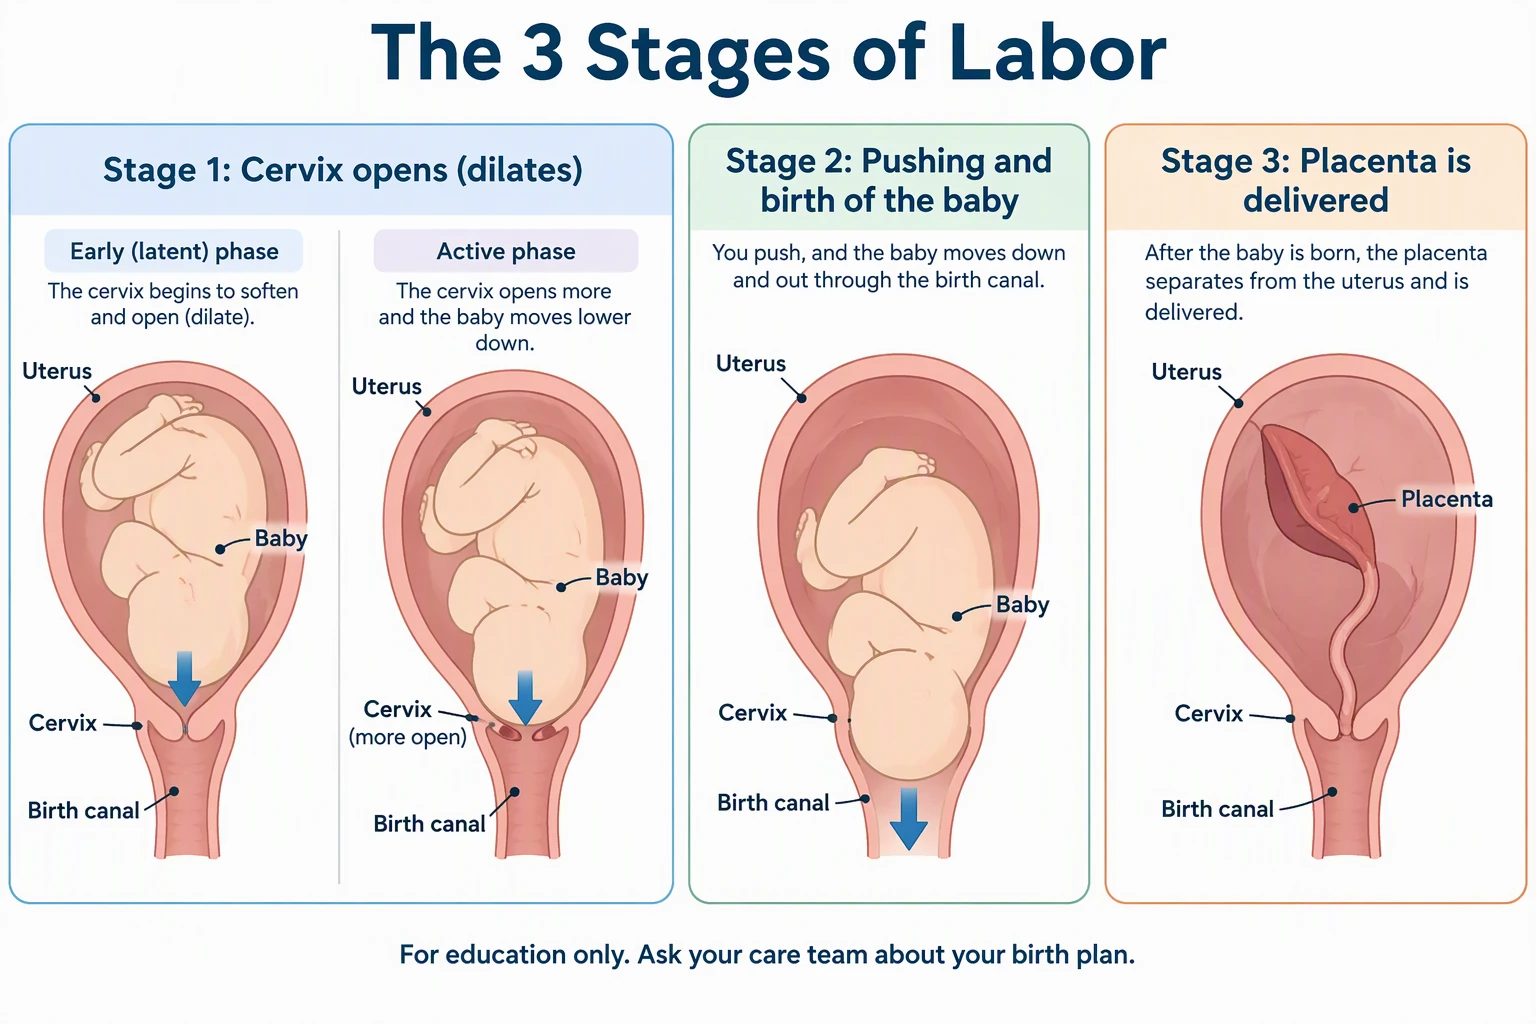 Example: The three stages of laborView full size
Preview is free on this page ·
Your labor diagram will appear here
AI diagrams are drafts. A clinician must review them before use with patients. No real patient data.
Stages of Labor Diagram Examples
Three AI illustrations with their known flaws noted. Generic drawings, no real patients. A clinician should review every illustration before patient use.
The three stages of labor (AI illustration)
AI-generated from the prompt shown, which asks for a head-down baby. The order is right: stage 1 is the cervix opening (early, then active phase), stage 2 is pushing and birth, stage 3 is the placenta. Known flaws: the baby is a simplified shape, with limbs that are hard to read; the placenta is not drawn in stages 1 and 2; the uterus in stage 3 is drawn almost as large as before the birth, while a real uterus shrinks after the baby is born; in stage 2 the baby is still inside the uterus rather than shown crowning; the baby is drawn without a face, so head and bottom are hard to tell apart and stages 1 and 2 look almost the same, so do not use it to teach fetal position; in stage 3 the cord runs from the placenta all the way down to the cervix, which is not how it is really drawn; the early and active phases have no centimeter marks (see the dilation chart). Use it as a teaching sketch, not a medical drawing.
Cervix dilation and effacement (AI illustration)
AI-generated from the prompt shown. Six circles run from 0 cm to 10 cm, with early (latent) labor up to 6 cm and active labor from 6 cm, following ACOG, and a note that some guidelines start active labor at 5 cm, as WHO does. Below, three sketches show the cervix getting shorter and thinner from 0% to 100% effaced. Known flaws: the circles are not drawn to scale, so the 10 cm circle is not ten times the 1 cm opening; the cervix drawings are simplified and the 100% effaced sketch looks more like a bowl than a real cervix; the cervix is not labeled in the lower row; a large cream-colored circle in the lower row (the baby's head) is not labeled; the 100% effaced sketch is also drawn wide, so it can look dilated as well as thin; the 50% effaced caption sits a little lower than the other two. It is not a measuring guide and must not be used to teach examination.
Positions to try in labor (AI illustration)
AI-generated from the prompt shown. Six clothed, faceless figures: leaning forward on a partner, swaying, hands and knees, side-lying with a pillow, sitting on a birth ball, and kneeling over the bed. WHO recommends encouraging mobility and an upright position during labor in women at low risk (recommendation 25, 2018). Known flaws: the first panel is titled leaning forward on a partner, but the figure rests both hands on a counter or stand while the partner stands beside and holds her; hands and feet are simple and sometimes merge; legs are cut off at the panel edge in the standing panels; the heart decorations are extra; the figures show different skin tones, so they are not one person; the birth ball and bed are drawn without scale. Positions that suit one person may not suit another, and some are not advised with certain medical conditions or epidural analgesia, so confirm with the care team.
Need other medical visuals? Try the Medical Illustration Generator for anatomy figures, or the Dermatology Patient Education Illustrations page for skin care handouts. For clinical teaching in nursing, see the Nursing Concept Map Generator. Guideline sources, checked October 2026: ACOG Clinical Practice Guideline No. 8 and the WHO intrapartum care recommendations.
What this page is for
This page is for midwives, obstetric nurses, childbirth educators, doulas, and nursing or midwifery students who need a simple picture for a prenatal class or a handout: the three stages of labor, how the cervix thins and opens, and positions to try. You describe the figure and the generator drafts it in a modest, non-graphic illustration style. Review it before it reaches a patient. It is an illustration maker, not a library of ready-made handouts, and not a substitute for your hospital's approved materials.
The three stages of labor in plain words
- Stage 1: the cervix thins (effacement) and opens (dilation). It has an early, slower (latent) phase and an active phase. It ends when the cervix is fully open, at 10 cm.
- Stage 2: from full dilation until the baby is born. WHO describes the woman or birthing person as having an involuntary urge to bear down, caused by expulsive contractions.
- Stage 3: from the birth of the baby until the placenta is delivered.
- The three definitions follow the ACOG clinical practice guideline on first and second stage labor management (links below). The WHO intrapartum care recommendations define the first and second stages in the same way and do not define the third stage. Some hospitals teach a fourth stage or a "recovery" period. Use the wording your own unit uses.
When does active labor start? 6 cm or 5 cm?
- Older textbooks say active labor starts at 4 cm, based on the Friedman curve from the 1950s. That is no longer the main teaching.
- ACOG (Clinical Practice Guideline No. 8, January 2024) recommends that cervical dilation of 6 cm be considered the start of the active phase of labor. The WHO recommendations (2018) define the active first stage as starting at 5 cm. The WHO recommendations also say the duration of active first stage usually does not extend beyond 12 hours in first labors and 10 hours in later labors.
- So a handout should say which guideline your unit follows. The example chart on this page uses 6 cm and adds a note about 5 cm. Checked October 2026. Sources: ACOG, "First and Second Stage Labor Management" (acog.org/clinical/clinical-guidance/clinical-practice-guideline/articles/2024/01/first-and-second-stage-labor-management); WHO, "WHO recommendations: intrapartum care for a positive childbirth experience" (iris.who.int/handle/10665/260178).
- Dilation figures describe averages and definitions for care teams. They are not a rule for how long any one labor will take, and the page does not tell anyone when to go to hospital. For that, patients should follow their own care team's advice.
Why modest, non-graphic drawings
Many people in a prenatal class are anxious, and some will be reading a handout in a waiting room or sharing it with family. The examples here use side cross-sections and simple circles, clothed faceless figures, and soft colors. There is no blood and no detail of the outer body. When you write your own prompt, ask for the same: "modest, non-graphic, soft-colored illustrations, no faces, no blood, clothed figures". Check the result, because AI sometimes adds detail you did not ask for.
How to make a stages of labor diagram
- Pick one message for one picture: the three stages, or dilation and effacement, or positions. Do not combine them.
- Say which guideline you follow for the start of active labor (6 cm for ACOG, 5 cm for WHO) and write the numbers you want in the prompt.
- List the panels and the exact labels in plain language, at about a sixth to eighth grade reading level.
- Ask for a modest, non-graphic style, clothed faceless figures where people are shown, and no blood.
- Add a footer such as "For education only. Ask your care team about your birth plan."
- Generate, then check every label, the order of the stages, any number, and the position of the baby.
- Have a clinician review the picture and the wording before it goes into a handout or a class slide.
Positions in labor
The WHO recommendations encourage mobility and an upright position during labor in women at low risk (recommendation 25). For the second stage, they encourage a birth position of the woman's own choice, including upright positions, with or without epidural analgesia (recommendations 34 and 35). The positions example above shows six common ones: leaning forward, swaying, hands and knees, side-lying, birth ball, and kneeling over the bed. Which positions are suitable depends on the person, the baby, and the unit, so a care team should confirm.
Breastfeeding positions
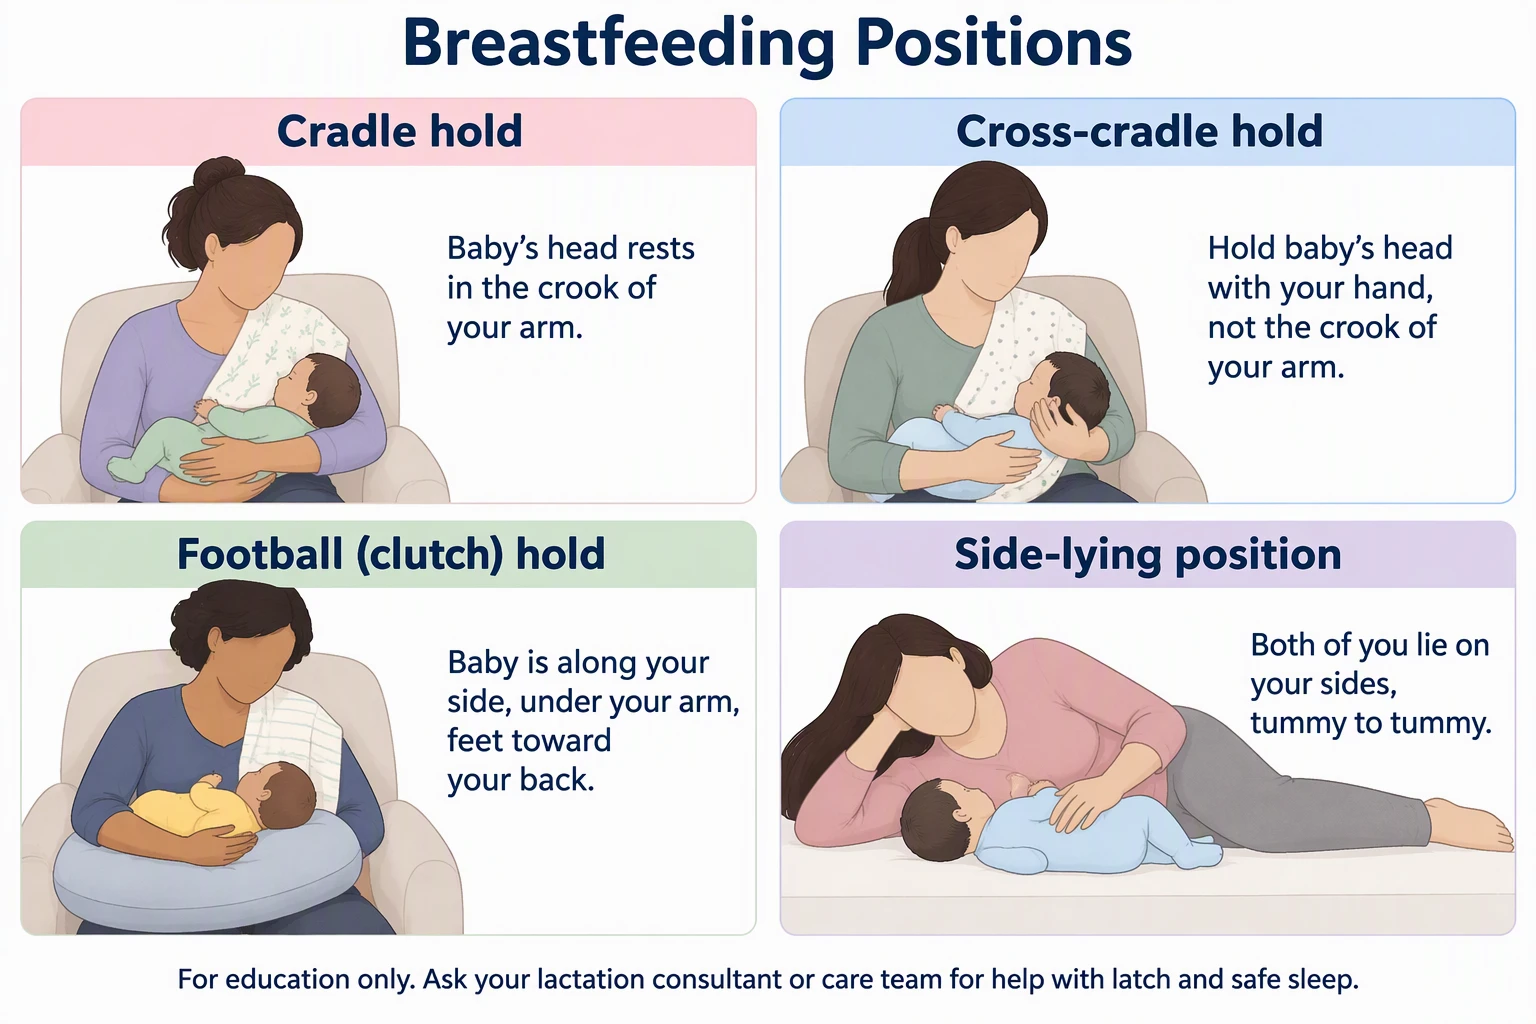
The same style works for postpartum handouts. This example shows four common breastfeeding holds with the parent covered. Ask your lactation consultant to check any breastfeeding figure, especially how the baby's head, chin, and airway are drawn.
Accuracy and what AI gets wrong
The four illustrations on this page (three in the gallery and one in the breastfeeding section) were generated from the prompts shown in the examples above, and each caption lists the flaws we found. The common problems are: simplified or unclear fetal anatomy, organs drawn at the wrong size for the stage, dilation circles that are not to scale, extra decoration, and text that changes. Fetal position in particular is not reliable in these drawings. The pictures are drafts for teaching. They do not diagnose, they do not predict how any labor will go, and they must be reviewed by a qualified clinician before use with patients.
Privacy and use with patients
Do not enter a patient name, date of birth, record number, or a photograph that could identify someone. Describe the figure in general terms. Check your organization's policy on AI tools and on what may go into patient handouts, and follow its rules on review and sign-off.
Free trial and downloads
Start free with 2 image credits, valid for 7 days, no card required. Free accounts download PNG or JPG.
Frequently Asked Questions
Related Medical Tools
 Medical
Medical Illustration Generator
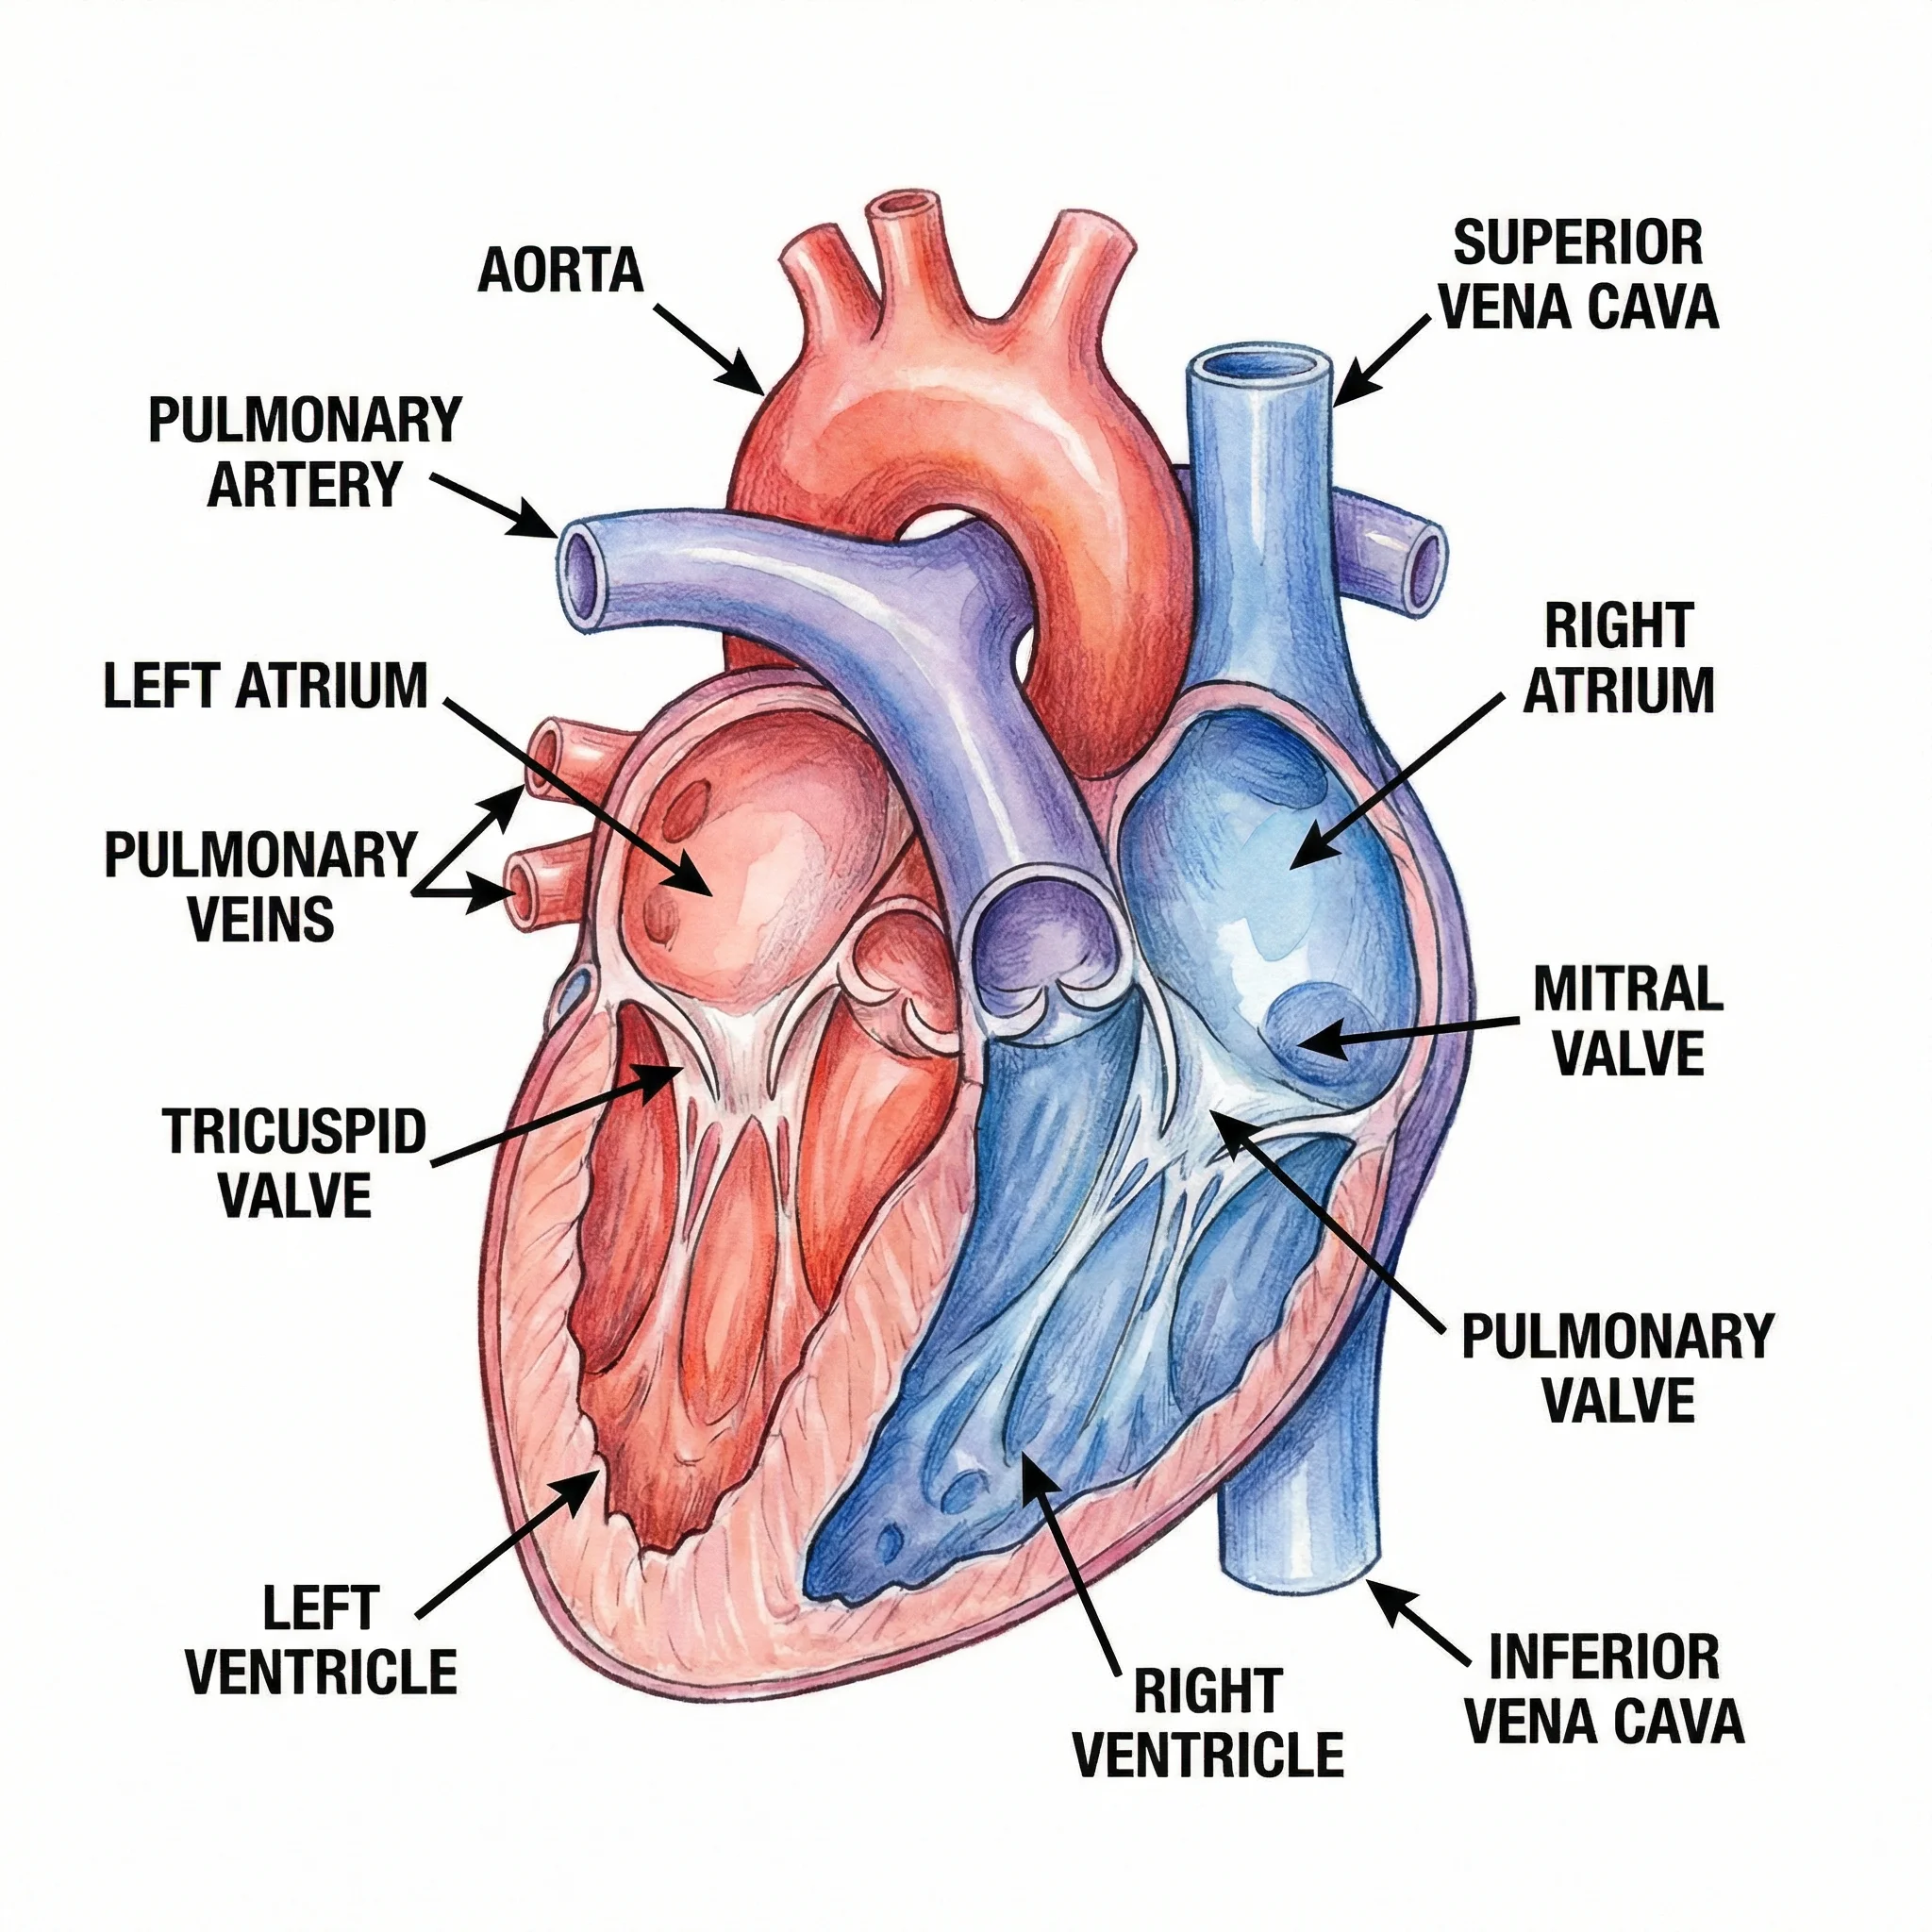
Create labeled medical and anatomy illustrations for teaching and patient education.
 Medical
Dermatology Patient Education Illustrations
Make skin condition and skin care illustrations for patient handouts, with diverse skin tones and plain-language labels.
 Medical
Nursing Concept Map Generator
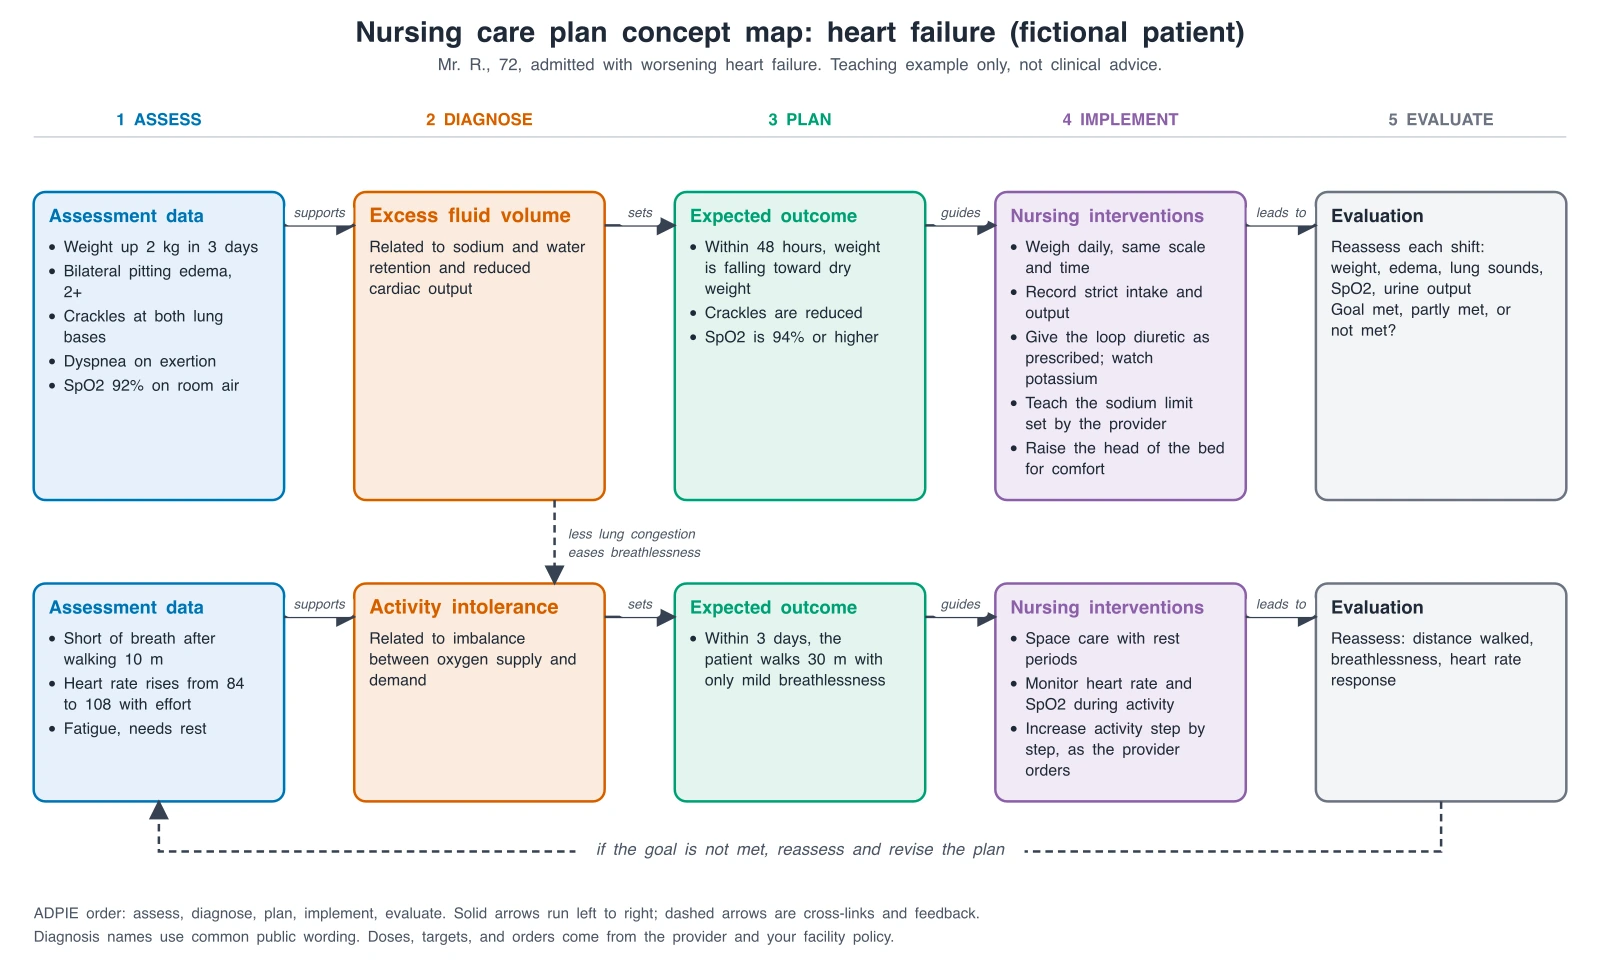
Generate nursing care plan and pathophysiology concept maps from a fictional case.