")
How to Draw a Volcano: Step-by-Step (Easy Labeled Diagram)
Learn how to draw a volcano step by step — an easy labeled cross-section for science class. Simple shapes for the cone, magma chamber, conduit, vent, and erupting ash cloud, plus a free instant generator.
Drawing a volcano is one of the most satisfying earth-science sketches: a few simple shapes turn into a labeled cross-section that shows exactly how a volcano works. This step-by-step guide shows you how to draw a volcano the easy way — first the outline, then the inside structures, then the eruption and labels — whether it's for a science notebook, a poster, or a class project.
If you'd rather get a clean labeled version in seconds, you can also generate one instantly and skip straight to the labeling.
What You'll Need
- A pencil (for light guide lines) and a pen or marker for the final outline
- Optional: orange, red, grey, and brown for lava, magma, ash, and rock layers
- A ruler is handy for the conduit and ground line, but freehand works too
Step-by-Step: How to Draw a Volcano
Step 1 — Draw the cone (a wide triangle)
Start with a wide triangle with the top cut off flat instead of a sharp point. That flat top is where the crater will go. Make the sides gently curved rather than perfectly straight so it looks like a real mountain. Add a horizontal ground line across the base.
Step 2 — Add the crater and vent
At the flat top, draw a shallow bowl shape — that's the crater. From the bottom of the crater, you'll soon connect a channel down into the mountain; the opening at the top of that channel is the vent.
Step 3 — Draw the magma chamber and conduit
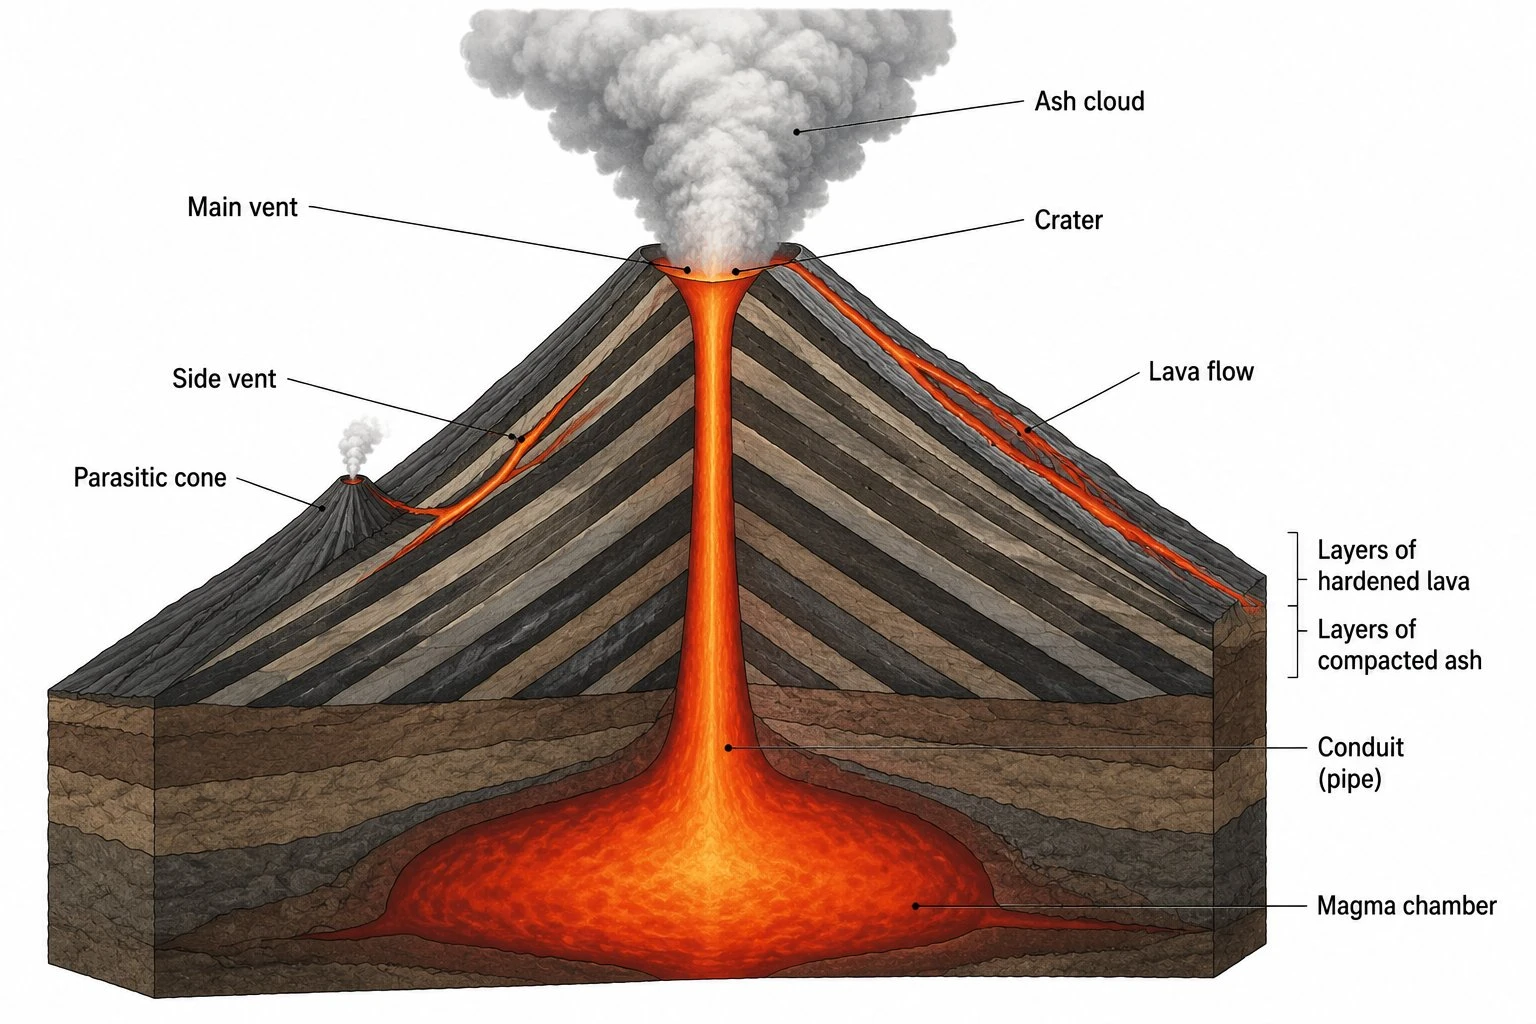
Below the ground line, draw a large rounded blob — the magma chamber (the underground reservoir of molten rock). Then connect it to the crater with a vertical tube running up through the middle of the cone: the conduit (pipe). This is the cross-section "inside view" that makes a volcano diagram so useful.
Step 4 — Add the eruption: ash cloud and lava
Above the crater, draw a billowing ash cloud — overlapping bumpy cloud shapes that get wider as they rise. Add a few lava flows as wavy lines running down the outside of the cone from the crater and any side vents. Fill the conduit and chamber with the same colour to show magma rising.
Step 5 — Show the rock layers (optional but realistic)
Inside the cone, draw a few curved lines parallel to the slope to show the alternating layers of lava and ash. These layers are what make a composite volcano (stratovolcano) — they record past eruptions.
Step 6 — Label your diagram
Add leader lines and labels for: magma chamber, conduit (pipe), vent, crater, lava flow, ash cloud, and the layers of lava and ash. Labeling is what turns a drawing into a proper science diagram.
Short on time, or want perfectly neat labels? The Volcano Diagram Generator creates a clean, fully labeled cross-section (or a blank version for worksheets) that you can download as PNG.
Make It Easy for Younger Students
For a kids' version, keep it simple: one triangle cone, a red/orange "V" of magma rising up the middle, and a grey puff of smoke on top. Skip the rock layers and use just three or four labels.

Drawing the Three Volcano Types
If your assignment asks for different volcano shapes, change the outline in Step 1:
- Shield volcano — a wide, low, gently sloping dome (fluid lava spreads far).
- Composite volcano / stratovolcano — the classic tall, steep cone with layers.
- Cinder cone — a small, steep-sided cone with a wide crater.

Tips for a Better Volcano Drawing
- Curve the sides of the cone slightly — perfectly straight triangles look flat and unnatural.
- Overlap the ash cloud shapes instead of drawing one smooth blob; it reads as billowing smoke.
- Use magma vs lava correctly — molten rock is magma underground (chamber and conduit) and lava once it's on the surface.
- Keep the magma chamber deep below the ground line, not near the top.
- Add directional arrows if you want to show how an eruption works — magma up the conduit, lava down the sides, ash into the sky.
FAQ
How do you draw a volcano step by step?
Draw a wide triangle with a flat top for the cone, add a bowl-shaped crater, draw a rounded magma chamber underground connected to the crater by a vertical conduit, add an ash cloud and lava flows, then label the parts (magma chamber, conduit, vent, crater, lava, ash cloud).
How do you draw an easy volcano for kids?
Use one triangle for the cone, a red or orange "V" rising up the middle for the magma, and a grey puff of smoke at the top. Add three or four simple labels and skip the rock layers.
What parts should a labeled volcano diagram include?
A complete volcano diagram includes the magma chamber, conduit (pipe), vent, crater, lava flows, ash cloud, side vent or secondary cone, and the internal layers of lava and ash.
What's the difference between magma and lava in my drawing?
Colour the molten rock inside the volcano (chamber and conduit) as magma, and the same molten rock flowing on the outside as lava. They're the same material — the name just depends on whether it's underground or on the surface.
Related Guides
- How a Volcano Works: Labeled Cross-Section — generate a clean, fully labeled volcano diagram (or a blank worksheet version) in seconds.
- Free Printable Water Cycle Worksheets for Teachers — more earth-science classroom resources.
Further Reading
Categories
More Posts

Infographic Design Styles & Trends: Flat, Isometric, Hand-Drawn and Minimalist
Compare infographic design styles and trends: flat, isometric, hand-drawn, minimalist, 3D and editorial layouts, with examples and selection rules.

AI Conceptual Framework for Thesis: Prompts, Examples, and Chapter 1 Workflow
Create an AI conceptual framework for thesis work with prompts, examples, variable tables, Chapter 1 writing tips, and validation checks.

Best Free Diagramming Tools 2026: Draw.io & Mermaid
Compare the best free diagramming tools for flowcharts, UML, mind maps and research diagrams: Draw.io, Excalidraw, Mermaid, PlantUML, Miro, Canva and more.