
How to Create Science Drawings: Easy Step-by-Step Guide for Students
Learn how to create clear, labeled science drawings for biology, chemistry, and physics class. Step-by-step guide with tips, examples, and free AI tools for students.
Science drawing is one of the most important skills you will learn as a student. Whether you are sketching a plant cell for biology, diagramming a circuit for physics, or illustrating lab apparatus for chemistry, the ability to produce clear and accurate science drawings helps you understand and communicate scientific concepts. The good news is that science drawing easy to learn once you know the basic rules.
This guide walks you through everything you need to create great science drawings — step by step, subject by subject — with practical tips for labeling, scale, clean lines, and modern AI tools that can help when you are stuck.
Why Science Drawings Matter
A science drawing is not the same as an art drawing. In art class, you aim for beauty and expression. In science class, your goal is accuracy and clarity. Teachers and examiners look for specific things in a science drawing:
- Correct proportions between structures
- Clear labels with straight leader lines
- Clean, sharp lines (no sketchy or repeated strokes)
- A descriptive title that tells exactly what the diagram shows
- Scale or magnification where appropriate
When done well, a single science drawing can communicate more information than an entire paragraph of text. That is why science drawing appears in every biology, chemistry, and physics curriculum from middle school through university.
Step-by-Step: How to Create a Science Drawing
Follow these seven steps every time you create a science drawing, regardless of the subject.
Step 1: Understand What You Are Drawing
Before you put pencil to paper, make sure you know the purpose of the diagram. Ask yourself:
- What concept or structure does this diagram need to show?
- What level of detail does my teacher expect?
- Is this a cross-section, an external view, or a process diagram?
Look at reference images in your textbook or class notes. Never draw from memory alone — even professional scientists work from references.
Step 2: Choose the Right Tools
For hand-drawn science diagrams, you need:
- A sharp HB pencil for drawing lines (not too soft, not too hard)
- A ruler for straight leader lines and borders
- An eraser for clean corrections
- Plain white paper (unlined is best for science drawings)
- A fine-tip pen (0.3mm or 0.5mm) if you need to ink your final version
Avoid using colored pencils unless your teacher specifically asks for color. Most science drawings are done in pencil or black ink.
Step 3: Start with the Outline
Draw the largest structure first and work inward:
- Sketch the outer boundary lightly — the cell membrane, the beaker outline, or the lens body
- Add major internal structures in their correct positions and proportions
- Add smaller details once the main shapes are placed correctly
- Keep your lines light at this stage so you can erase and adjust easily
Use the full space available on your paper. A tiny diagram crammed into a corner loses marks because it is hard to read and hard to label.
Step 4: Draw Clean, Single Lines
This is where many students lose marks. Science drawings require:
- Single, continuous lines — do not go over the same line multiple times
- No shading with pencil — if you need to show texture, use stippling (small dots) or hatching (parallel lines)
- No rough or sketchy edges — take your time and draw each line once with confidence
If you make a mistake, erase it fully and redraw. A clean diagram always scores higher than a messy one, even if the messy one has more detail.
Step 5: Add Labels with Leader Lines
Labels are what turn a sketch into a science drawing. Follow these rules:
- Draw straight, horizontal leader lines from each structure to its label
- Use a ruler for every leader line — freehand lines look unprofessional
- Never let leader lines cross each other
- Place labels outside the diagram, neatly aligned on one or both sides
- Use standard scientific terms (write "mitochondrion" not "the powerhouse thing")
- End each leader line with a small dot or arrow touching the structure it identifies
Step 6: Add a Title, Scale, and Annotations
Every science drawing needs:
- A title below or above the diagram (e.g., "Transverse Section of a Leaf" or "Circuit Diagram Showing Series Connection")
- A magnification or scale bar for microscopy drawings (e.g., "x400" or a bar representing 10 micrometers)
- Any annotations explaining processes or directions (e.g., arrows showing current flow or the direction of a force)
Step 7: Review and Refine
Before submitting your drawing:
- Compare it against your textbook diagram or reference image
- Check that all required structures are labeled
- Verify that proportions look correct
- Make sure the title is descriptive and accurate
- Ask a classmate to look at it — if they can understand the diagram without your explanation, it is a good science drawing
Science Drawing Techniques by Subject
Different science subjects have different drawing conventions. Here is what to focus on for each.
Biology Drawing Techniques
Biology drawings focus on living organisms, cells, and biological processes. Key conventions include:
- Use stippling for shading — small dots create tone without the ambiguity of pencil shading
- Draw cross-sections to show internal structures (always label the plane of section)
- Include a magnification for anything viewed under a microscope
- Show relative sizes accurately — a nucleus should not be larger than the cell it sits in
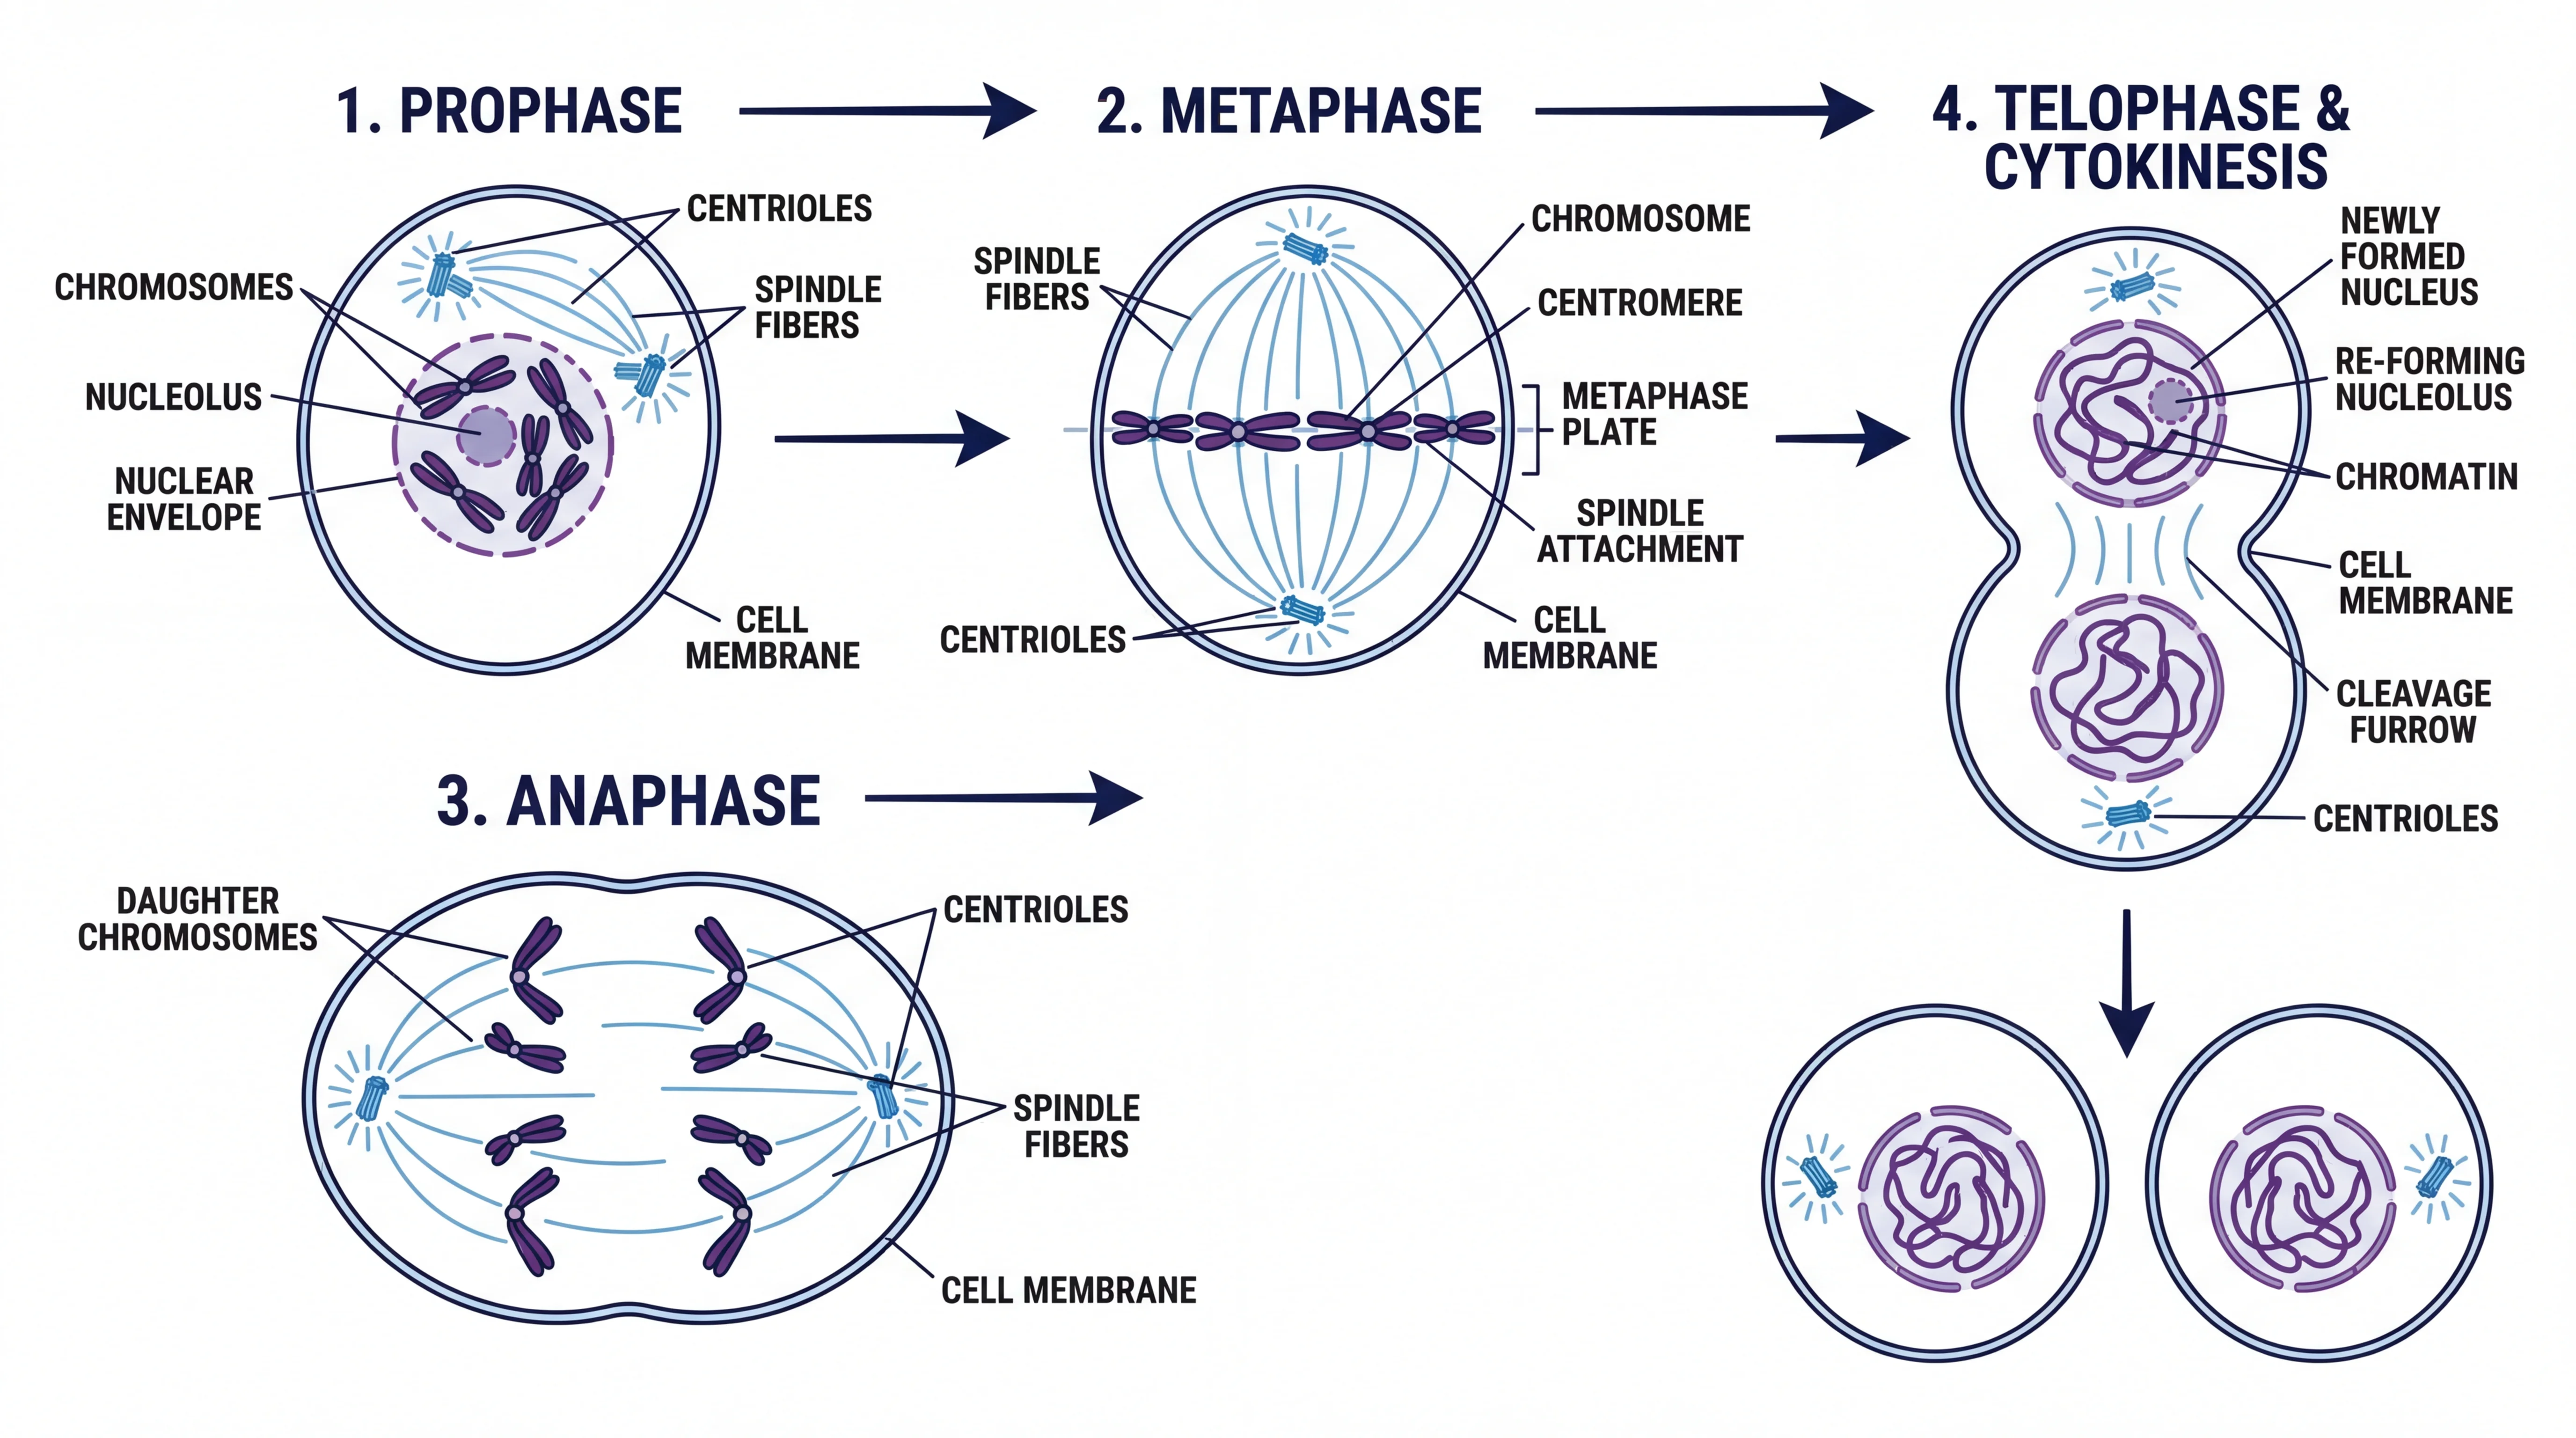
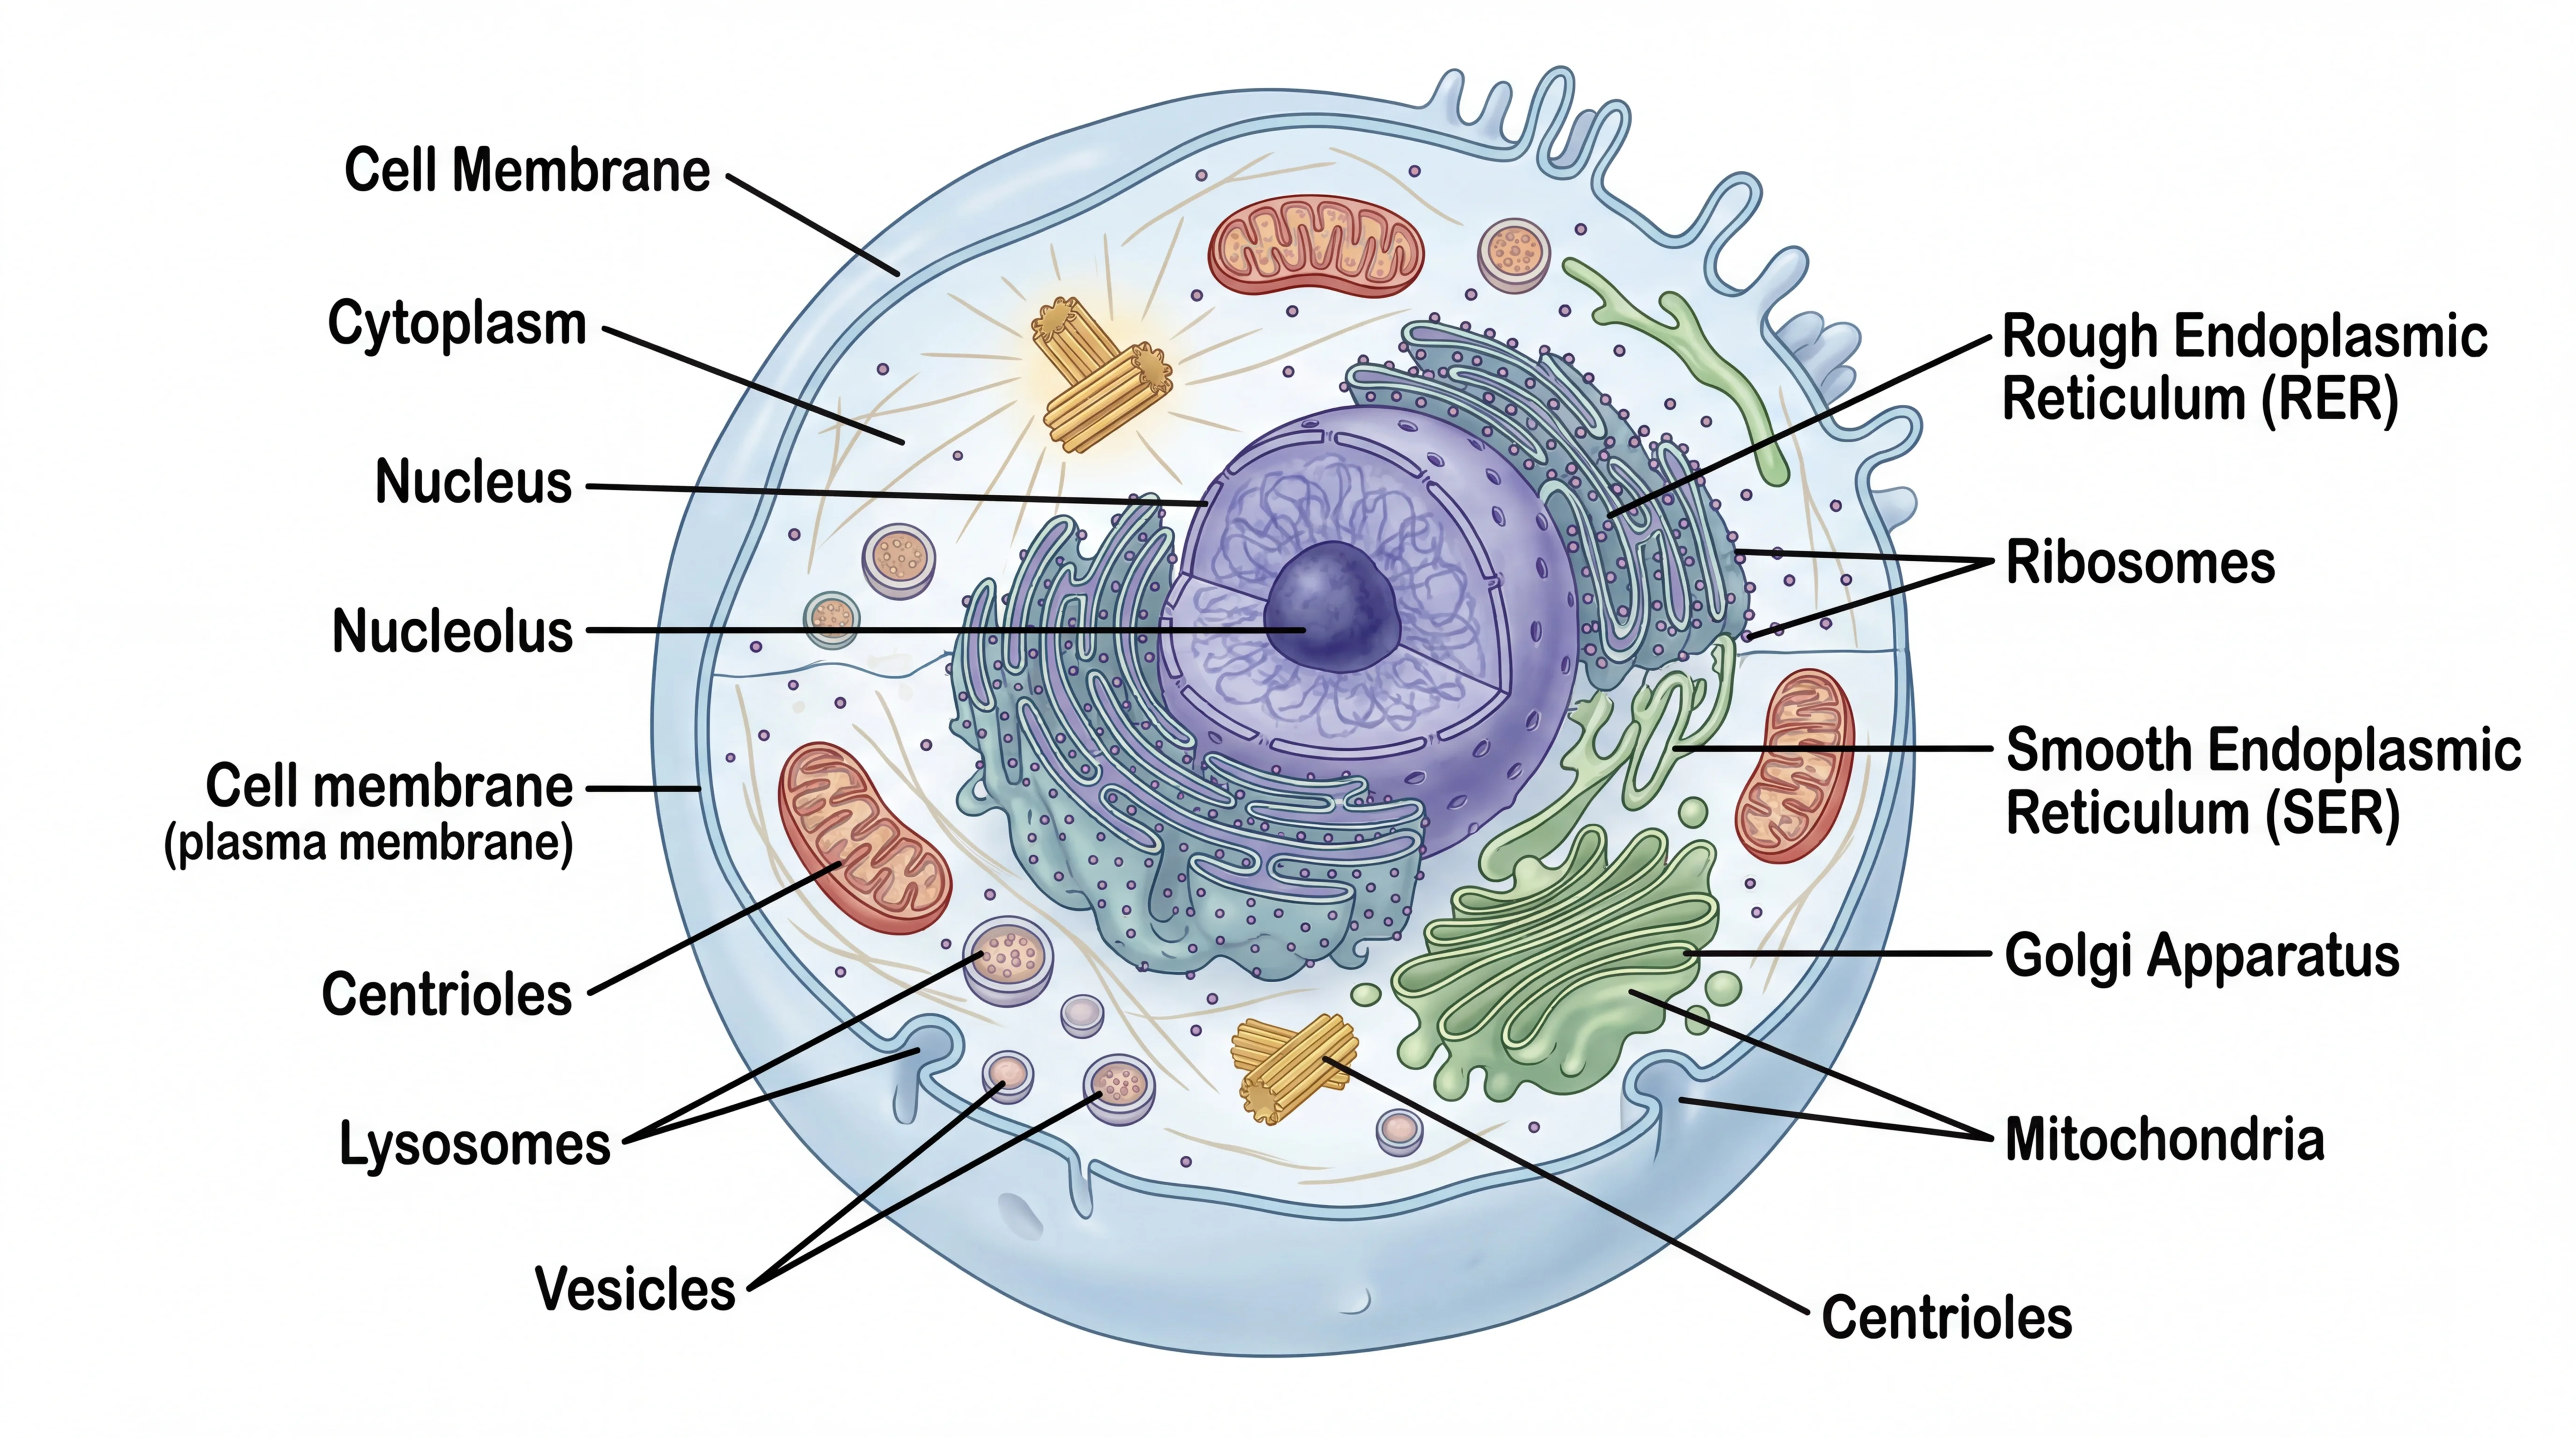
Common biology drawings students need to master:
- Animal and plant cell diagrams
- Organ cross-sections (leaf, heart, eye)
- Life cycle diagrams
- Food webs and food chains
For a comprehensive deep dive into biological illustration, see our Biology Drawing Guide.
Biology Drawing Generator
Create labeled biology drawings for cells, organs, and organisms with AI.
Try it free →Chemistry Drawing Techniques
Chemistry drawings focus on lab apparatus, molecular structures, and experimental setups. Key conventions include:
- Draw apparatus in 2D cross-section — show the inside of beakers, flasks, and test tubes
- Use standard symbols for apparatus (Bunsen burner, clamp stand, delivery tube)
- Label all chemicals with their correct names or formulae
- Show the direction of gas or liquid flow with arrows
- Include a heat source symbol where applicable (use the standard triangle for a Bunsen flame)
Common chemistry drawings students need to master:
- Lab apparatus setups (distillation, titration, gas collection)
- Molecular structure diagrams (dot-and-cross, structural formulae)
- Energy level diagrams
- Electrochemical cells
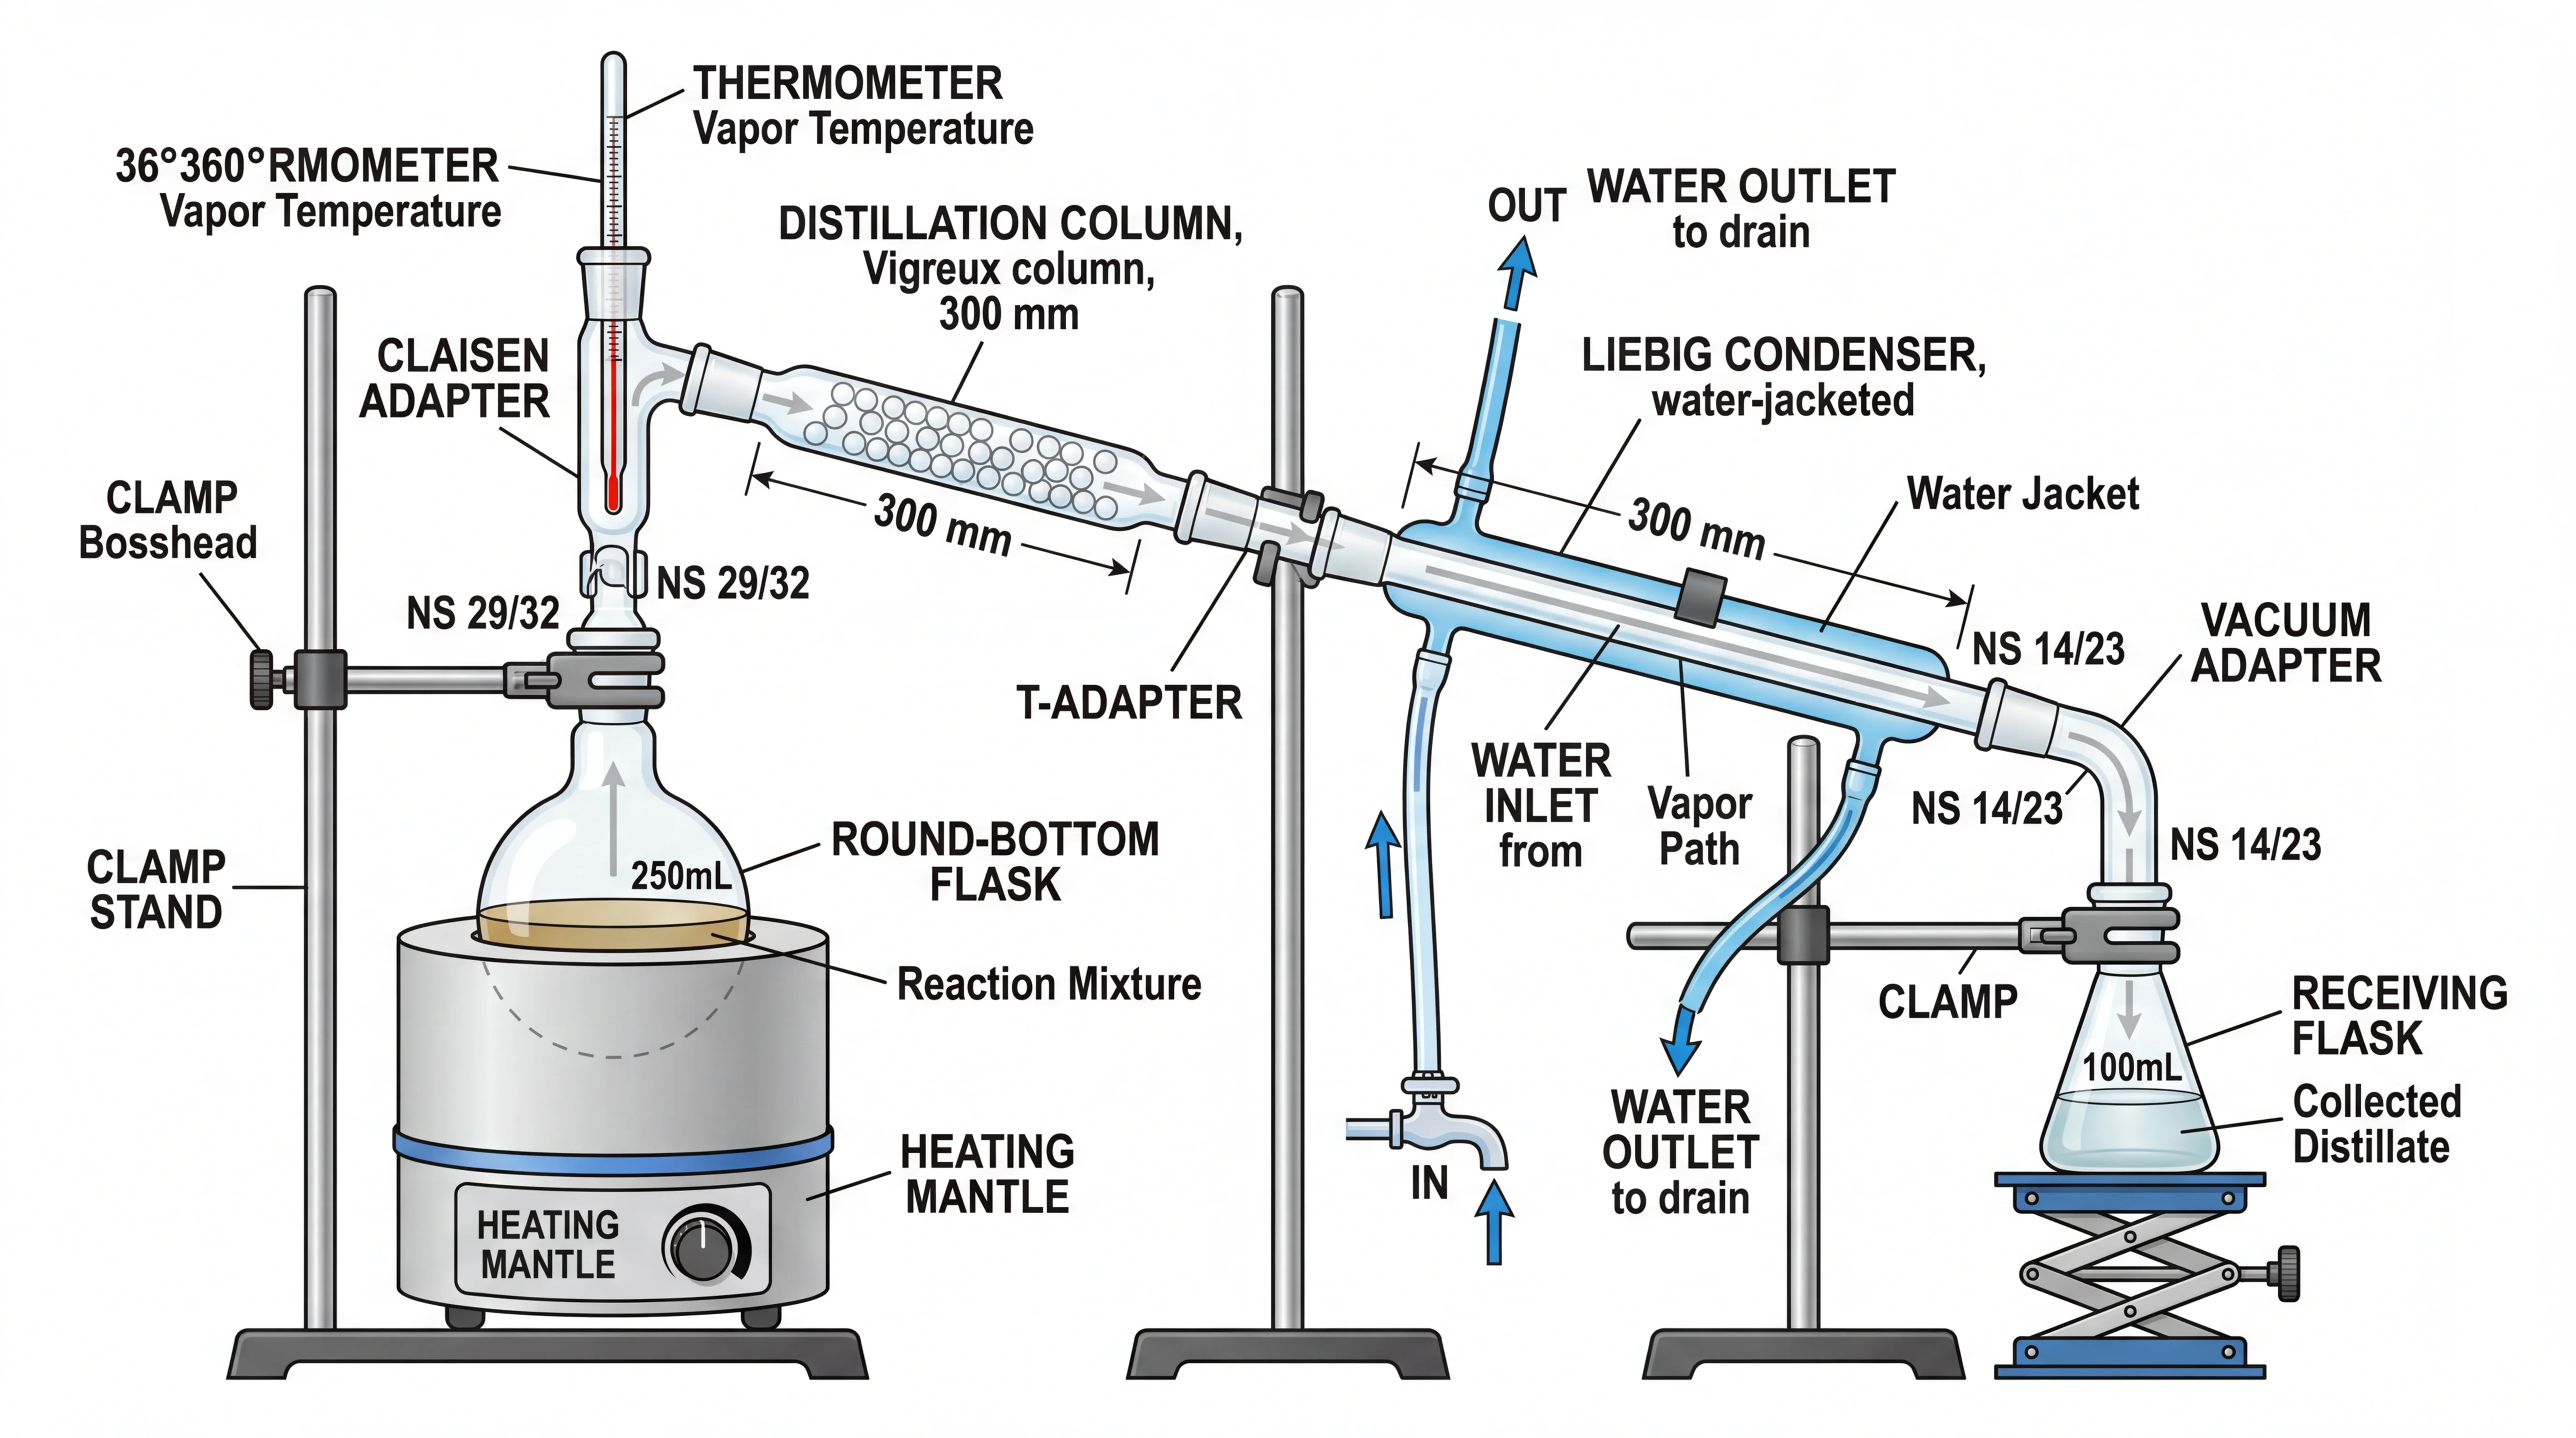
Chemistry drawing tip: When drawing lab apparatus, always start from the bottom (the bench or clamp stand) and build upward. This keeps proportions realistic and ensures everything is connected properly.
Physics Drawing Techniques
Physics drawings focus on forces, circuits, optics, and motion. Key conventions include:
- Use standard circuit symbols (IEC or your curriculum's standard set)
- Draw ray diagrams with a ruler — light rays must be perfectly straight
- Use arrows to show direction of force, current, or motion
- Label magnitudes where required (force in Newtons, voltage in Volts)
- Keep diagrams schematic — physics diagrams are usually simplified representations, not realistic drawings
Common physics drawings students need to master:
- Circuit diagrams (series and parallel)
- Ray diagrams (reflection, refraction, lenses)
- Force diagrams (free body diagrams)
- Wave diagrams (transverse and longitudinal)
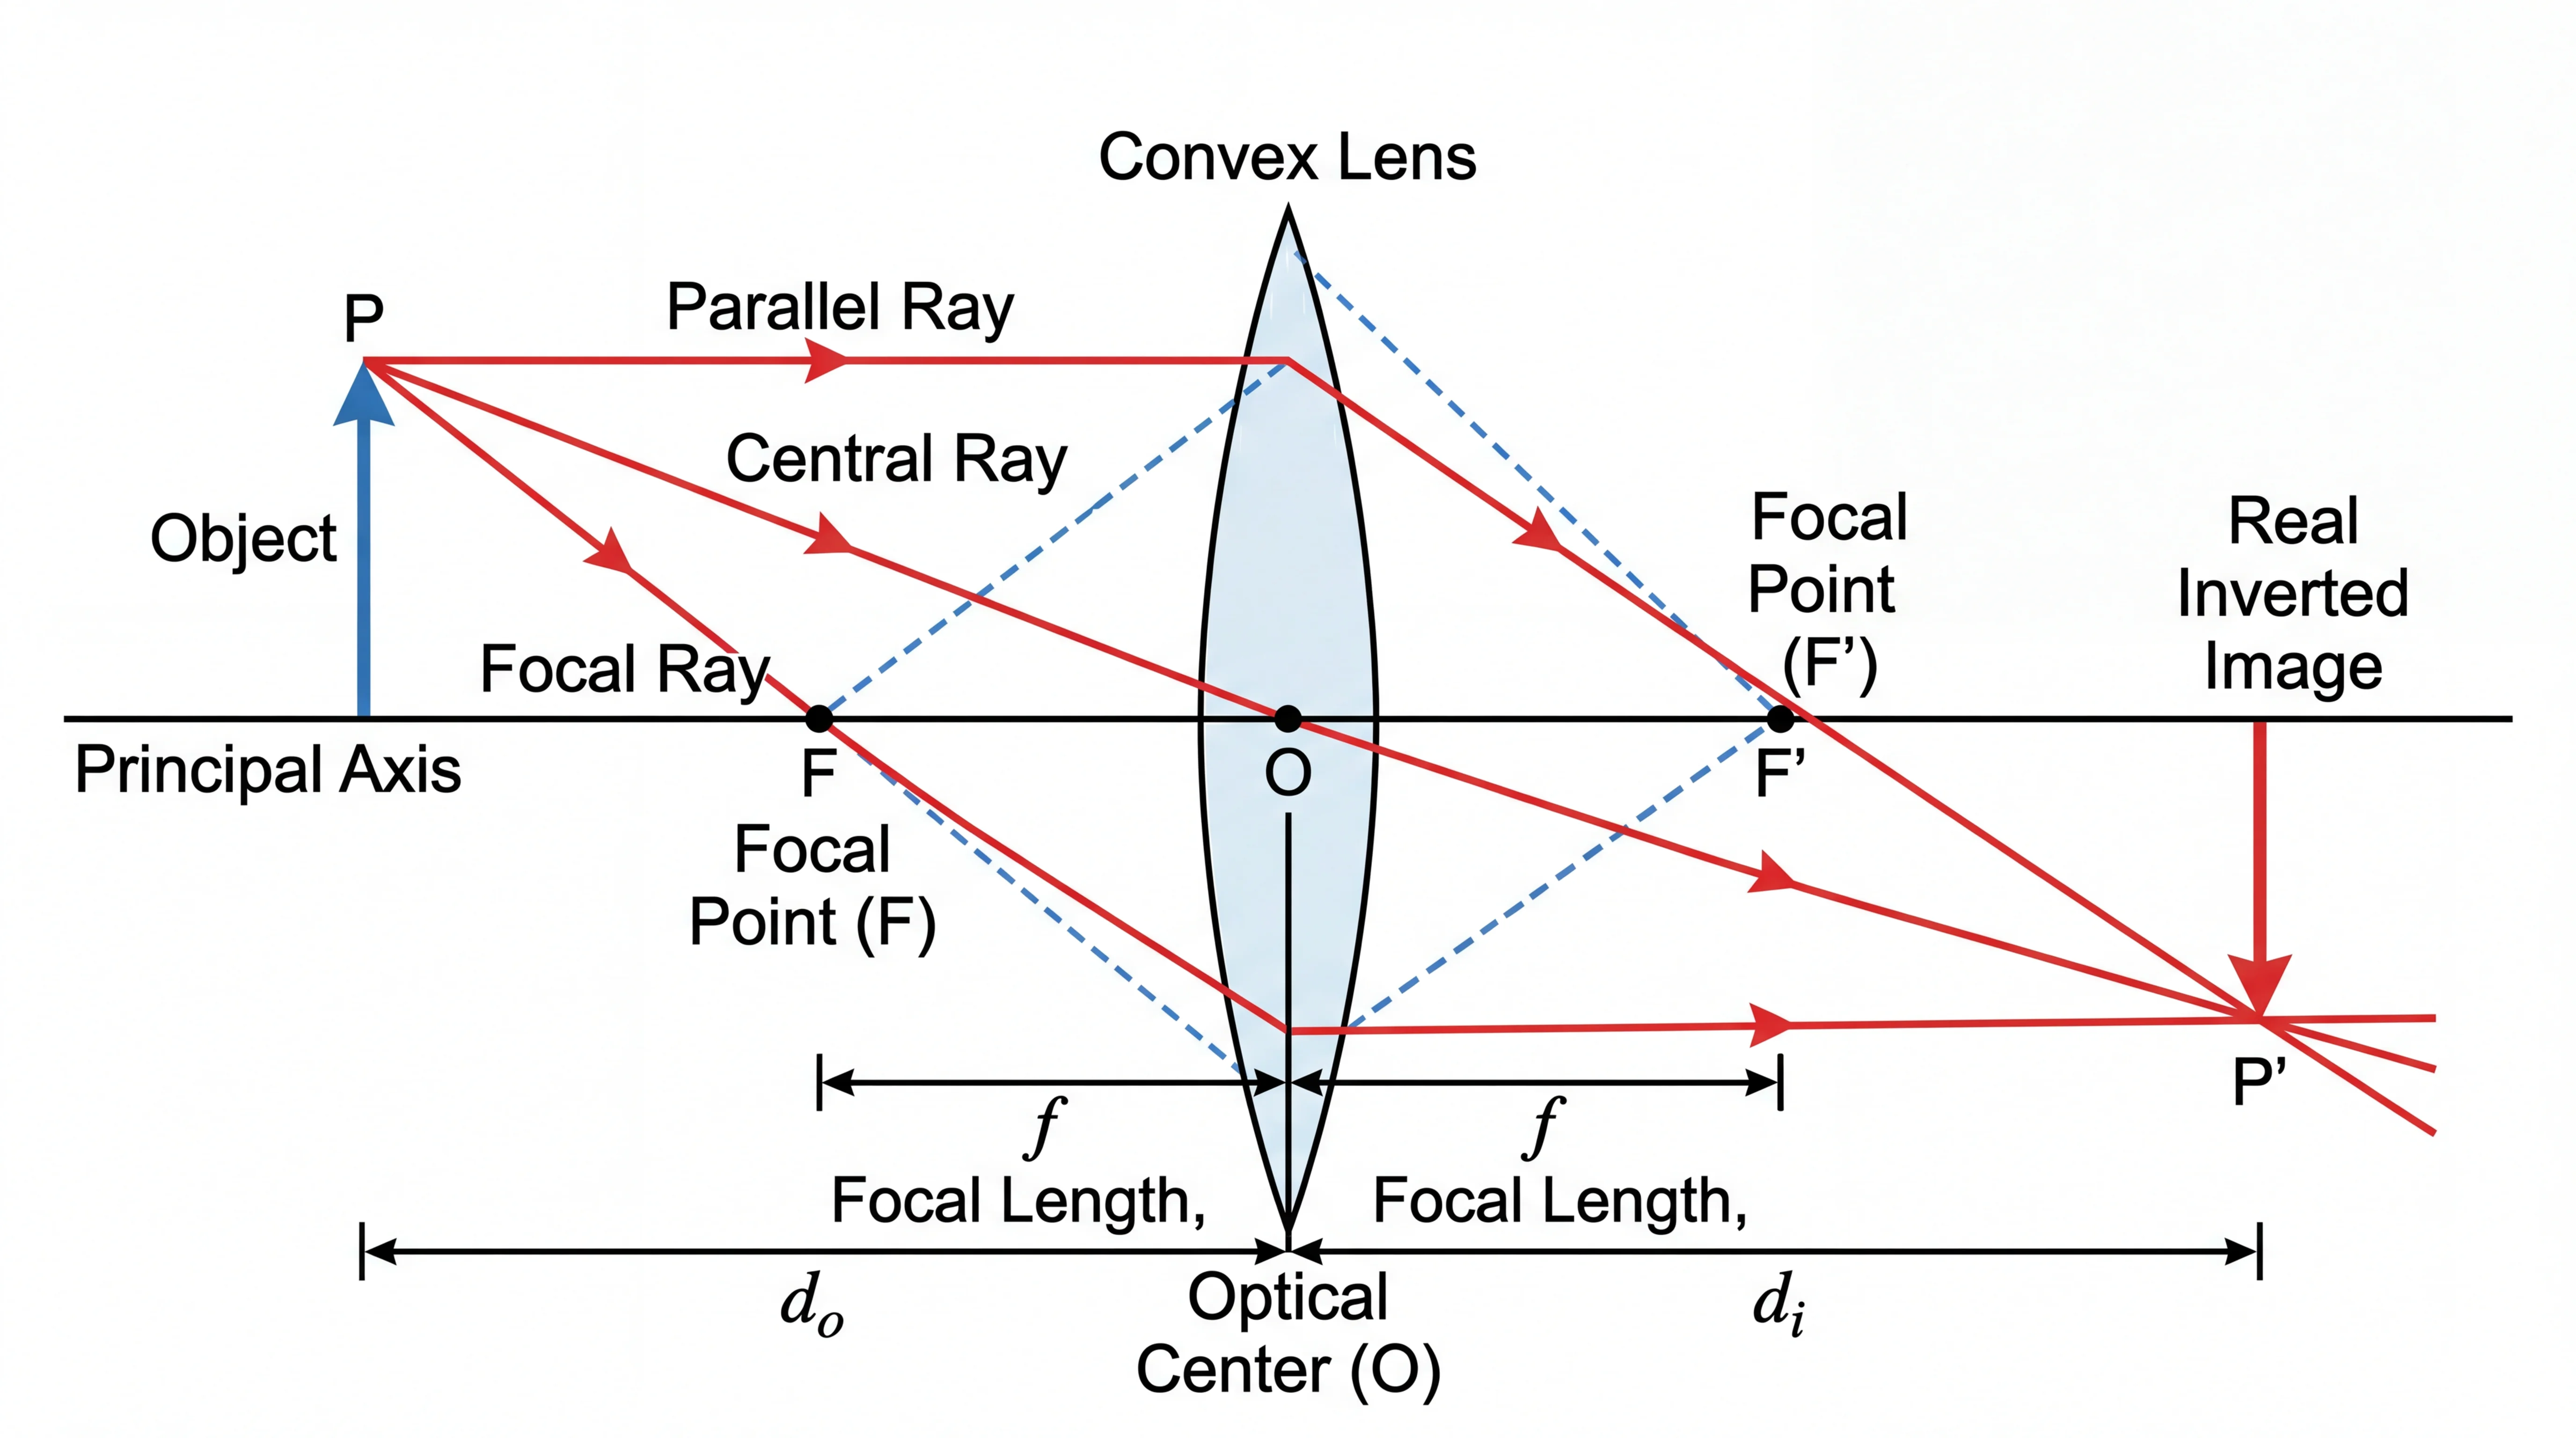
Physics drawing tip: For ray diagrams, always draw the normal line (perpendicular to the surface) as a dashed line first, then measure your angles of incidence and refraction from the normal, not from the surface.
Comparison: Hand Drawing vs Digital vs AI Tools
Students today have three main options for creating science drawings. Each has its place depending on the situation.
| Feature | Hand Drawing | Digital Software | AI Drawing Tools |
|---|---|---|---|
| Cost | Pencil and paper only | Free (Inkscape) to $22/mo (Illustrator) | Free tier available (ConceptViz) |
| Learning curve | Low — basic drawing skills | Medium to high — software skills needed | Very low — describe what you need |
| Speed | Slow (15-45 min per diagram) | Medium (10-30 min) | Fast (under 1 min) |
| Accuracy | Depends on your skill | High with practice | High — trained on scientific conventions |
| Accepted in exams | Yes — the standard | No — exams are paper-based | No — exams are paper-based |
| Best for | Exams, lab notebooks, practice | Reports, presentations, posters | Homework, study notes, quick reference |
| Editing | Erase and redraw | Easy undo and adjust | Regenerate with new description |
| Labeling | Manual with ruler | Text tool with alignment | Automatic labels included |
The bottom line: Learn to draw by hand because you will need it in exams. Use digital and AI tools for homework, study materials, and presentations where speed and polish matter.
Science Drawing Generator
Create labeled science drawings for any subject with AI.
Try it free →Tips for Getting Higher Marks on Science Drawings
Here are the most common mistakes students make, and how to avoid them.
1. Use the Full Page
A small, cramped diagram is hard to label and hard for your teacher to read. Use at least half the available space on your page.
2. Never Shade with Pencil
Pencil shading is an art technique, not a science technique. If you need to show depth or texture, use stippling (dots) or hatching (parallel lines). This reproduces more clearly and follows scientific convention.
3. Keep Labels Horizontal
Write all labels horizontally, even if the leader line comes from a diagonal direction. Angled or vertical text is harder to read and loses marks in most marking schemes.
4. Do Not Use Color Unless Asked
Most science drawing marking schemes expect pencil or black ink. Adding color can actually confuse the diagram unless your teacher specifically requires it or unless you are making a poster or presentation.
5. Draw from Observation, Not Memory
When you are in the lab looking at a specimen under a microscope, draw what you actually see — not what you think the textbook diagram looks like. Examiners can tell the difference.
6. Practice the Diagrams Your Exam Requires
Every science curriculum has a set of "must-know" diagrams. Identify them and practice drawing each one from scratch until you can do it quickly and accurately. For biology, this typically includes cell diagrams, leaf cross-sections, and the heart. For chemistry, it is lab apparatus setups. For physics, it is circuit diagrams and ray diagrams.
7. Use Consistent Line Weight
Use the same pencil pressure throughout your diagram. Varying line thickness makes a drawing look unfinished. The only exception is using slightly thicker lines for the outermost boundary of a structure to separate it from internal details.
Using AI Tools to Study Science Drawing
AI-powered drawing tools are not a replacement for learning to draw by hand, but they are an excellent study aid. Here is how students can use them effectively:
- Generate reference diagrams — When your textbook diagram is unclear or you want to see a concept from a different angle, use an AI tool to generate a clean, labeled version
- Check your own work — Draw a diagram by hand, then generate the AI version and compare. This helps you spot mistakes in your proportions or missing labels
- Create study materials — Generate diagrams for flashcards, revision notes, or study guides
- Explore variations — See how the same structure looks at different magnifications or from different cross-section angles
ConceptViz offers specialized generators for science drawings across all subjects, including a Science Drawing Generator for general use and a Biology Drawing Generator for life science diagrams.
For tips on choosing the right fonts when creating science posters and printed figures, see our guide on the best fonts for scientific posters and figures.
Frequently Asked Questions
What makes a good science drawing?
A good science drawing has clean single lines (no sketchy marks), accurate proportions, clear labels connected by straight ruler-drawn leader lines, a descriptive title, and a scale bar or magnification where needed. It should communicate the scientific concept clearly without relying on color or artistic shading.
Is science drawing easy to learn?
Yes, science drawing is easy to learn because it relies on following rules rather than artistic talent. Unlike art drawing, you do not need creative skills — you need a sharp pencil, a ruler, a good reference image, and knowledge of the labeling conventions for your subject. Most students can produce high-quality science drawings within a few weeks of practice.
Why can't I shade my science drawings with pencil?
Pencil shading is discouraged in science drawings because it looks unclear when photocopied or printed, and it does not follow scientific illustration conventions. Instead, use stippling (small dots) to show tone and texture, or hatching (parallel lines) for cross-sectioned surfaces. These techniques reproduce cleanly and are the accepted standard in scientific diagrams.
How do I draw science diagrams for exams?
For exams, practice drawing each required diagram from scratch until you can complete it quickly and accurately. Use a sharp HB pencil, a ruler for all leader lines, and plain paper. Start with the largest structure, work inward, add labels with straight horizontal leader lines, and include a title and magnification. Keep your diagram large enough to label clearly and avoid using color unless the exam specifically requires it.
Can AI tools help me learn science drawing?
AI tools like ConceptViz are excellent study aids for science drawing. You can generate reference diagrams to compare against your hand-drawn work, create labeled diagrams for revision flashcards, and explore different views of the same structure. However, you should still learn to draw by hand because exams require paper-based diagrams.
What is the difference between a science drawing and a scientific diagram?
The terms are often used interchangeably, but a science drawing typically refers to a hand-drawn illustration of a specimen or structure observed directly (such as a cell under a microscope), while a scientific diagram is a broader term that includes schematic representations like circuit diagrams, flowcharts, and process diagrams. Both follow the same principles of accuracy, clear labeling, and clean lines.
Related Reading
- Biology Drawing Guide: Create Scientific Diagrams — A comprehensive guide to biological illustration techniques for all education levels
- Best Fonts for Scientific Posters and Figures — Choose the right typography for your science presentations and printed figures
- Science Drawing Generator — Create labeled science drawings for any subject with AI
- Biology Drawing Generator — Generate accurate biology diagrams from text descriptions
Categories
More Posts
")
Free Printable Life Cycle Worksheets for Teachers (2026)
Download free printable life cycle worksheets for plants, butterflies, frogs, and chickens. Includes labeled diagrams, blank worksheets for quizzes, and hands-on activities aligned with NGSS standards.

Scientific Poster Font Sizes: A0/A1 Fonts & Examples
Choose readable scientific poster fonts with A0/A1 size charts, figure font rules, journal-safe typefaces, pairings and free Helvetica/Arial alternatives.

Central Dogma Diagram Guide: DNA to RNA to Protein
Learn how to read and draw a central dogma diagram, including DNA, mRNA, transcription, translation, ribosomes, codons, and common mistakes.