
How to Create Science Animations for PowerPoint: Complete Guide for Researchers
Learn to create engaging scientific animations in PowerPoint with zero budget. Includes step-by-step tutorials, free tools comparison, and best practices for molecular biology, chemistry, and physics presentations.
A well-crafted scientific animation can transform a complex research concept into an instantly understandable visual story. Whether you're preparing a video abstract, a conference presentation, or a thesis defense, animations help your audience grasp mechanisms, processes, and results that static images simply can't convey.
The good news? You don't need expensive software or professional animation skills. PowerPoint alone can create compelling science animations—and this guide shows you exactly how.
Why Use Animations in Scientific Presentations?
Before diving into techniques, let's understand when animations add value:
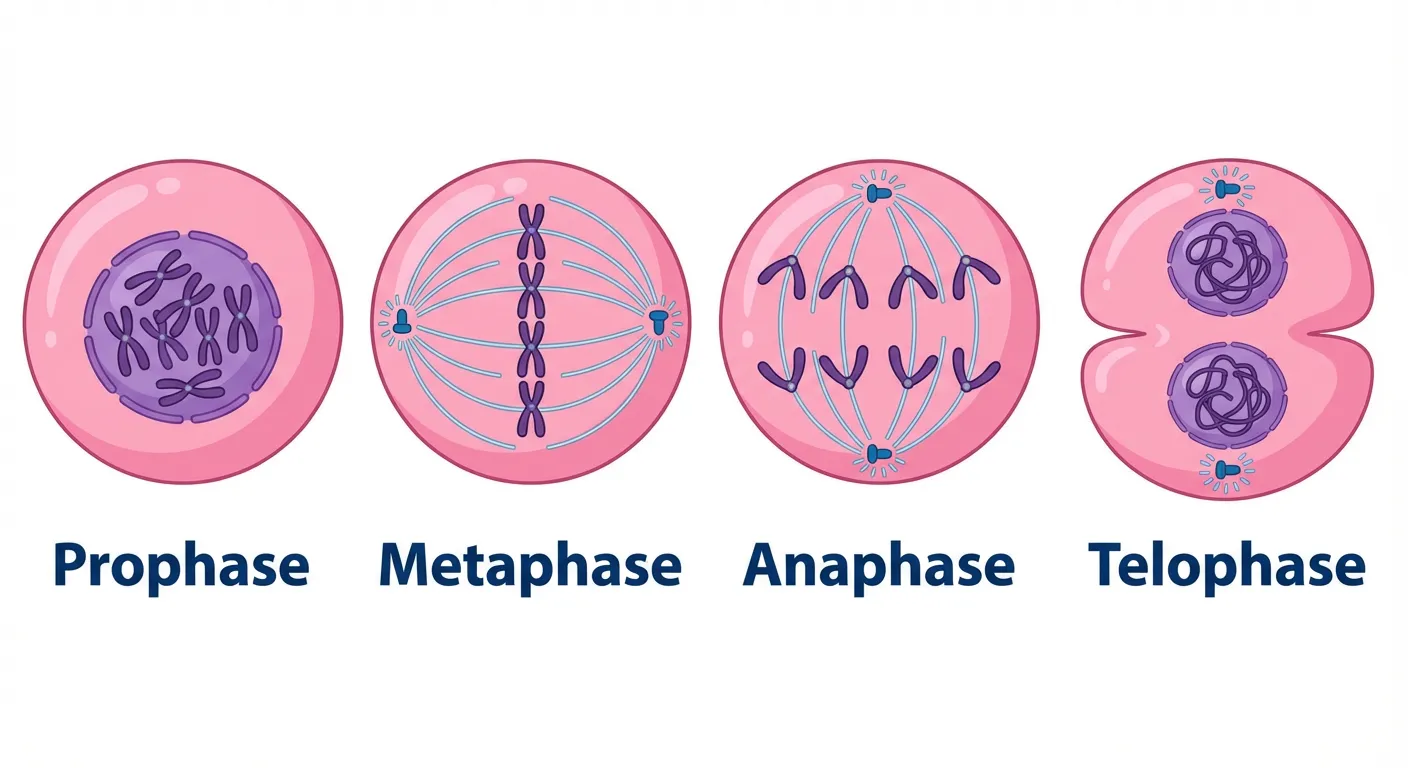
Sequential processes like mitosis are perfect candidates for animation - each stage can be revealed progressively to build understanding
| Use Case | Why Animation Helps |
|---|---|
| Molecular mechanisms | Shows binding, conformational changes, pathways |
| Temporal processes | Illustrates sequences, cycles, progressions |
| Before/after comparisons | Reveals transformations dramatically |
| Complex systems | Builds understanding layer by layer |
| Data storytelling | Guides attention through results |
Research published in CBE—Life Sciences Education confirms that "animations can significantly support learning when they are contextualized by a complete educational experience."
However, animation isn't always the answer. Static diagrams work better when:
- The concept is inherently spatial, not temporal
- Your audience needs to study details at their own pace
- You're preparing print materials
For guidance on static scientific figures, see our guide on making figures for Nature/Science journals.
Two DIY Animation Approaches in PowerPoint
According to Animate Your Science, there are two distinct methods for creating science animations in PowerPoint without learning professional software:
Method 1: Whiteboard Style Animation
Best for researchers who enjoy drawing or have illustration skills.
How it works:
- Create a series of slides, each slightly different from the last
- Draw your science story frame by frame
- Export as animated GIF or video
Pros:
- Unique, personal style
- Full creative control
- No external assets needed
Cons:
- Time-intensive
- Requires drawing ability
- Consistency can be challenging
Method 2: Cut-Out Style Animation
Best for researchers who prefer working with existing images.
How it works:
- Gather or create static images (icons, diagrams, photographs)
- Use PowerPoint's animation tools to move, reveal, and transform these elements
- Layer multiple animations for complex effects
Pros:
- Faster than drawing
- Uses existing visual assets
- More consistent visual quality
Cons:
- Limited by available assets
- Can look generic if not customized
- Less artistic flexibility
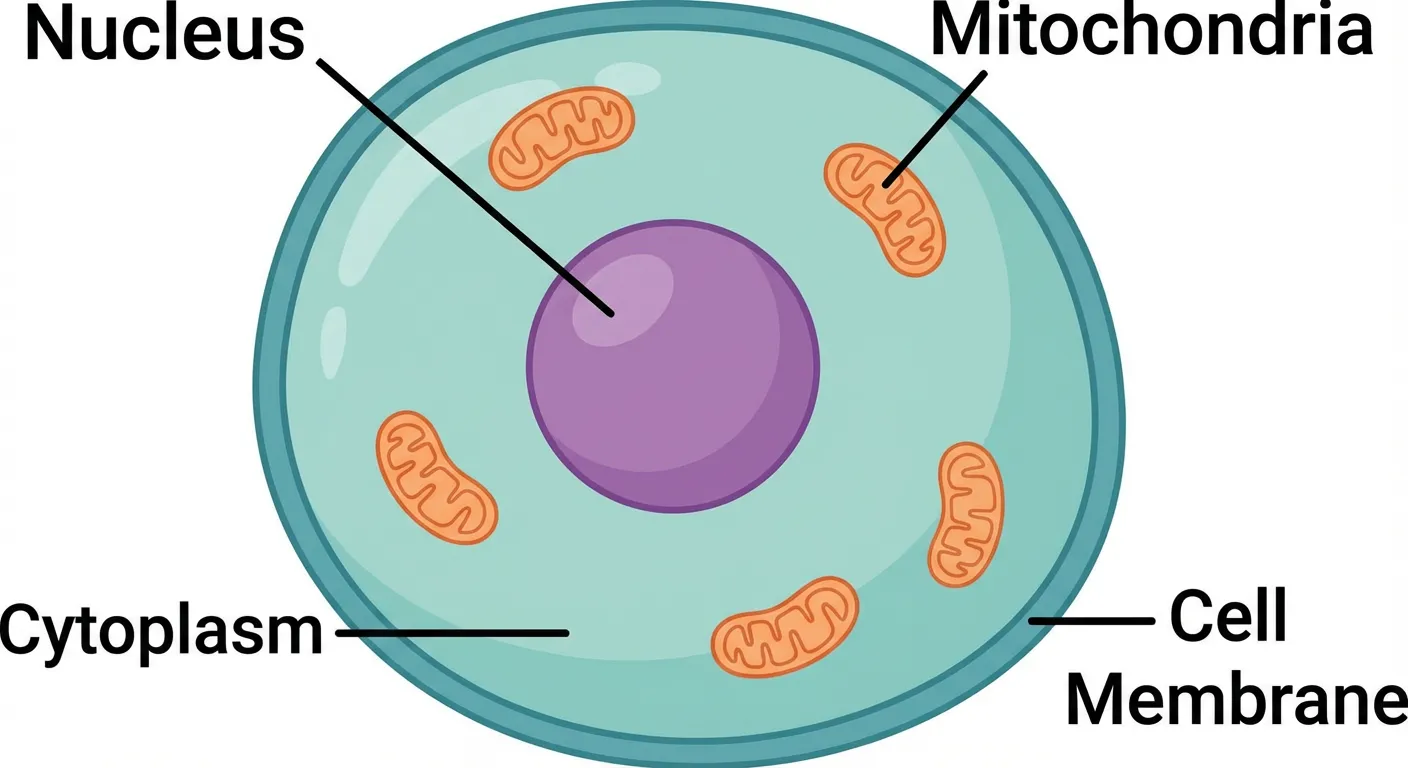
Cell structure diagrams like this are perfect for cut-out style animation - each organelle can be animated to appear, highlight, or move independently
For excellent video tutorials on creating molecular animations, check out Janet Iwasa's iBiology course on Molecular Animation.
PowerPoint Animation Fundamentals
The Four Animation Categories
PowerPoint offers four types of animations:
| Category | Purpose | Common Uses |
|---|---|---|
| Entrance | Bring elements onto the slide | Revealing steps, introducing concepts |
| Emphasis | Draw attention to existing elements | Highlighting key findings, showing changes |
| Exit | Remove elements from the slide | Showing degradation, removal processes |
| Motion Paths | Move elements across the slide | Showing transport, binding, movement |
Accessing Animation Tools
- Select the element you want to animate
- Click the Animations tab on the ribbon
- Choose an animation effect
- Adjust settings in the Animation Pane (View → Animation Pane)
Key Animation Settings
For each animation, you can control:
- Start: On Click, With Previous, After Previous
- Duration: How long the animation takes
- Delay: Wait time before animation begins
- Effect Options: Direction, path shape, etc.
Pro Tips for Smooth Animations
- Use "With Previous" for simultaneous actions – Creates the illusion of coordinated movement
- Keep durations consistent – Typically 0.5-1.5 seconds works well
- Add small delays for sequences – Helps viewers follow the logic
- Preview frequently – Press Shift+F5 to preview from current slide
Creating Animated GIFs from PowerPoint
One of PowerPoint's most useful features for science communication is the ability to export animations as GIFs—perfect for graphical abstracts, social media, and websites.
Step-by-Step Process
As explained by the AGU Blogosphere:
-
Create your animation using slides as frames
- Each slide represents one frame
- Make incremental changes between slides
- Keep the background and static elements consistent
-
Set appropriate slide timing
- Go to Transitions tab
- Set "After" timing for each slide (e.g., 0.5 seconds)
- Uncheck "On Mouse Click"
-
Export as GIF
- File → Export → Create an Animated GIF
- Choose quality (Medium or Large for science content)
- Select "Seconds spent on each slide" if needed
GIF Best Practices
- Keep file size manageable – Under 5MB for web use
- Loop appropriately – Most science GIFs should loop continuously
- Test at actual display size – Details may be lost when scaled down
- Consider adding a brief pause – Helps viewers understand the loop point
Adding Narration to Your Animations
For video abstracts or online presentations, voiceover adds significant value.
Recording in PowerPoint
- Go to Slide Show tab
- Click Record Slide Show
- Narrate as you advance through animations
- Recordings are attached to each slide
Export Options
- MP4 Video: File → Export → Create a Video
- Choose quality (1080p recommended for science content)
- Include recorded timings and narrations
Narration Tips
- Write a script first
- Speak slightly slower than normal conversation
- Match narration timing to animation reveals
- Use a decent microphone (even phone earbuds help)
Free Tools for Advanced Science Animations
When PowerPoint's built-in tools aren't enough, these free options provide professional capabilities:
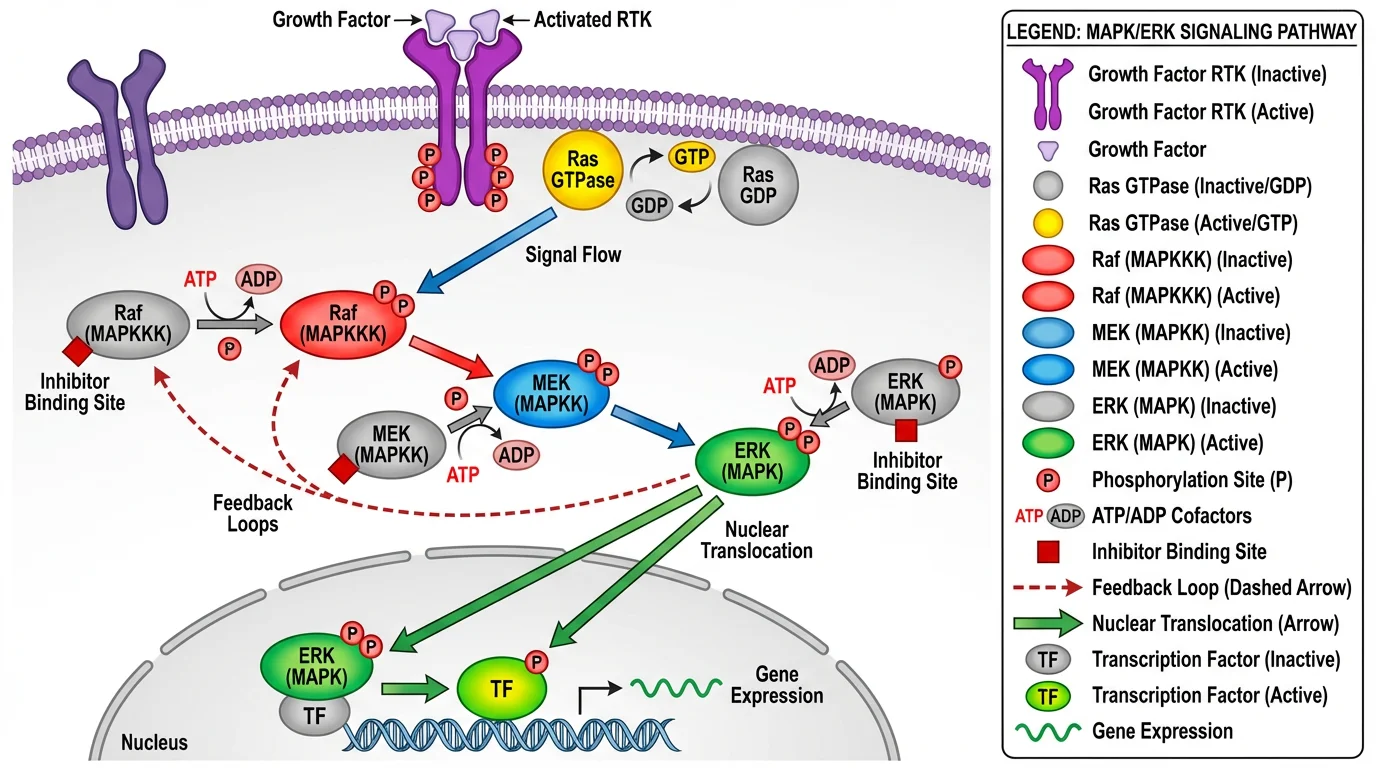
Complex pathways like this MAPK signaling cascade are ideal candidates for animated explanation using tools like Blender or BioBlender
Blender (Free, Open Source)
Blender is the gold standard for free 3D animation software.
Best for:
- 3D molecular structures
- Anatomical models
- Complex simulations
- Cinema-quality rendering
Learning curve: Steep, but extensive tutorials available
Special feature: The Grease Pencil tool allows 2D drawing and animation within 3D space.
BioBlender (Free, Open Source)
BioBlender is a Blender fork specifically for molecular visualization.
Best for:
- PDB file visualization
- Molecular dynamics
- Protein surface properties
- Scientific accuracy
As BiteSizeBio notes, BioBlender offers "rapid production times and quick modifications" for molecular animations.
Molecular Maya (Free base, paid add-ons)
For researchers needing professional molecular animations, Molecular Maya extends Autodesk Maya with molecular modeling capabilities.
OpenToonz (Free, Open Source)
The software behind Studio Ghibli films, OpenToonz is excellent for 2D animation.
Best for:
- Hand-drawn style animations
- 2D biological processes
- Educational content
- Artistic interpretations
Browser-Based Options
| Tool | Best For | Cost |
|---|---|---|
| Canva | Quick social media animations | Free tier available |
| BioRender | Biological diagram animations | Free tier limited |
| Clara.io | 3D modeling in browser | Free |
NASA Scientific Visualization Studio
NASA SVS provides public domain visualizations and animations for Earth and space sciences—free to use and adapt.
Tool Comparison Chart
| Tool | Cost | Learning Curve | Best For | 3D Capable |
|---|---|---|---|---|
| PowerPoint | Included | Easy | Quick animations, GIFs | Limited |
| Blender | Free | Steep | Professional 3D work | Yes |
| BioBlender | Free | Steep | Molecular visualization | Yes |
| OpenToonz | Free | Moderate | 2D animation | No |
| Canva | Freemium | Easy | Social media content | No |
| BioRender | Freemium | Easy | Biological diagrams | No |
| ConceptViz | Freemium | Easy | AI-generated diagrams | No |
Best Practices for Molecular Animations
For researchers creating molecular biology animations, the Frontiers in Bioinformatics journal has published comprehensive design principles:
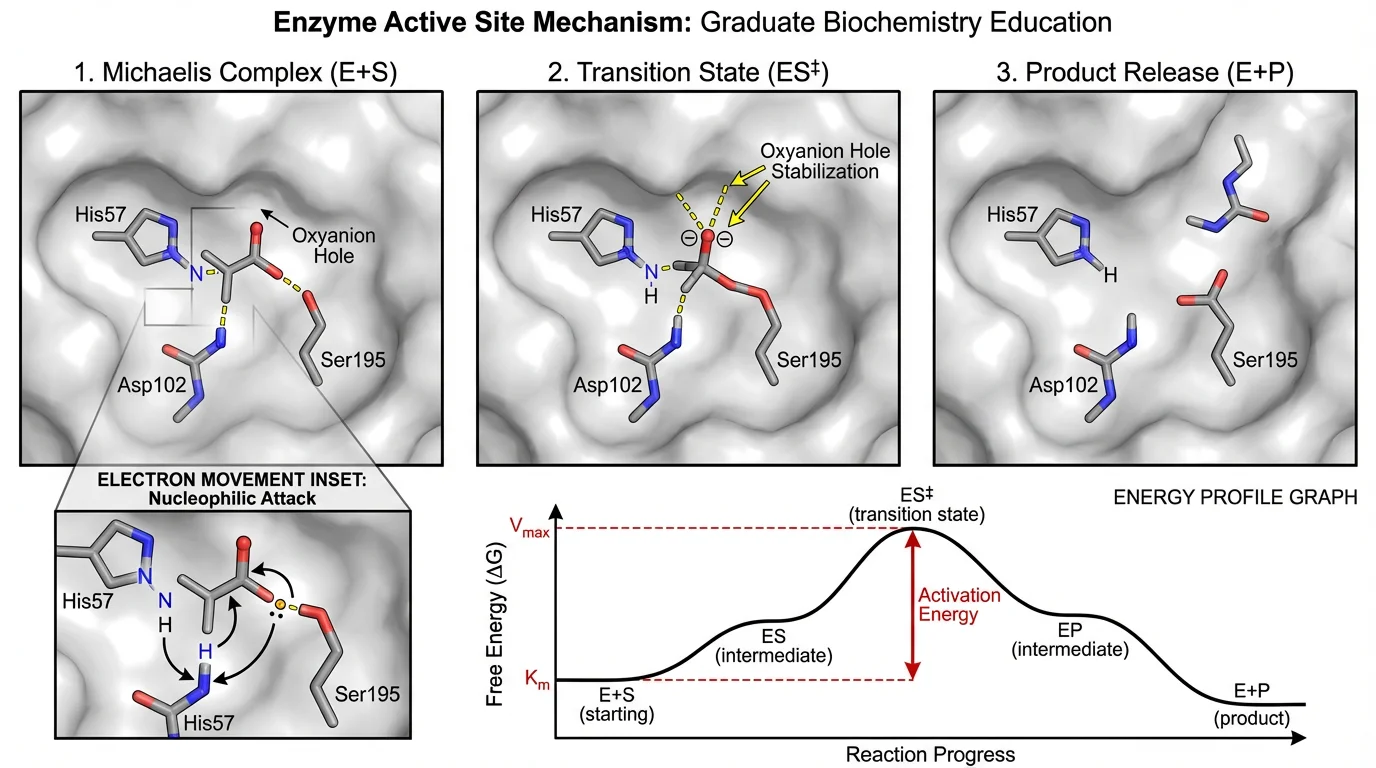
Molecular mechanism diagrams like this enzyme binding process translate well to animation, showing conformational changes step by step
1. Prioritize Clarity Through Simplification
"Every scene of a molecular animation should be designed to secure clarity. Clarity is reached by simplification and abstraction where the choice of adequate representation is of great importance."
Practical tips:
- Remove non-essential molecules from crowded scenes
- Use consistent color coding throughout
- Provide visual hierarchy (important elements more prominent)
2. Communicate Scale Accurately
"Variation in temporal scale may be communicated in a number of ways, including sonification cues, manipulation of the timeline, or including a timescale to remind viewers of the rate at which activities occur."
Practical tips:
- Include scale bars when relevant
- Use inset views to show both macro and micro scales
- Consider time indicators for processes that span different timescales
3. Maintain Scientific Accuracy
"For maintaining scientific authenticity it is good practice to mark use of artistic licence which ensures transparency and accountability."
Practical tips:
- Base molecular structures on actual PDB data when possible
- Note any simplifications or artistic interpretations
- Ensure motion follows known biophysical principles
4. Consider the Crowded Cellular Environment
Real cellular environments are crowded with molecules. While showing this complexity isn't always practical, acknowledging it helps:
- Include some background molecules in key scenes
- Use depth-of-field effects to suggest crowded space
- Mention simplifications in your narration
Animation for Different Presentation Contexts
Conference Talks (15-20 minutes)
- Use 2-4 short animations maximum
- Keep each under 30 seconds
- Ensure animations work without sound (backup for AV issues)
- Test on the actual presentation system if possible
3-Minute Thesis (3MT) Presentations
Animations can be powerful for 3MT but require careful planning:
- Single slide = single animation opportunity
- Keep it under 10 seconds
- Must be instantly understandable
- Should support, not replace, your spoken explanation
For more 3MT tips, see our 3-Minute Thesis presentation guide.
Video Abstracts
Video abstracts are where animation truly shines:
- 2-5 minutes typical length
- Full narration expected
- Can use multiple animation sequences
- Higher production value expected
Online Teaching
For educational content:
- Segment into short modules (2-3 minutes each)
- Include pause points for student reflection
- Provide downloadable versions for offline viewing
- Consider accessibility (captions, transcripts)
Common Mistakes to Avoid
1. Over-Animating
Not every element needs to move. Excessive animation:
- Distracts from your message
- Looks unprofessional
- Increases file size and technical issues
2. Inconsistent Timing
When animation speeds vary randomly, viewers become confused about what's important. Establish a consistent rhythm.
3. Poor Color Choices
Colors that work on your monitor may fail on projectors or for colorblind viewers. Test your animations in different conditions and see our scientific color palette guide.
4. Ignoring Resolution
Animations that look great at full screen may become illegible when embedded in a website or viewed on mobile devices.
5. Missing the Scientific Point
An animation should serve your science, not showcase your animation skills. University of Utah researcher Janet Iwasa notes that "animations always include a number of ideas, some of which may be backed by a great deal of experimental data, and some that are more conjecture." Be clear about what's established versus hypothetical.
Step-by-Step Tutorial: Simple Binding Animation
Let's create a basic protein-ligand binding animation in PowerPoint:
Step 1: Set Up Your Elements
-
Create or import images of:
- Protein (receptor)
- Ligand (small molecule)
- Bound complex (or create from overlapping elements)
-
Position the protein in the center of your slide
-
Position the ligand off to the side
Step 2: Add Motion Path to Ligand
- Select the ligand
- Animations → Add Animation → Motion Paths → Custom Path
- Draw a path from the ligand's starting position to the binding site
- Set Duration: 1.5 seconds
- Set Start: On Click (or After Previous)
Step 3: Add Conformational Change (Optional)
- Create a slightly different version of the protein (bound state)
- Position it exactly over the original
- Add Entrance animation (Fade) to bound state
- Set Start: With Previous (to sync with ligand arrival)
- Add Exit animation (Fade) to unbound state
- Time both to coincide with ligand arrival
Step 4: Add Labels and Effects
- Add text labels that appear after binding completes
- Use Entrance animations (Appear or Fade)
- Set Start: After Previous with 0.5s delay
Step 5: Test and Refine
- Press Shift+F5 to preview
- Adjust timing as needed
- Ensure the sequence tells a clear story
Frequently Asked Questions
Can I create professional science animations in PowerPoint alone?
Yes, PowerPoint can create surprisingly professional animations for most science communication needs. It excels at 2D animations, motion graphics, and simple 3D effects. For complex 3D molecular animations, you may need specialized software like Blender or BioBlender, but PowerPoint handles the majority of presentation animation needs effectively.
What's the best free software for molecular biology animations?
BioBlender is the best free option specifically designed for molecular animations. It's built on Blender and can import PDB files directly, visualize protein surfaces, and create scientifically accurate molecular dynamics animations. For simpler needs, PowerPoint combined with BioRender's free tier can create effective 2D molecular animations.
How do I export a PowerPoint animation as a GIF?
Go to File → Export → Create an Animated GIF. Choose your quality setting (Medium or Large recommended for science content), select the seconds per slide if using the slide-as-frames method, and click Create GIF. The resulting file can be used in graphical abstracts, websites, or social media.
How long should a science animation be?
For conference presentations, keep individual animations under 30 seconds. Video abstracts typically run 2-5 minutes total. For educational content, 2-3 minute segments work best. The key is that every second should serve your scientific message—if an animation doesn't add understanding, cut it shorter.
Do I need to learn Blender for science animations?
Not necessarily. PowerPoint handles most 2D animation needs, and tools like BioRender offer simpler interfaces for biological diagrams. However, Blender is worth learning if you regularly need 3D molecular visualizations, anatomical models, or cinema-quality renders. The learning curve is steep but the capability is unmatched among free tools.
How can I make my PowerPoint animations look more professional?
Use consistent timing (0.5-1.5 seconds per animation), limit yourself to 2-3 animation types per presentation, ensure smooth motion paths, use high-quality source images, apply a cohesive color scheme, and always preview on the actual presentation system. Restraint often looks more professional than complexity.
Can I use animations in my journal submission?
Many journals now accept video abstracts and supplementary video files. Check your target journal's guidelines—journals like Cell, Nature, and PLOS actively encourage video content. Animated GIFs can sometimes be included in online-only supplementary materials. Always ensure animations meet the journal's technical specifications.
What's the difference between PowerPoint animation and video editing?
PowerPoint animation moves elements within slides using built-in effects. Video editing (using tools like Premiere or DaVinci Resolve) combines multiple video clips, adds transitions, and offers more sophisticated effects. For most science presentations, PowerPoint animation is sufficient. Video editing becomes necessary when combining multiple sources or creating broadcast-quality content.
Conclusion
Creating science animations doesn't require a Hollywood budget or years of training. With PowerPoint's built-in tools—and free software like Blender for more advanced needs—any researcher can transform complex concepts into engaging visual stories.
Key takeaways:
- Start with PowerPoint – It's capable of more than most people realize
- Choose the right method – Whiteboard style for artists, cut-out style for everyone else
- Prioritize clarity – Every animation should serve understanding
- Keep it simple – One clear animation beats five confusing ones
- Test extensively – What works on your screen may fail on a projector
Ready to create stunning scientific visuals? Try ConceptViz to generate professional diagrams that can serve as the foundation for your animations.
Additional Resources
- Animate Your Science – Comprehensive PowerPoint animation tutorials
- AGU Science Communication Blog – #SciAnimations guide
- Frontiers in Bioinformatics: Design Principles for Molecular Animation
- Scientific Infographic Design Guide
- How to Make Figures for Nature/Science Journals
分類
更多文章
")
How to Diagram a Sentence: Complete Guide with Examples & Free Generator (2026)
Master sentence diagramming with our step-by-step Reed-Kellogg guide. See 15+ examples from simple to complex — or use our free AI sentence diagram generator.

Molecular Orbital Diagrams Explained: Bonding & Bond Order
Learn how to read and draw a molecular orbital diagram: bonding vs antibonding orbitals, filling electrons, and calculating bond order, with H2, N2, and O2 examples.

Use Case Diagram Generator Guide: Create UML Use Cases from Text
Learn how to use a use case diagram generator, define actors and system boundaries, write better prompts, and avoid common UML notation mistakes.