
How to Create a Workflow Diagram: Step-by-Step Guide with Examples
Learn how to create a workflow diagram for research, business processes, and team projects. Step-by-step guide with symbols, types, best practices, and free tools.
A workflow diagram turns a complex process into a visual map that everyone on your team can understand at a glance. Whether you are documenting a research methodology for a grant proposal, mapping a clinical trial protocol, planning a data analysis pipeline, or outlining an approval process for a team project, a clear workflow diagram eliminates ambiguity and keeps everyone aligned.
This guide covers everything you need to create effective workflow diagrams: what they are, the standard symbols, step-by-step creation process, different diagram types, and real examples from research and business contexts.
Workflow Diagram Generator
Create professional workflow and process diagrams for research, business, and team projects with AI.
Try it free →What Is a Workflow Diagram?
A workflow diagram is a visual representation of a sequence of tasks, decisions, and handoffs that make up a process from start to finish. According to Atlassian, workflow diagrams provide "a graphic overview of the business process using standardized symbols and shapes to show step by step how your work is completed."
The key distinction from a general flowchart: a workflow diagram emphasizes who does what and in what sequence — it focuses on the flow of work between people, teams, or systems. A flowchart can represent any logical process; a workflow diagram specifically shows operational sequences with clear ownership and handoffs.
Workflow Diagram vs. Flowchart vs. Process Flow Diagram
These terms are often used interchangeably but have meaningful differences:
| Diagram Type | Focus | Typical Use |
|---|---|---|
| Workflow diagram | Tasks, roles, handoffs between people/teams | Research protocols, operational processes, team collaboration |
| Flowchart | Logical steps and decision branches in any process | Software logic, decision trees, troubleshooting guides |
| Process flow diagram | Material and data flow through a system | Chemical engineering, manufacturing, supply chain |
| Swimlane diagram | Multi-team workflow with role separation | Cross-departmental processes, clinical pathways |
For a deeper look at process mapping approaches, see our mapping diagram complete guide.
Standard Workflow Diagram Symbols
Workflow diagrams use a subset of standard flowchart symbols defined by ISO 5807 and widely adopted across industries:
| Symbol | Shape | Meaning |
|---|---|---|
| Terminator | Rounded rectangle (pill) | Start or end point of the workflow |
| Process | Rectangle | A task, action, or step performed |
| Decision | Diamond | A yes/no or branching choice |
| Document | Rectangle with wavy bottom | A document created or used |
| Data/Input | Parallelogram | Data entering or leaving the process |
| Arrow | Directional line | Flow direction between steps |
| Delay | D-shaped box | A waiting period in the process |
| Connector | Small circle | Connection point for complex diagrams |
Practical rule: For most research and business workflow diagrams, you only need four shapes — terminator, process box, decision diamond, and arrow. Introduce additional symbols only when the process genuinely requires them.
Step-by-Step: How to Create a Workflow Diagram
Step 1: Define the process scope and purpose
Before drawing anything, answer three questions:
- What process are you mapping? Be specific: "submission of a manuscript to peer review" rather than "publication process."
- What is the start point and end point? Every workflow diagram needs a clear trigger (what starts the process) and a clear terminus (what marks completion).
- Who is the audience? A workflow diagram for a grant proposal reviewer needs more annotation than one for your internal team.
Step 2: List every step in the process
Write out all the steps in plain text first. Include:
- Every action taken by a person or system
- Every decision point (where the process can branch)
- Every handoff (where responsibility passes from one person or team to another)
- Any waiting periods or approval gates
Talk to the people who actually do the work — their knowledge of the real process often differs significantly from what the official procedure document says.
Step 3: Identify decision points and branches
Mark which steps involve a decision — any point where the process can go one of two or more ways. For each decision:
- Write the question as a yes/no question (e.g., "Does the data pass quality check?")
- Map both the "Yes" path and the "No" path (including loops back to earlier steps)
Unresolved branches are one of the most common sources of confusion in complex processes.
Step 4: Choose your diagram type
Linear workflow: Use when the process is sequential with minimal branching. Reads left to right or top to bottom.
Branching workflow: Use when there are significant decision points that split the process into parallel or alternative paths.
Swimlane diagram: Use when multiple teams or roles are involved and you need to show clearly who is responsible for each step. Each "lane" represents one role or department.
Circular/cyclic workflow: Use when the process is iterative — for example, a research review cycle or an agile sprint.
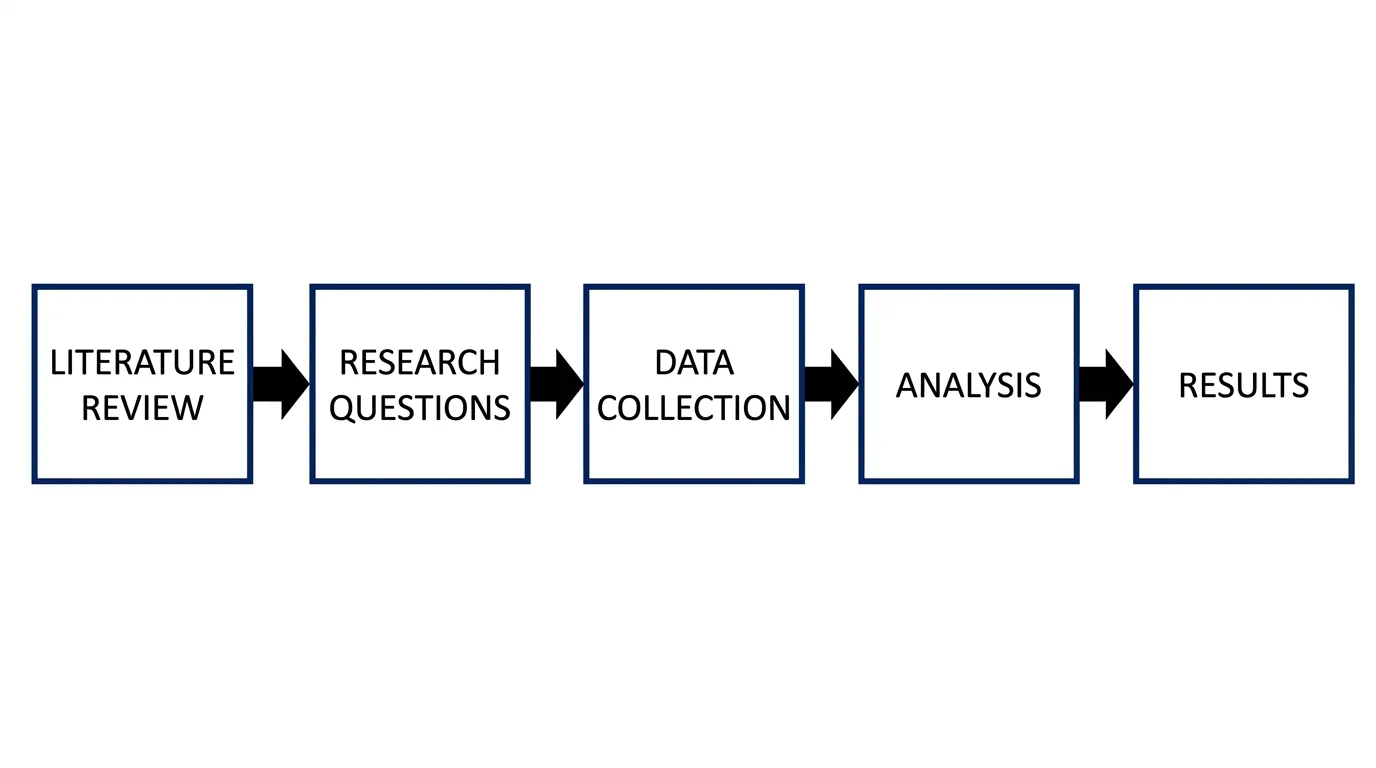
A workflow diagram for a research methodology showing the sequential phases from problem statement through literature review, data collection, analysis, and publication.
Step 5: Draft the diagram layout
Start with the terminator (start) at the top-left or center-left. Arrange process steps in the natural sequence of the workflow, flowing left to right or top to bottom. Place decision diamonds at branch points with branches flowing to the right (for "yes") and downward (for "no") — or use a consistent convention throughout.
Leave adequate white space between steps. A crowded workflow diagram is harder to read than a clean one with more space.
Step 6: Draw and connect the shapes
Use consistent shape sizes throughout the diagram. Connect all shapes with directional arrows. Label every arrow that follows a decision diamond with the decision outcome (Yes / No, or the specific condition that triggers that path).
If your workflow loops back to an earlier step, show the loop with an arrow that curves around the diagram — never draw a backward arrow that cuts through other shapes.
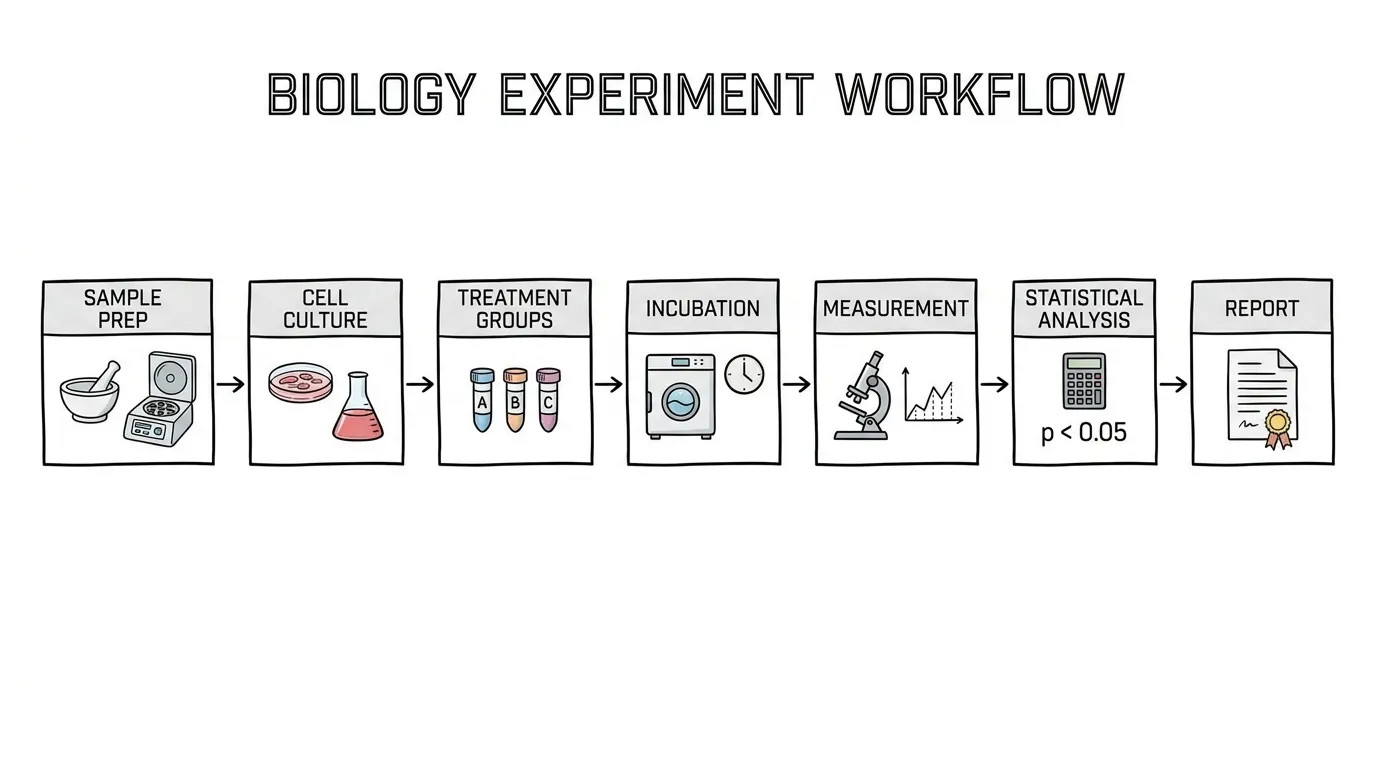
A workflow diagram for an experimental research protocol, from hypothesis formation through ethics approval, experimental runs, and statistical analysis.
Step 7: Label clearly and add annotations
Every shape needs a label. Process box labels should be verb phrases: "Collect samples," "Run statistical analysis," "Submit for peer review." Decision diamond labels should be questions: "Sample size sufficient?" "Ethics approval granted?"
Add short annotations where the process has important conditions, time constraints, or responsible parties that are not clear from the shape labels alone.
Step 8: Validate with stakeholders
Show the completed diagram to the people who work in the process. Ask:
- Does this match what actually happens?
- Are any steps missing?
- Are the decision branches correct?
- Are the handoffs shown accurately?
A workflow diagram that doesn't match reality is worse than no diagram — it creates false confidence and misleads anyone who relies on it.
Workflow Diagram Examples
Research Methodology Workflow
Academic research projects benefit enormously from workflow diagrams in grant applications and thesis proposals. A well-drawn research workflow shows funding bodies exactly how you will move from research question to publishable output — and demonstrates methodological rigor.
Key elements of a research methodology workflow:
- Literature review phase (with inclusion/exclusion criteria decision)
- Data collection protocol
- Quality control checks and decision points
- Analysis pipeline
- Output and dissemination stages
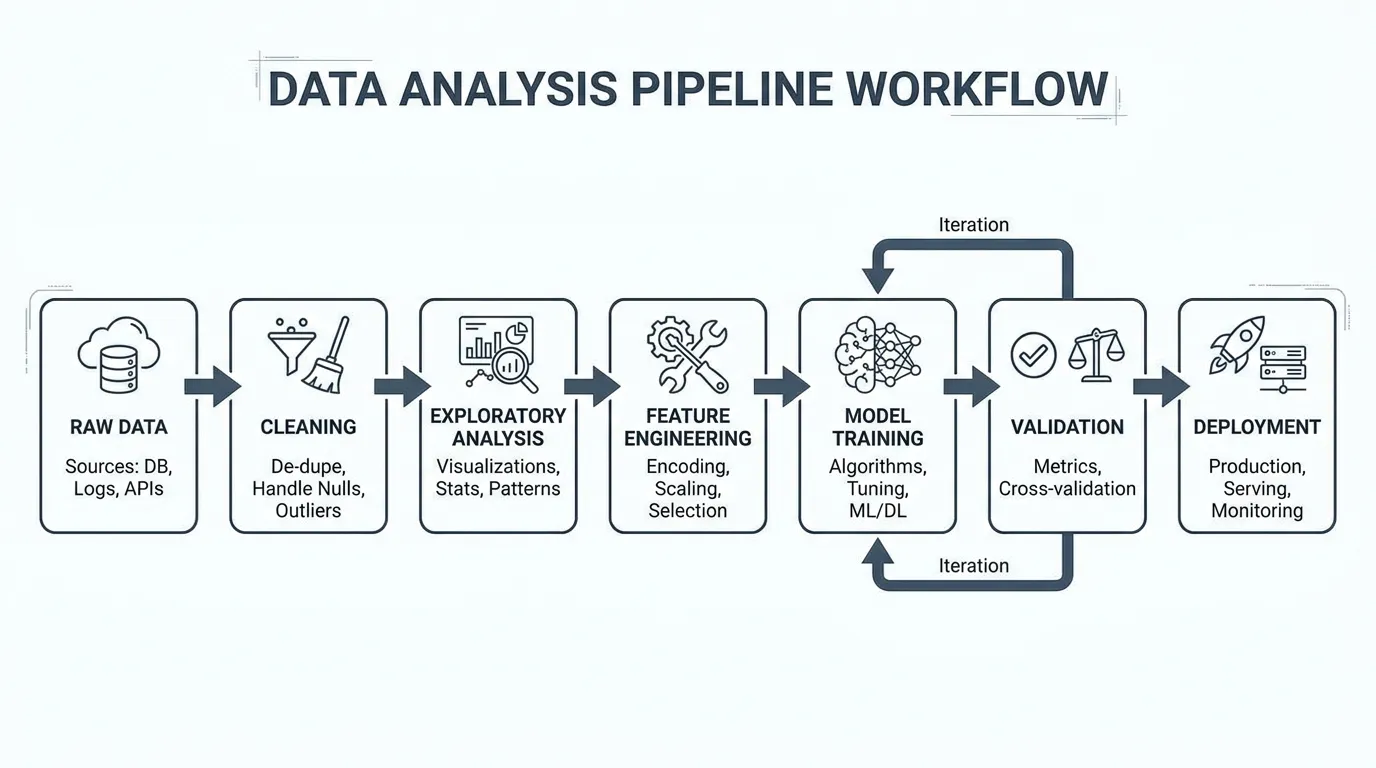
A data analysis pipeline workflow diagram showing data ingestion, cleaning and transformation, statistical analysis, and visualization and reporting stages.
Clinical Trial Workflow
Clinical research workflows are among the most standardized in any field. Regulatory bodies and ethics committees expect to see detailed workflow diagrams in study protocols — they want to see how patients flow through the trial and where safety checks occur.
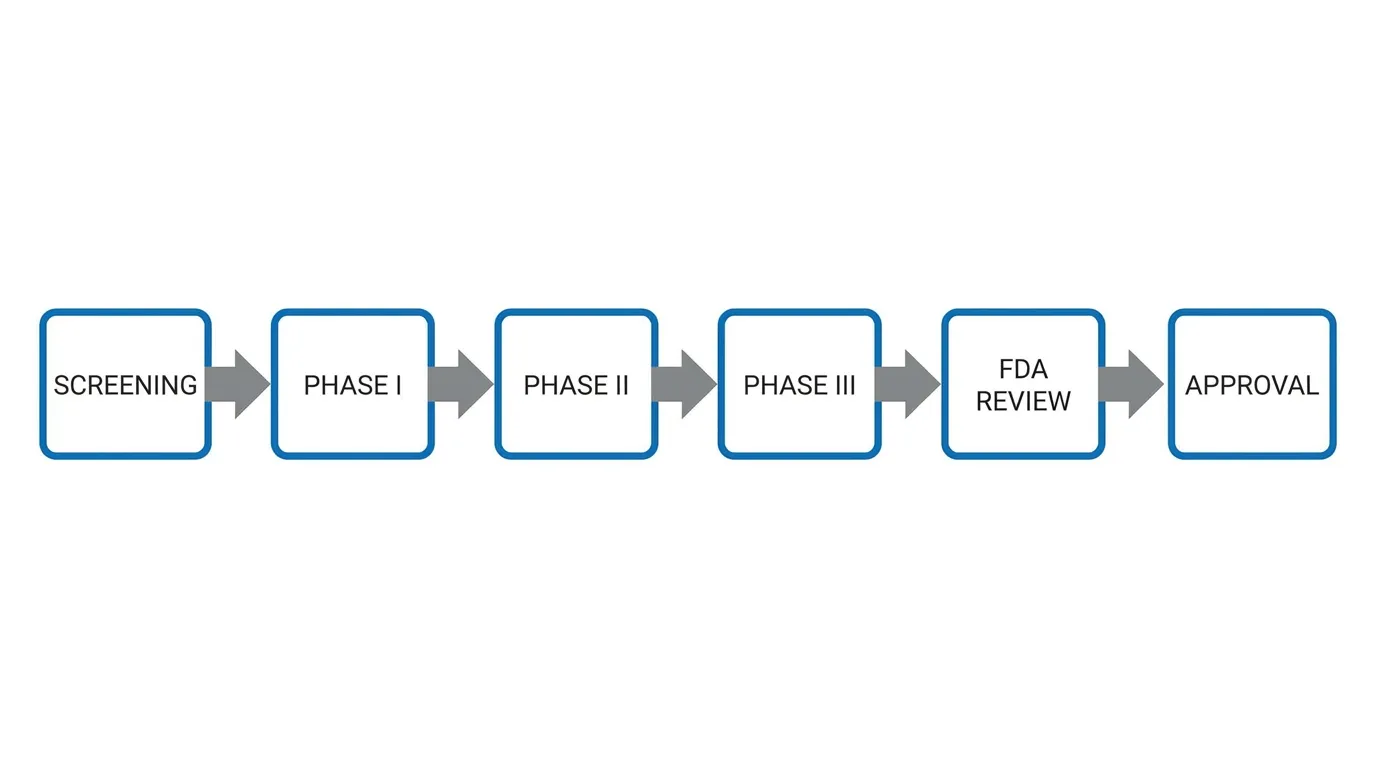
A clinical trial workflow diagram showing patient recruitment, screening and eligibility assessment, randomization, intervention delivery, follow-up visits, and data analysis phases.
Essential stages to include:
- Patient identification and screening
- Eligibility assessment (with clear inclusion/exclusion criteria)
- Informed consent
- Randomization (if applicable)
- Intervention and follow-up
- Data collection and locking
- Statistical analysis
Grant Application Workflow
Grant applications benefit from a workflow diagram that shows the timeline and sequence of proposed research activities. This is distinct from a Gantt chart (which shows duration) — a workflow diagram shows the logical sequence and dependencies between tasks.
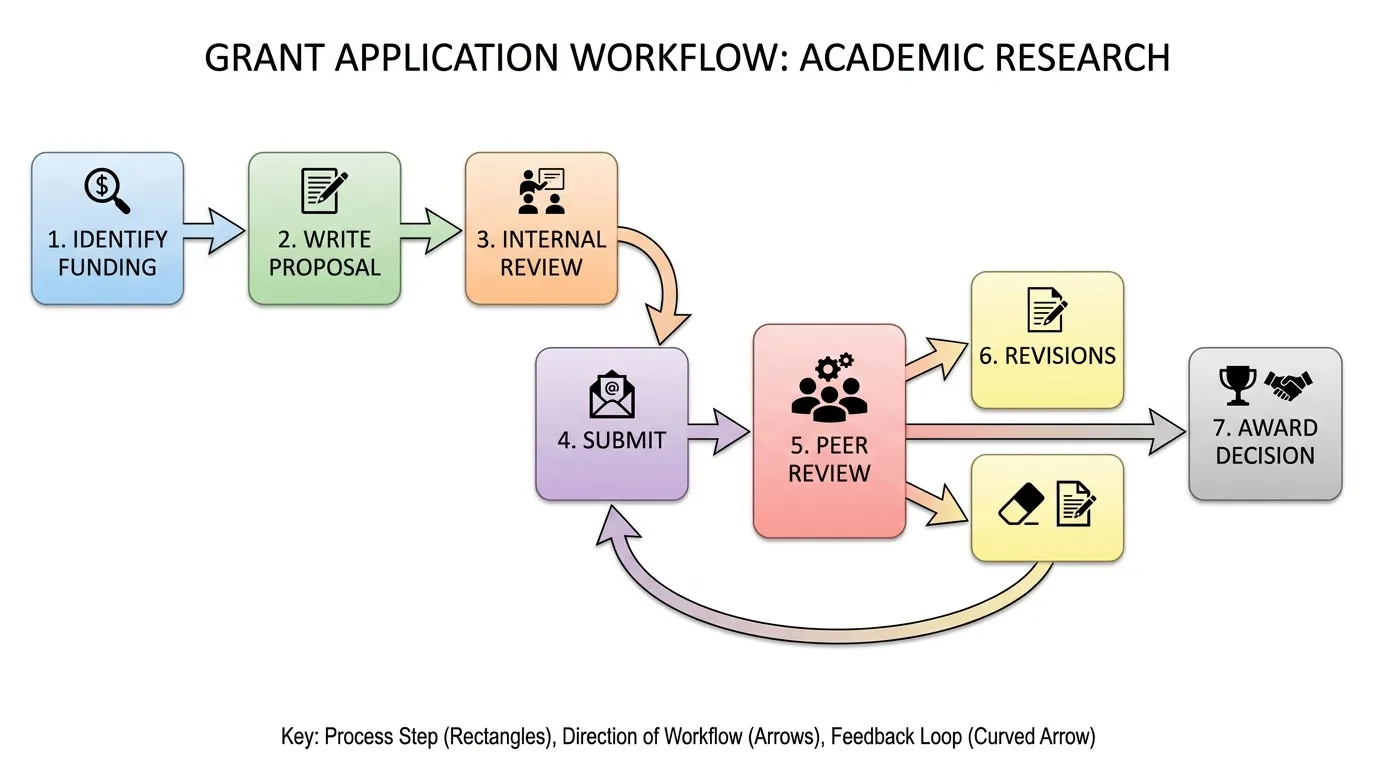
A grant application workflow diagram showing the sequence of proposed research activities, approval gates, and deliverables for a multi-year research project.
Swimlane Workflow Diagram
When a workflow involves multiple teams or roles, use a swimlane diagram. Each horizontal (or vertical) lane represents one role, department, or system. Handoffs between roles are shown as arrows crossing lane boundaries.
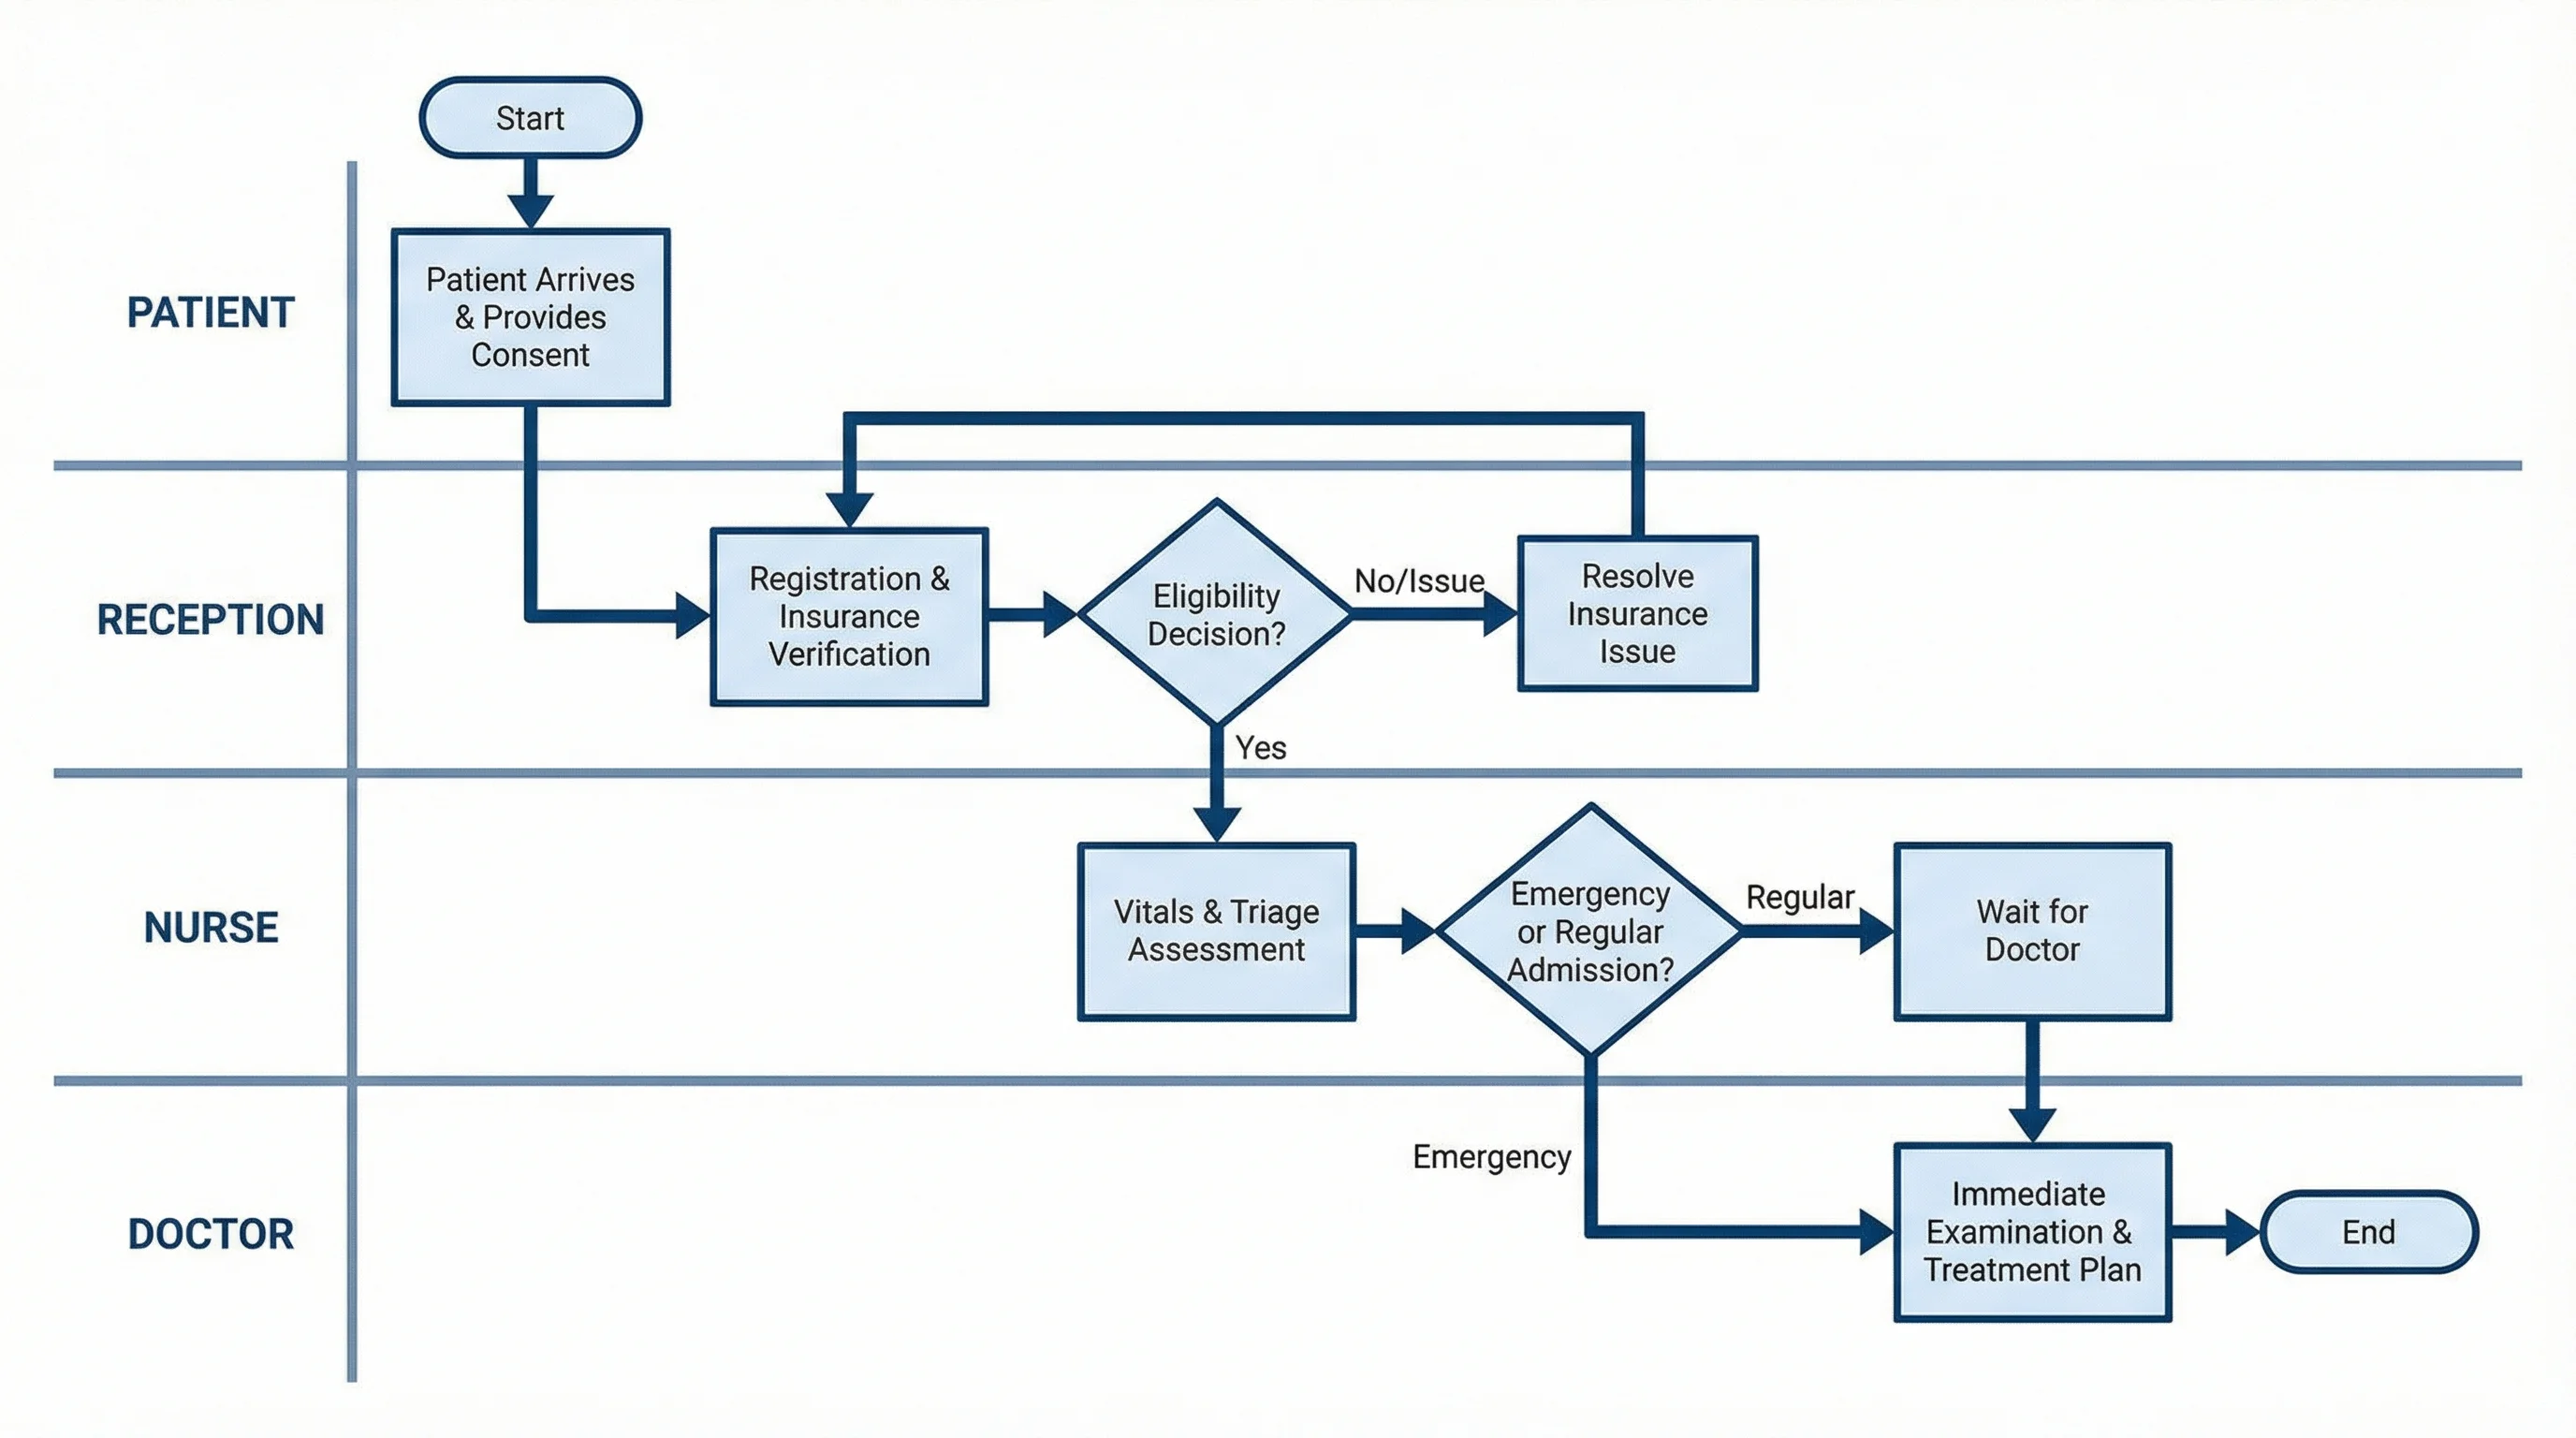
A swimlane workflow diagram for hospital patient admission, showing the parallel and sequential tasks handled by reception, nursing, the admitting physician, and the pharmacy.
Swimlane diagrams are the preferred format whenever:
- More than two people or teams are involved
- Handoffs between roles are a key source of delays or errors
- You need to show parallel activities happening simultaneously
For creating swimlane diagrams specifically, see our dedicated swimlane diagram generator.
Choosing Your Workflow Diagram Tool
| Tool | Best For | Cost |
|---|---|---|
| ConceptViz Workflow Diagram Generator | AI-generated research and process workflows | Free tier available |
| Lucidchart | Team collaboration with real-time editing | Free (limited), paid from $9/mo |
| Miro | Visual collaboration and large process mapping | Free (limited), paid from $8/mo |
| draw.io / diagrams.net | Free offline-capable diagramming | Completely free |
| Microsoft Visio | Enterprise-grade professional diagrams | Paid only |
| Canva | Simple visually polished workflow charts | Free tier available |
Lucidchart's tutorial on workflow diagrams provides a solid introduction to symbols and layout conventions. For a tool comparison that includes open-source alternatives, see our best free diagram software comparison.
Workflow Diagram Generator
Generate research methodology, clinical trial, and project workflow diagrams with AI.
AI Flowchart Generator
Create decision flowcharts and process diagrams from text descriptions.
Common Workflow Diagram Mistakes
Too much detail too early A workflow diagram should capture the main steps and decisions, not every micro-task within each step. If you find yourself with more than 20 shapes in a single workflow, consider breaking the diagram into a high-level overview and separate sub-process diagrams.
Missing the start and end terminators Every workflow diagram needs an explicit start and end. "Start" and "End" (or "Begin" and "Complete") in rounded rectangles are non-negotiable — without them, readers cannot tell where the process begins or what constitutes completion.
Decision diamonds with unlabeled branches A decision diamond with unlabeled arrows leaving it forces readers to guess. Always label the branches: "Yes"/"No," "Approved"/"Rejected," "Pass"/"Fail" — whatever the actual decision outcomes are.
Showing the ideal process instead of the real one The most useful workflow diagrams document how the process actually works, not how the procedure manual says it should work. Include the rework loops, the exception paths, and the informal checks that happen in practice.
Inconsistent flow direction Mixing left-to-right and top-to-bottom flow within a single diagram is visually confusing. Pick one direction and stick to it throughout. Wrike's workflow diagram guide recommends left-to-right for most business processes, as it mirrors natural reading direction.
Related Reading
- Mapping Diagram Complete Guide — Comprehensive overview of process mapping approaches
- How to Create a Data Flow Diagram — For diagramming how data moves through systems
- UML Diagram Types Complete Guide — When to use activity diagrams vs. sequence diagrams vs. workflow diagrams
- Lucidchart: What Is a Workflow Diagram — Symbol reference and tutorial (external)
- Asana: Workflow Diagram Guide — Types, symbols, and step-by-step creation (external)
- Atlassian: Workflow Charts — Agile workflow diagramming context (external)
Frequently Asked Questions
What is a workflow diagram used for?
A workflow diagram is used to visually document the steps, decisions, and handoffs in a process from start to finish. Common uses include documenting research methodologies for grant applications, mapping clinical trial protocols, designing team collaboration processes, onboarding new team members, identifying bottlenecks in operational workflows, and presenting process designs to stakeholders or ethics committees.
What is the difference between a workflow diagram and a flowchart?
A flowchart is a general-purpose diagram for any logical process, often used to represent algorithms, decision trees, or software logic. A workflow diagram specifically focuses on sequences of tasks involving people, roles, or systems — emphasizing who does what and where handoffs occur. All workflow diagrams use flowchart symbols, but workflow diagrams have a stronger focus on operational and human-process aspects than general flowcharts.
What symbols are used in workflow diagrams?
Standard workflow diagram symbols include: rounded rectangles (terminators) for start and end points, regular rectangles for process steps or tasks, diamonds for decision points, parallelograms for data inputs or outputs, and arrows to show the direction of flow. For most workflow diagrams, using just these five symbol types is sufficient — adding more specialized symbols only when the process genuinely requires them.
How do I create a workflow diagram for a research project?
Start by listing every phase of your research process in plain text: problem statement, literature review, methodology design, data collection, analysis, interpretation, and dissemination. Identify decision points (e.g., 'Does preliminary analysis support the hypothesis?') and any approval gates (e.g., ethics committee approval). Map these into a left-to-right or top-to-bottom flow using standard symbols. For grant applications, include time estimates for each phase and show how phases depend on each other.
What is a swimlane workflow diagram?
A swimlane diagram is a workflow diagram divided into horizontal or vertical 'lanes,' each representing a different role, team, or system. Tasks are placed in the lane of the person or team responsible for that step. Arrows crossing between lanes show handoffs. Swimlane diagrams are the best format when multiple teams are involved in a process and you need to show clearly who is responsible for each step and where transitions occur.
How many steps should a workflow diagram have?
For clarity, a single workflow diagram should have between 5 and 20 steps. If your process has more than 20 steps, consider creating a high-level overview diagram with 5–8 main phases, then separate sub-process diagrams for the detailed steps within each phase. Diagrams with too many shapes become difficult to read and lose their value as communication tools.
Can I create a workflow diagram with AI?
Yes. AI tools like ConceptViz's Workflow Diagram Generator can produce labeled workflow diagrams from text descriptions in seconds. Describe your process — the steps, decision points, and roles involved — and the AI generates a clean, structured diagram. This is especially useful for research proposals and grant applications where you need a professional-looking methodology diagram quickly. You can then refine the AI-generated draft in your preferred design tool.
Категории
Ещё публикации

Scientific Illustration Guide 2026: Types, Tools & How to Get Started
What is scientific illustration? Learn the types (botanical, medical, technical), best tools (free & paid), and how to create effective scientific visuals. With career tips.

Vector Diagram Physics Guide: How to Draw and Read Vector Diagrams
Learn how to draw vector diagrams in physics, add vectors head-to-tail, resolve components, find resultants, and avoid common diagram mistakes.
")
How to Make a Venn Diagram: Free Guide with Examples & AI Generator (2026)
Learn how to make a Venn diagram step by step. Explore 10+ real examples for science, business, and education — or use our free AI Venn diagram maker to create one instantly.