
How to Abstractly Depict People in Research Videos: Complete Guide for Scientists
Learn effective techniques for representing people abstractly in scientific videos and animations. Includes design approaches, privacy considerations, and practical examples for research communication.
Creating research videos and animations often requires depicting people, but realistic human representations can raise privacy concerns, distract from scientific content, or require significant artistic skill. Abstract human depictions offer an elegant solution, allowing you to communicate effectively while maintaining focus on your research message.
Why Use Abstract Human Representations?
Abstract depictions of people in scientific videos serve multiple important purposes beyond simple illustration:
Privacy Protection
When presenting case studies, patient data, or participant information, abstract representations protect individual identities while conveying necessary information about human subjects.
Universal Accessibility
Stylized figures transcend cultural, ethnic, and demographic specifics, making your research communication more inclusive and universally relatable.
Focus on Concepts
Abstract representations prevent viewers from focusing on irrelevant details like appearance, clothing, or facial features, directing attention to the scientific concepts you're explaining.
Production Efficiency
Creating abstract human figures requires less time and artistic skill than realistic illustrations or video footage, making video production more accessible to researchers.
Professional Consistency
Stylized figures maintain visual consistency throughout your video, creating a cohesive professional appearance that reinforces your research brand.
Types of Abstract Human Representations
Different abstraction levels suit different research communication needs:
Stick Figures
The simplest form of human representation uses basic lines for limbs and circles for heads. Stick figures work well for:
- Process diagrams showing movement or interaction
- Quick sketches and whiteboard-style animations
- Informal educational content
- Situations where extreme simplification is appropriate
Advantages: Universally understood, quick to create, minimal distraction
Limitations: Limited expressiveness, may appear too casual for formal presentations
Geometric Shapes
Representing humans with circles, rectangles, and triangles creates clean, modern aesthetics. This approach includes:
- Circle heads with rectangular bodies
- Triangle-based body shapes
- Cylindrical limbs and torsos
- Abstract geometric assemblages
Advantages: Professional appearance, easy to animate, scalable
Limitations: Less intuitive than stick figures, requires more design consideration
Silhouettes
Solid filled shapes showing human outlines provide recognizable forms without details. Silhouettes are effective for:
- Demographic representations
- Activity illustrations
- Comparative size relationships
- Professional presentations
Advantages: Clear recognition, elegant simplicity, strong visual impact
Limitations: Limited ability to show facial expressions or fine details
Simplified Anatomical Forms
Stylized but anatomically suggestive shapes balance abstraction with recognizability. These include:
- Rounded, simplified body proportions
- Minimal facial features (dots for eyes, line for mouth)
- Suggested clothing or accessories
- Cartoon-like but not fully realistic
Advantages: Expressive, relatable, suitable for diverse contexts
Limitations: Requires more artistic skill, potential for unintended characterization
Icon-Based Representations
Using standardized human icons from design libraries provides consistency and professionalism. Common in:
- Infographics and data visualizations
- User interface demonstrations
- Statistical representations
- Standardized research communications
Advantages: Professional, consistent, widely available
Limitations: Less unique, may lack personality for storytelling
Design Principles for Abstract Human Figures
Creating effective abstract human representations requires attention to key design principles:
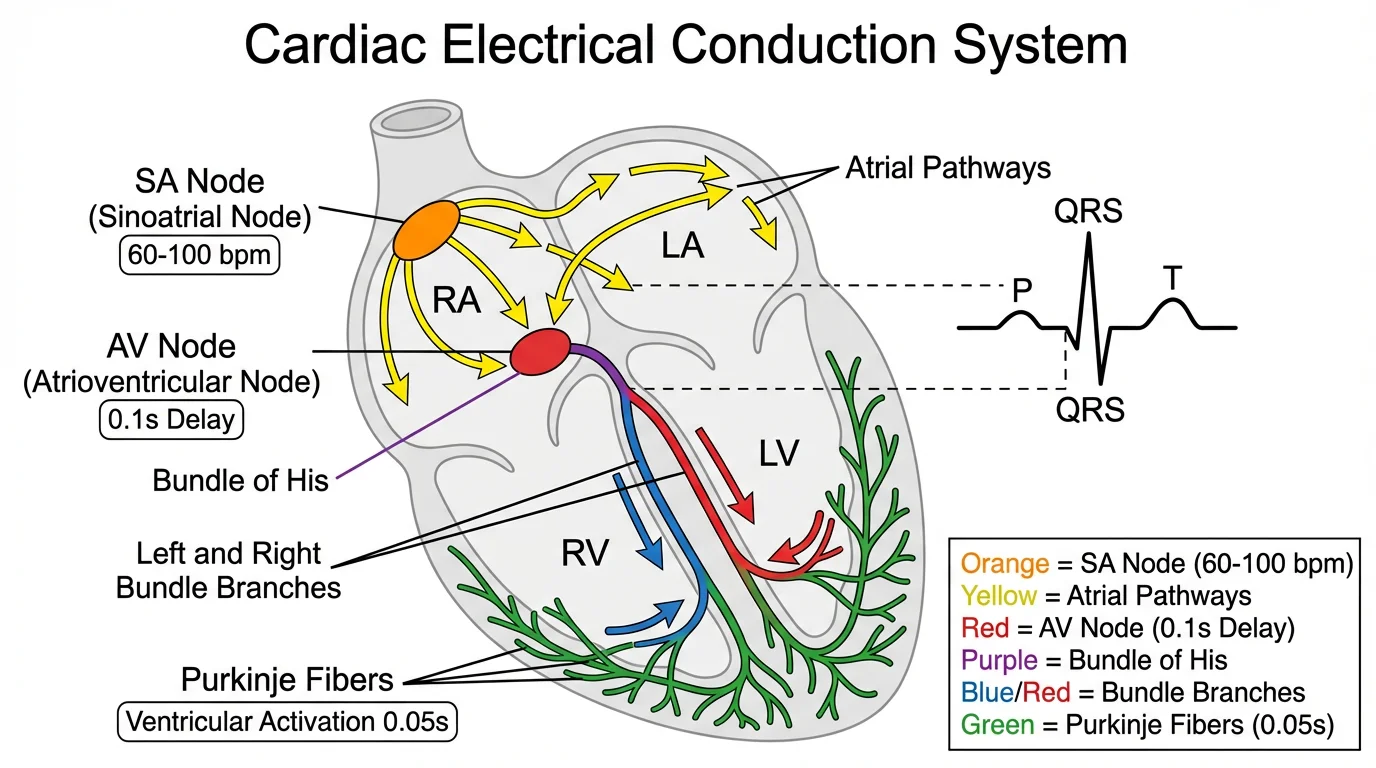
Abstract representations in medical contexts maintain clarity while respecting privacy and focusing on key concepts
Proportion and Scale
Maintain believable proportions even in abstraction:
- Head typically 1/7 to 1/8 of total height for adults
- Children have larger head-to-body ratios (1/4 to 1/6)
- Limb lengths should appear balanced
- Consider using golden ratio for pleasing proportions
Posture and Gesture
Communicate meaning through body language:
- Standing upright suggests confidence or attention
- Leaning forward indicates engagement or movement
- Raised arms can show excitement or emphasis
- Crossed arms suggest defensiveness or contemplation
- Seated positions indicate rest or work activities
Movement and Animation
Bring figures to life through motion:
- Use anticipation before major movements
- Follow through after actions
- Add secondary motion (hair, clothing) for realism
- Maintain consistent movement speed and style
- Consider easing functions for natural motion
Color and Contrast
Use color strategically:
- Neutral colors (gray, blue) for general representations
- Bright colors to highlight specific individuals or groups
- Consistent color coding for different roles or categories
- Sufficient contrast against backgrounds
- Consider colorblind-safe palettes
Consistency
Maintain visual coherence:
- Use the same style throughout your video
- Keep proportions consistent across all figures
- Apply uniform line weights and colors
- Match abstraction level to your content's formality
- Create style guides for multi-video projects
Techniques for Different Research Contexts
Different research scenarios call for different approaches to human representation:
Medical and Health Research
When depicting patients, healthcare providers, or medical procedures:
- Use neutral, respectful representations
- Avoid stereotypical associations with illness
- Clearly distinguish between different roles (patient, doctor, nurse)
- Consider using color coding for different health states
- Maintain dignity in all depictions
Example approach: Simple silhouettes with minimal medical accessories (stethoscope, clipboard) to indicate roles, using color to show health status changes over time.
Social Science Research
For studies involving human behavior, interactions, or demographics:
- Show diverse body types and sizes
- Use positioning to indicate relationships
- Employ groupings to show social structures
- Consider using speech bubbles or thought clouds
- Represent emotions through posture rather than facial details
Example approach: Rounded geometric figures in various sizes and colors, positioned to show social dynamics, with simple gestures indicating interactions.
Educational Content
When teaching concepts or procedures:
- Prioritize clarity over artistic sophistication
- Use consistent characters throughout lessons
- Add simple accessories to indicate context
- Consider using different colors for different learners
- Make figures relatable but not distracting
Example approach: Friendly simplified anatomical forms with minimal facial features, using consistent colors and simple props to show different learning scenarios.
Experimental Procedures
For demonstrating research methods or protocols:
- Focus on actions rather than appearance
- Use arrows and lines to show movement
- Number figures to indicate sequence
- Show spatial relationships clearly
- Minimize unnecessary details
Example approach: Clean silhouettes or geometric shapes with clear action indicators, positioned to show experimental setup and procedures.
Data Visualization
When representing statistical information about populations:
- Use standardized icon-based figures
- Maintain consistent size for accurate comparison
- Consider using partial figures for fractional data
- Arrange figures to show patterns or distributions
- Ensure accessibility for colorblind viewers
Example approach: Uniform icon-based human figures arranged in grids or patterns, with color or style variations indicating different categories or values.
Tools and Software for Creating Abstract Human Figures
Various tools support different skill levels and production needs:
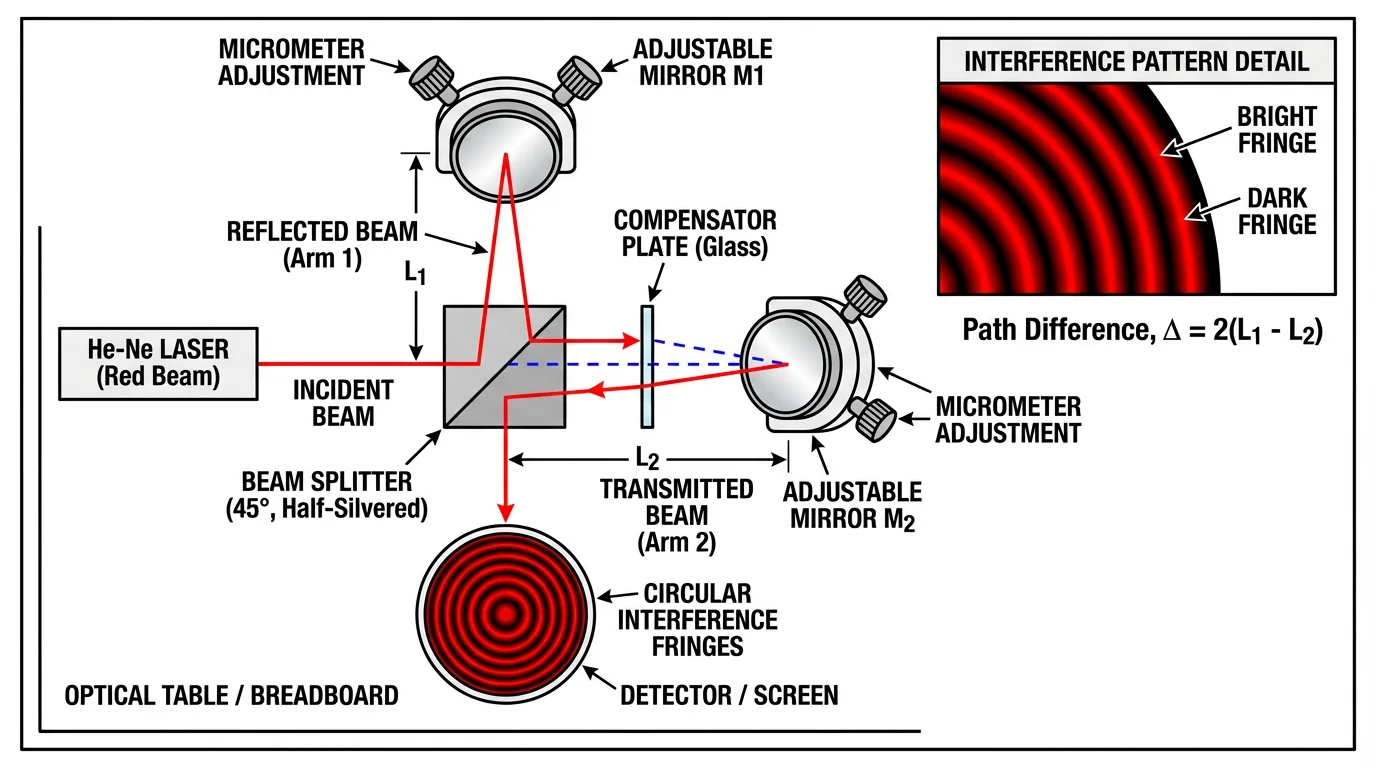
Professional tools help create clear, scientifically accurate representations for research communication
Beginner-Friendly Options
Start with these accessible tools:
- PowerPoint/Keynote: Built-in shapes and icons for simple figures
- Google Slides: Free, collaborative, with basic drawing tools
- Canva: Templates with pre-made human figures and icons
- Noun Project: Extensive library of human icon designs
- Flaticon: Free and premium human figure icons
Animation Software
For moving figures:
- Vyond: Character animation specifically for business and education
- Powtoon: Animated presentation tool with character libraries
- Animaker: Drag-and-drop animation with human characters
- Doodly: Whiteboard animation with stick figure options
- VideoScribe: Hand-drawn animation style
Professional Design Tools
For advanced control:
- Adobe Illustrator: Vector-based design for scalable figures
- Adobe After Effects: Professional animation and motion graphics
- Blender: 3D modeling and animation (free and open-source)
- Procreate: Digital illustration for iPad
- Affinity Designer: Affordable vector design alternative
Specialized Scientific Tools
Purpose-built for research:
- BioRender: Includes stylized human figures for biological contexts
- ConceptViz tools: AI-powered scientific diagram generation
- Explain Everything: Interactive whiteboard with drawing tools
- Prezi Video: Presentation tool with human figure options
Code-Based Solutions
For programmatic generation:
- Python with Matplotlib: Create simple stick figures programmatically
- Processing: Creative coding for custom animations
- D3.js: Web-based data visualization with custom figures
- R with ggplot2: Statistical graphics with human icons
Step-by-Step: Creating Abstract Human Figures
Follow this process to develop effective abstract human representations:
Step 1: Define Your Purpose
Clarify why you need human figures:
- What role do they play in your narrative?
- What actions or states must they convey?
- Who is your target audience?
- What level of formality is appropriate?
Step 2: Choose Your Abstraction Level
Select the appropriate style:
- Consider your audience's expectations
- Match formality to your research context
- Balance simplicity with expressiveness
- Ensure consistency with other visual elements
Step 3: Sketch Basic Forms
Start with rough sketches:
- Draw basic shapes for head, torso, limbs
- Experiment with proportions
- Try different poses and gestures
- Test multiple abstraction levels
Step 4: Refine Your Design
Develop your chosen approach:
- Clean up lines and shapes
- Establish consistent proportions
- Add minimal details as needed
- Test readability at different sizes
Step 5: Create Variations
Develop a figure library:
- Different poses and actions
- Various viewing angles
- Multiple emotional states
- Diverse body types if appropriate
Step 6: Test and Iterate
Validate your designs:
- Show figures to colleagues unfamiliar with your work
- Verify that intended meanings are clear
- Check accessibility (color contrast, size)
- Refine based on feedback
Step 7: Document Your Style
Create guidelines for consistency:
- Record proportions and measurements
- Document color schemes
- Note animation principles
- Save templates for future use
Animation Techniques for Abstract Figures
Bringing your figures to life requires understanding basic animation principles:
Keyframe Animation
Define start and end positions, letting software interpolate between:
- Set key poses at important moments
- Adjust timing between keyframes
- Use easing functions for natural movement
- Preview and refine motion paths
Rigging and Bones
Create skeletal structures for complex movements:
- Define joint locations (shoulders, elbows, hips, knees)
- Set rotation limits for realistic motion
- Create inverse kinematics for natural limb movement
- Save rigs for reuse across scenes
Motion Paths
Guide figures along defined trajectories:
- Draw paths for figures to follow
- Adjust speed along the path
- Add rotation to match movement direction
- Combine with other animations for complexity
Morphing and Transformation
Smoothly transition between different states:
- Change figure shapes to show transformation
- Morph between poses for fluid motion
- Use for emphasis or dramatic effect
- Maintain recognizability throughout transition
Particle Effects
Add visual interest to figure movements:
- Trailing effects for rapid motion
- Emphasis particles for important actions
- Environmental interactions (dust, water)
- Use sparingly to avoid distraction
Accessibility Considerations
Ensure your abstract human representations are inclusive:
Visual Accessibility
Make figures visible to all viewers:
- Use sufficient color contrast (minimum 4.5:1 ratio)
- Don't rely solely on color to convey information
- Ensure figures are large enough to see clearly
- Test with colorblind simulation tools
- Provide text descriptions in video captions
Cultural Sensitivity
Avoid unintended cultural implications:
- Research cultural meanings of gestures and poses
- Avoid stereotypical representations
- Use neutral, inclusive designs
- Consider consulting diverse reviewers
- Be mindful of clothing and accessory choices
Cognitive Accessibility
Support diverse learning needs:
- Keep designs simple and uncluttered
- Use consistent visual language
- Provide clear context for figure actions
- Avoid rapid or complex animations
- Include pauses for information processing
Common Mistakes to Avoid
Steer clear of these frequent pitfalls:
Over-Complication
Adding unnecessary details defeats the purpose of abstraction. Keep figures as simple as possible while maintaining clarity.
Inconsistent Style
Mixing different abstraction levels or styles within one video creates visual confusion and appears unprofessional.
Inappropriate Abstraction
Using overly casual stick figures in formal research presentations or overly complex figures in simple explanations.
Neglecting Motion Principles
Ignoring basic animation principles results in unnatural, distracting movement that undermines your message.
Cultural Insensitivity
Using gestures, poses, or representations that may be offensive or inappropriate in some cultural contexts.
Poor Contrast
Creating figures that blend into backgrounds or are difficult to distinguish from other elements.
Stereotyping
Unintentionally reinforcing stereotypes through body types, colors, or accessories associated with specific groups.
Case Studies: Effective Abstract Human Depictions
Learn from successful examples across research fields:
Example 1: Public Health Campaign
A vaccination awareness video used simple geometric figures (circles for heads, rectangles for bodies) in bright, friendly colors. Different colors represented different age groups, and simple animations showed the vaccination process. The abstract approach made the content accessible across cultures while maintaining professional credibility.
Key success factors: Clear color coding, simple animations, universal appeal
Example 2: Psychology Research Video
A study on social interactions used rounded, simplified human forms with minimal facial features (dots for eyes, curved lines for mouths). Positioning and body language conveyed emotional states and relationships. The abstraction allowed viewers to focus on behavioral patterns rather than individual characteristics.
Key success factors: Expressive postures, clear spatial relationships, emotional clarity
Example 3: Medical Procedure Explanation
An educational video about surgical procedures used clean silhouettes for patients and medical staff, with simple accessories (surgical caps, masks) indicating roles. Color coding distinguished between different stages of the procedure. The abstract approach maintained dignity while clearly communicating complex information.
Key success factors: Respectful representation, clear role differentiation, procedural clarity
Example 4: Data Visualization Animation
A demographic study used standardized icon-based human figures arranged in dynamic patterns to show population changes over time. Consistent sizing and spacing allowed accurate visual comparison, while color variations indicated different demographic categories.
Key success factors: Standardization, accurate proportions, clear categorization
Integrating Figures with Other Visual Elements
Abstract human figures work best when integrated thoughtfully with other design elements:
Background Design
Create appropriate contexts:
- Use simple, non-distracting backgrounds
- Ensure sufficient contrast between figures and backgrounds
- Add minimal environmental elements for context
- Consider using gradients or subtle textures
- Maintain visual hierarchy with figures as focal points
Text and Labels
Combine figures with textual information:
- Position text to complement rather than obscure figures
- Use arrows or lines to connect labels to figures
- Maintain consistent text styling
- Ensure readability at all sizes
- Consider using callouts for detailed information
Data Visualizations
Integrate figures with charts and graphs:
- Use figures to represent data points or categories
- Maintain consistent scale between figures and data
- Position figures to enhance rather than obscure data
- Consider using partial figures for fractional values
- Ensure figures don't distract from data patterns
Scientific Diagrams
Combine abstract humans with technical illustrations:
- Match abstraction levels across all elements
- Use figures to show scale or interaction
- Position figures to indicate perspective or viewpoint
- Maintain scientific accuracy in all representations
- Consider using scientific diagram tools for integrated visuals
Best Practices for Research Video Production
Apply these principles when creating research videos with abstract human figures:
Planning Phase
- Storyboard your entire video before creating figures
- Identify all scenes requiring human representation
- Determine consistent style and abstraction level
- Plan for reusable figure templates
- Consider accessibility from the start
Production Phase
- Create figure templates for efficiency
- Maintain consistent proportions and styling
- Test animations at intended playback speed
- Render at appropriate resolution
- Save source files for future edits
Review Phase
- Get feedback from diverse viewers
- Check for unintended interpretations
- Verify accessibility compliance
- Test on different devices and screen sizes
- Refine based on feedback
Distribution Phase
- Include captions describing figure actions
- Provide alternative text descriptions
- Consider multiple format versions
- Share on appropriate platforms
- Monitor viewer engagement and feedback
Conclusion
Abstract human depictions in research videos offer powerful advantages: they protect privacy, maintain focus on scientific content, ensure cultural inclusivity, and streamline production. By choosing appropriate abstraction levels, following design principles, and applying animation techniques thoughtfully, you can create engaging research videos that communicate effectively with diverse audiences.
Remember that the goal is clarity and communication, not artistic perfection. Start simple, maintain consistency, and refine your approach based on feedback and experience. Your research deserves to be understood and appreciated—well-designed abstract human figures help ensure your video content reaches and resonates with viewers.
Ready to create engaging research videos? Explore our science animation tools to bring your research to life with professional abstract human representations that enhance understanding and extend your research impact.
Related Articles:
分類
更多文章
")
Block Diagrams Explained: How to Create One with Examples (2026 Guide)
Learn what block diagrams are and how to create them step by step. Covers system block diagrams, functional block diagrams, and process block diagrams with real examples.

How to Write a Research Manuscript: Complete IMRaD Format Guide
Master the art of writing research manuscripts with this comprehensive IMRaD format guide. Learn the best writing order, avoid common rejection reasons, and get your paper published.
")
How to Create a Network Diagram: Types, Symbols & Step-by-Step Guide (2026)
Learn how to create network diagrams for IT infrastructure. Covers logical vs physical diagrams, standard symbols, topology types, and real-world examples.