
Ray Diagram: Lenses and Mirrors Explained
Learn what a ray diagram is, the principal ray rules for lenses and mirrors, real versus virtual images, and how to draw one step by step with clear examples.
A ray diagram is the simplest way to figure out where an image forms, how big it is, and whether it is upright or inverted — without doing any maths. By tracing just two or three special light rays from an object through a lens or off a mirror, you can predict the image every time.
This guide explains what a ray diagram is, the key optical terms, the principal ray rules for lenses and mirrors, the difference between real and virtual images, and exactly how to draw a ray diagram step by step.
Quick Answer: What Is a Ray Diagram?
A ray diagram is a scale drawing that shows how light rays travel from an object, bend at a lens (refraction) or bounce off a mirror (reflection), and meet to form an image. You only need to trace two or three "principal rays" whose paths are predictable — where they cross is the top of the image.
In one line: trace the special rays, and their intersection tells you where the image is.
What a Ray Diagram Is For
Every point on an object sends out light in all directions, but you only need a few rays that follow simple, known rules at a lens or mirror. Once you draw those rays and find where they meet, you know:
- Position — how far the image is from the lens or mirror.
- Size — magnified, reduced, or the same size as the object.
- Orientation — upright or inverted.
- Type — real (rays actually meet) or virtual (rays only appear to meet).
Key Terms You Need First
- Principal axis — the horizontal line through the centre of the lens or mirror.
- Optical centre (lens) / pole (mirror) — the central point where the principal axis meets the optic.
- Focal point (F) — the point on the axis where rays parallel to the axis converge (or appear to come from). The distance from the optic to F is the focal length.
- Centre of curvature (C) — for a mirror, the centre of the sphere the mirror is part of; it sits at twice the focal length (2F).
- Object and image — drawn as vertical arrows standing on the principal axis.
Ray Diagram Generator
Pick a lens or mirror, set the object distance, and get an accurate ray diagram with the correct principal rays and image labelled in seconds.
Make a ray diagram ->The Principal Ray Rules for Lenses
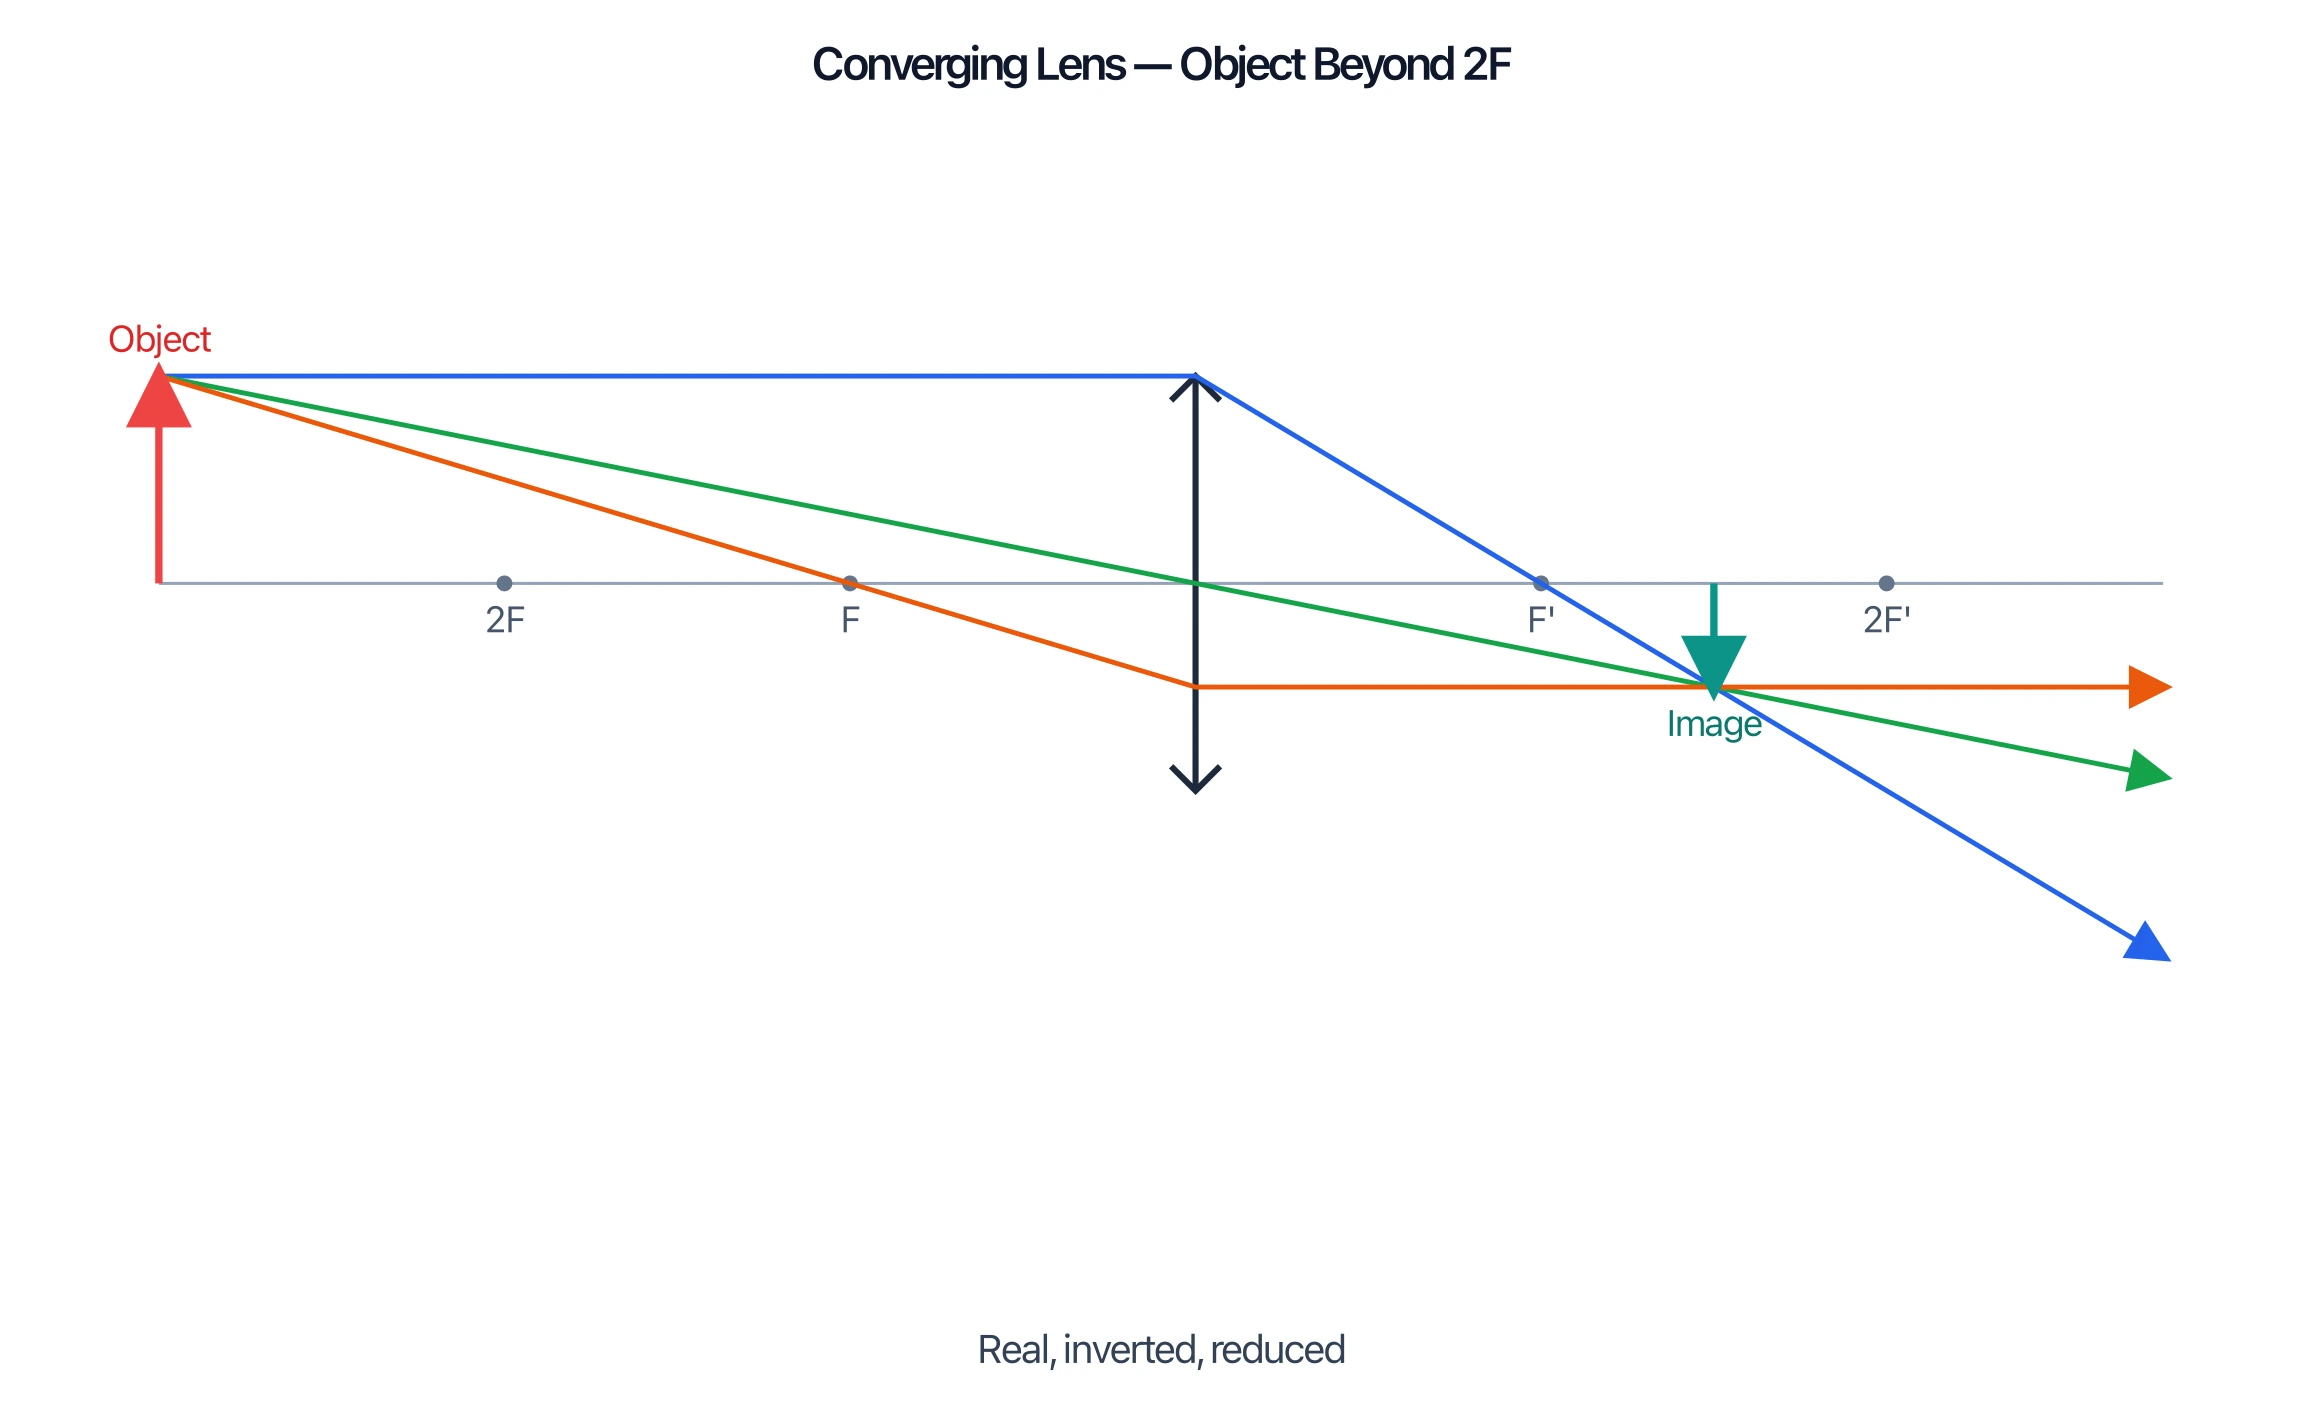
For a thin lens you draw three rays from the top of the object. Any two that cross will locate the image; the third is a useful check.
- Parallel ray. A ray travelling parallel to the principal axis refracts and passes through the focal point on the far side of the lens.
- Central ray. A ray through the optical centre of the lens goes straight through without bending.
- Focal ray. A ray that passes through the focal point on the near side refracts and emerges parallel to the principal axis.
These rules are mirror images of one another, which is why the parallel ray and the focal ray swap roles depending on which side you start from.
Converging vs Diverging Lens
A converging (convex) lens is thicker in the middle and bends parallel rays inward to a real focal point. The image it forms depends on where the object sits relative to F and 2F — it can be real and inverted, or (when the object is inside F) virtual, upright, and magnified, which is how a magnifying glass works.
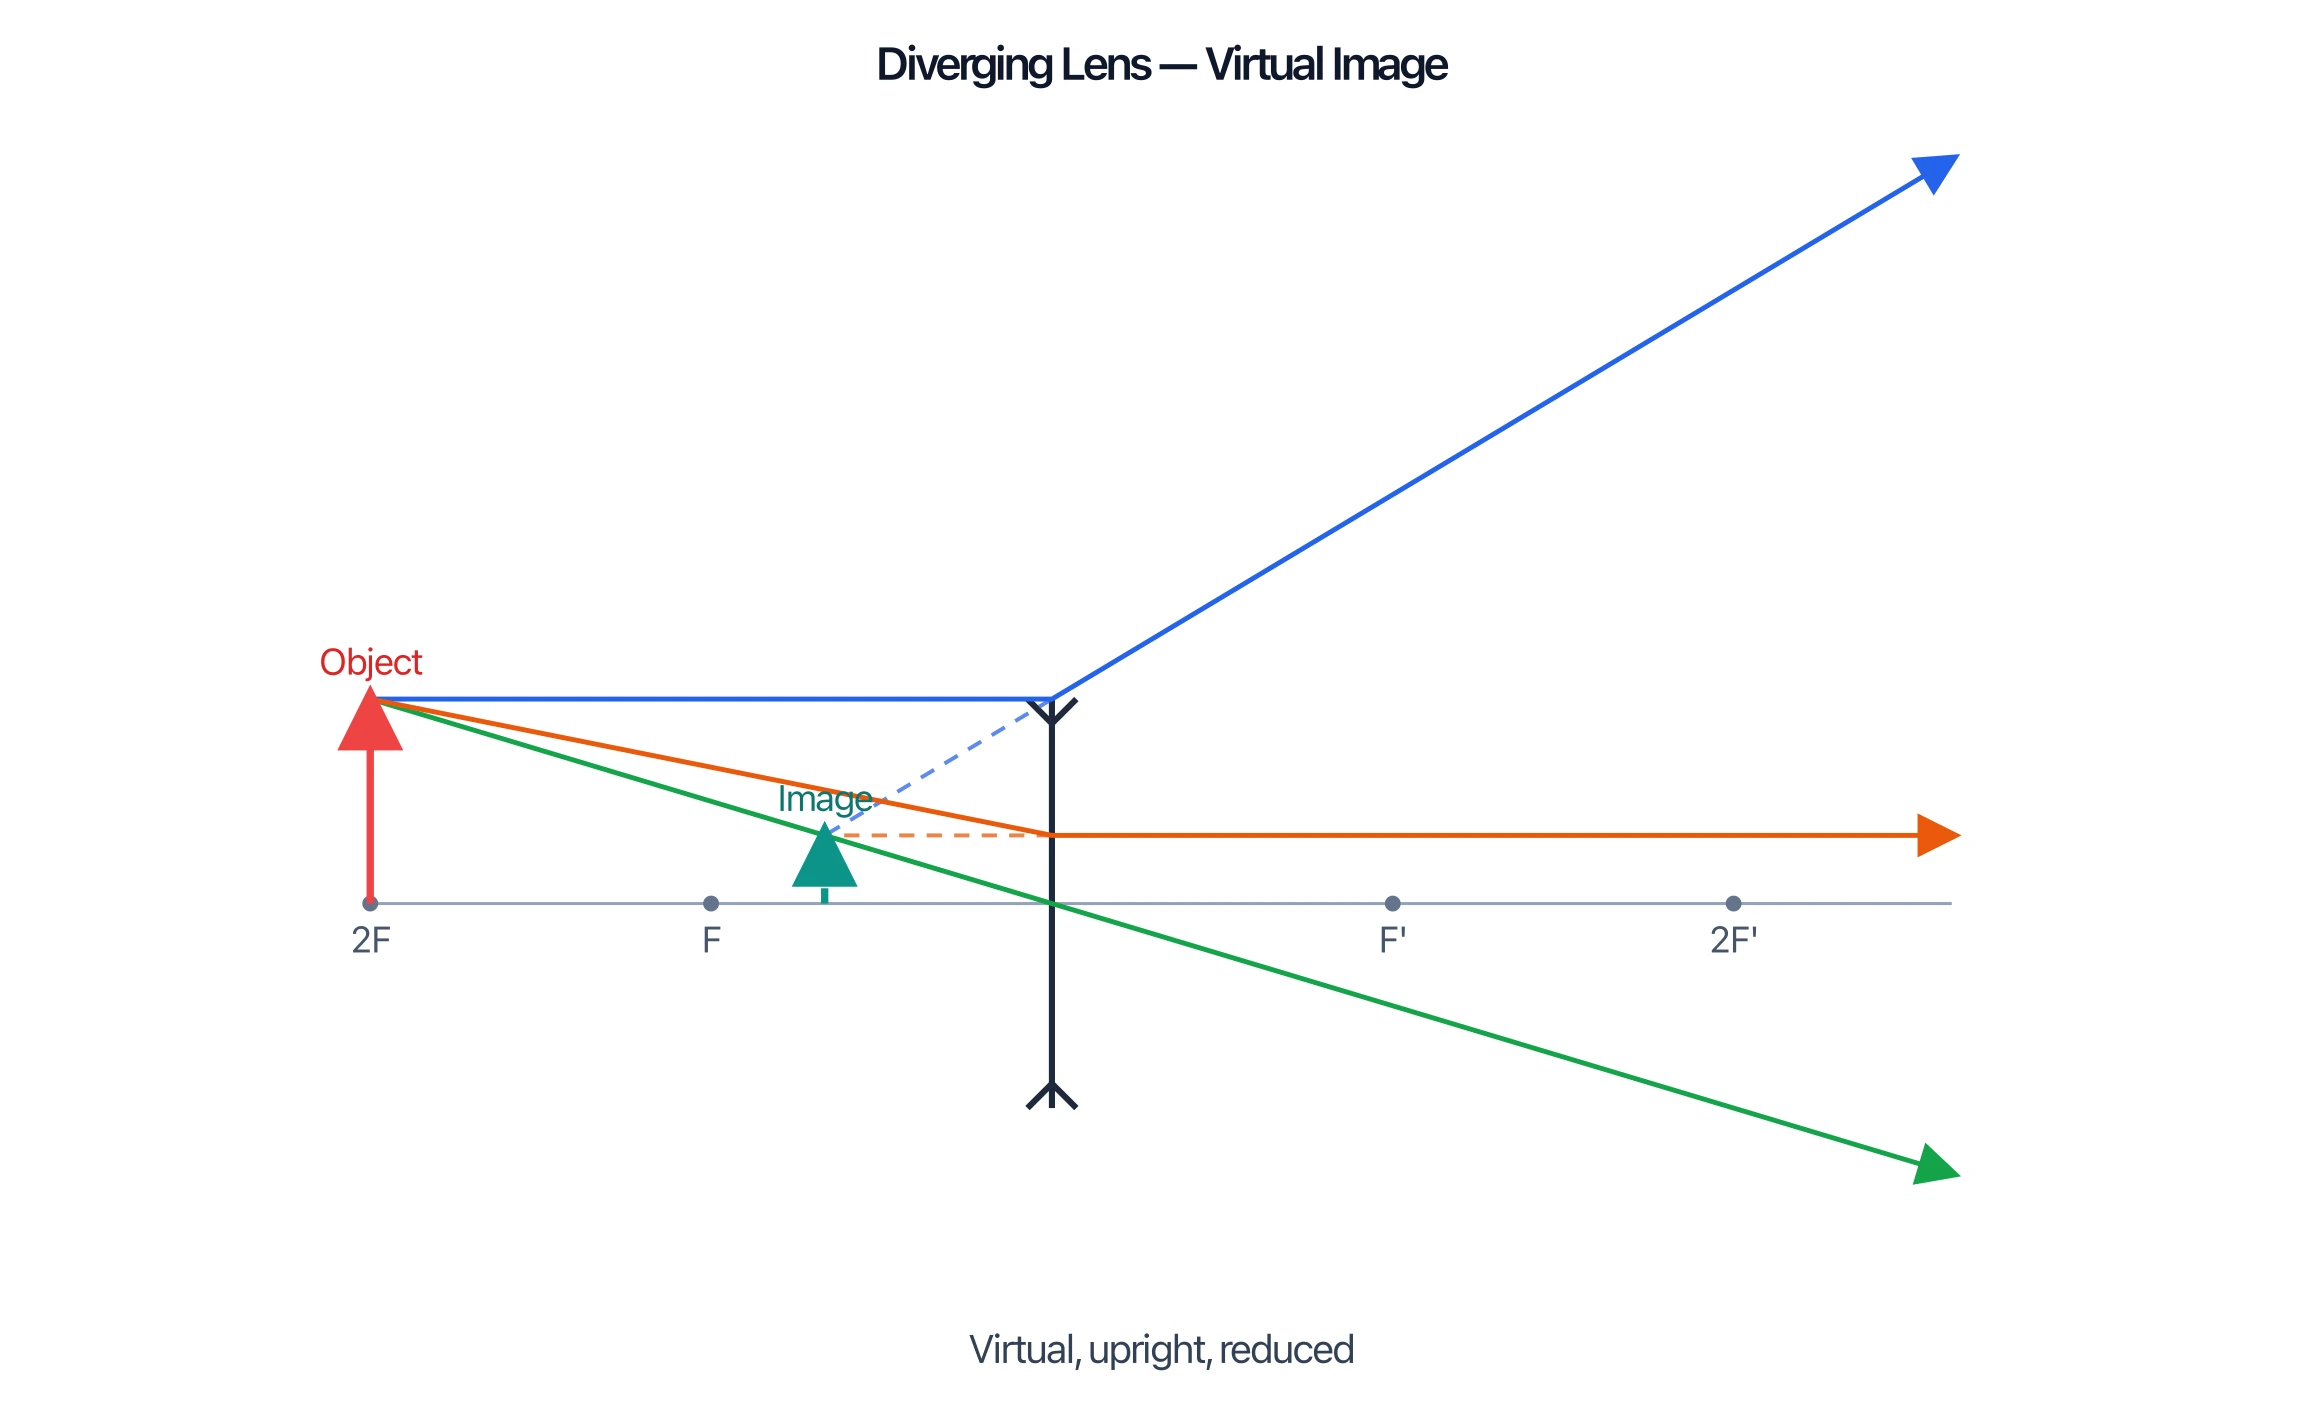
A diverging (concave) lens is thinner in the middle and spreads parallel rays apart, so they only appear to come from a focal point on the same side as the object. A diverging lens always produces a virtual, upright, reduced image, no matter where the object is.
Concave vs Convex Mirror
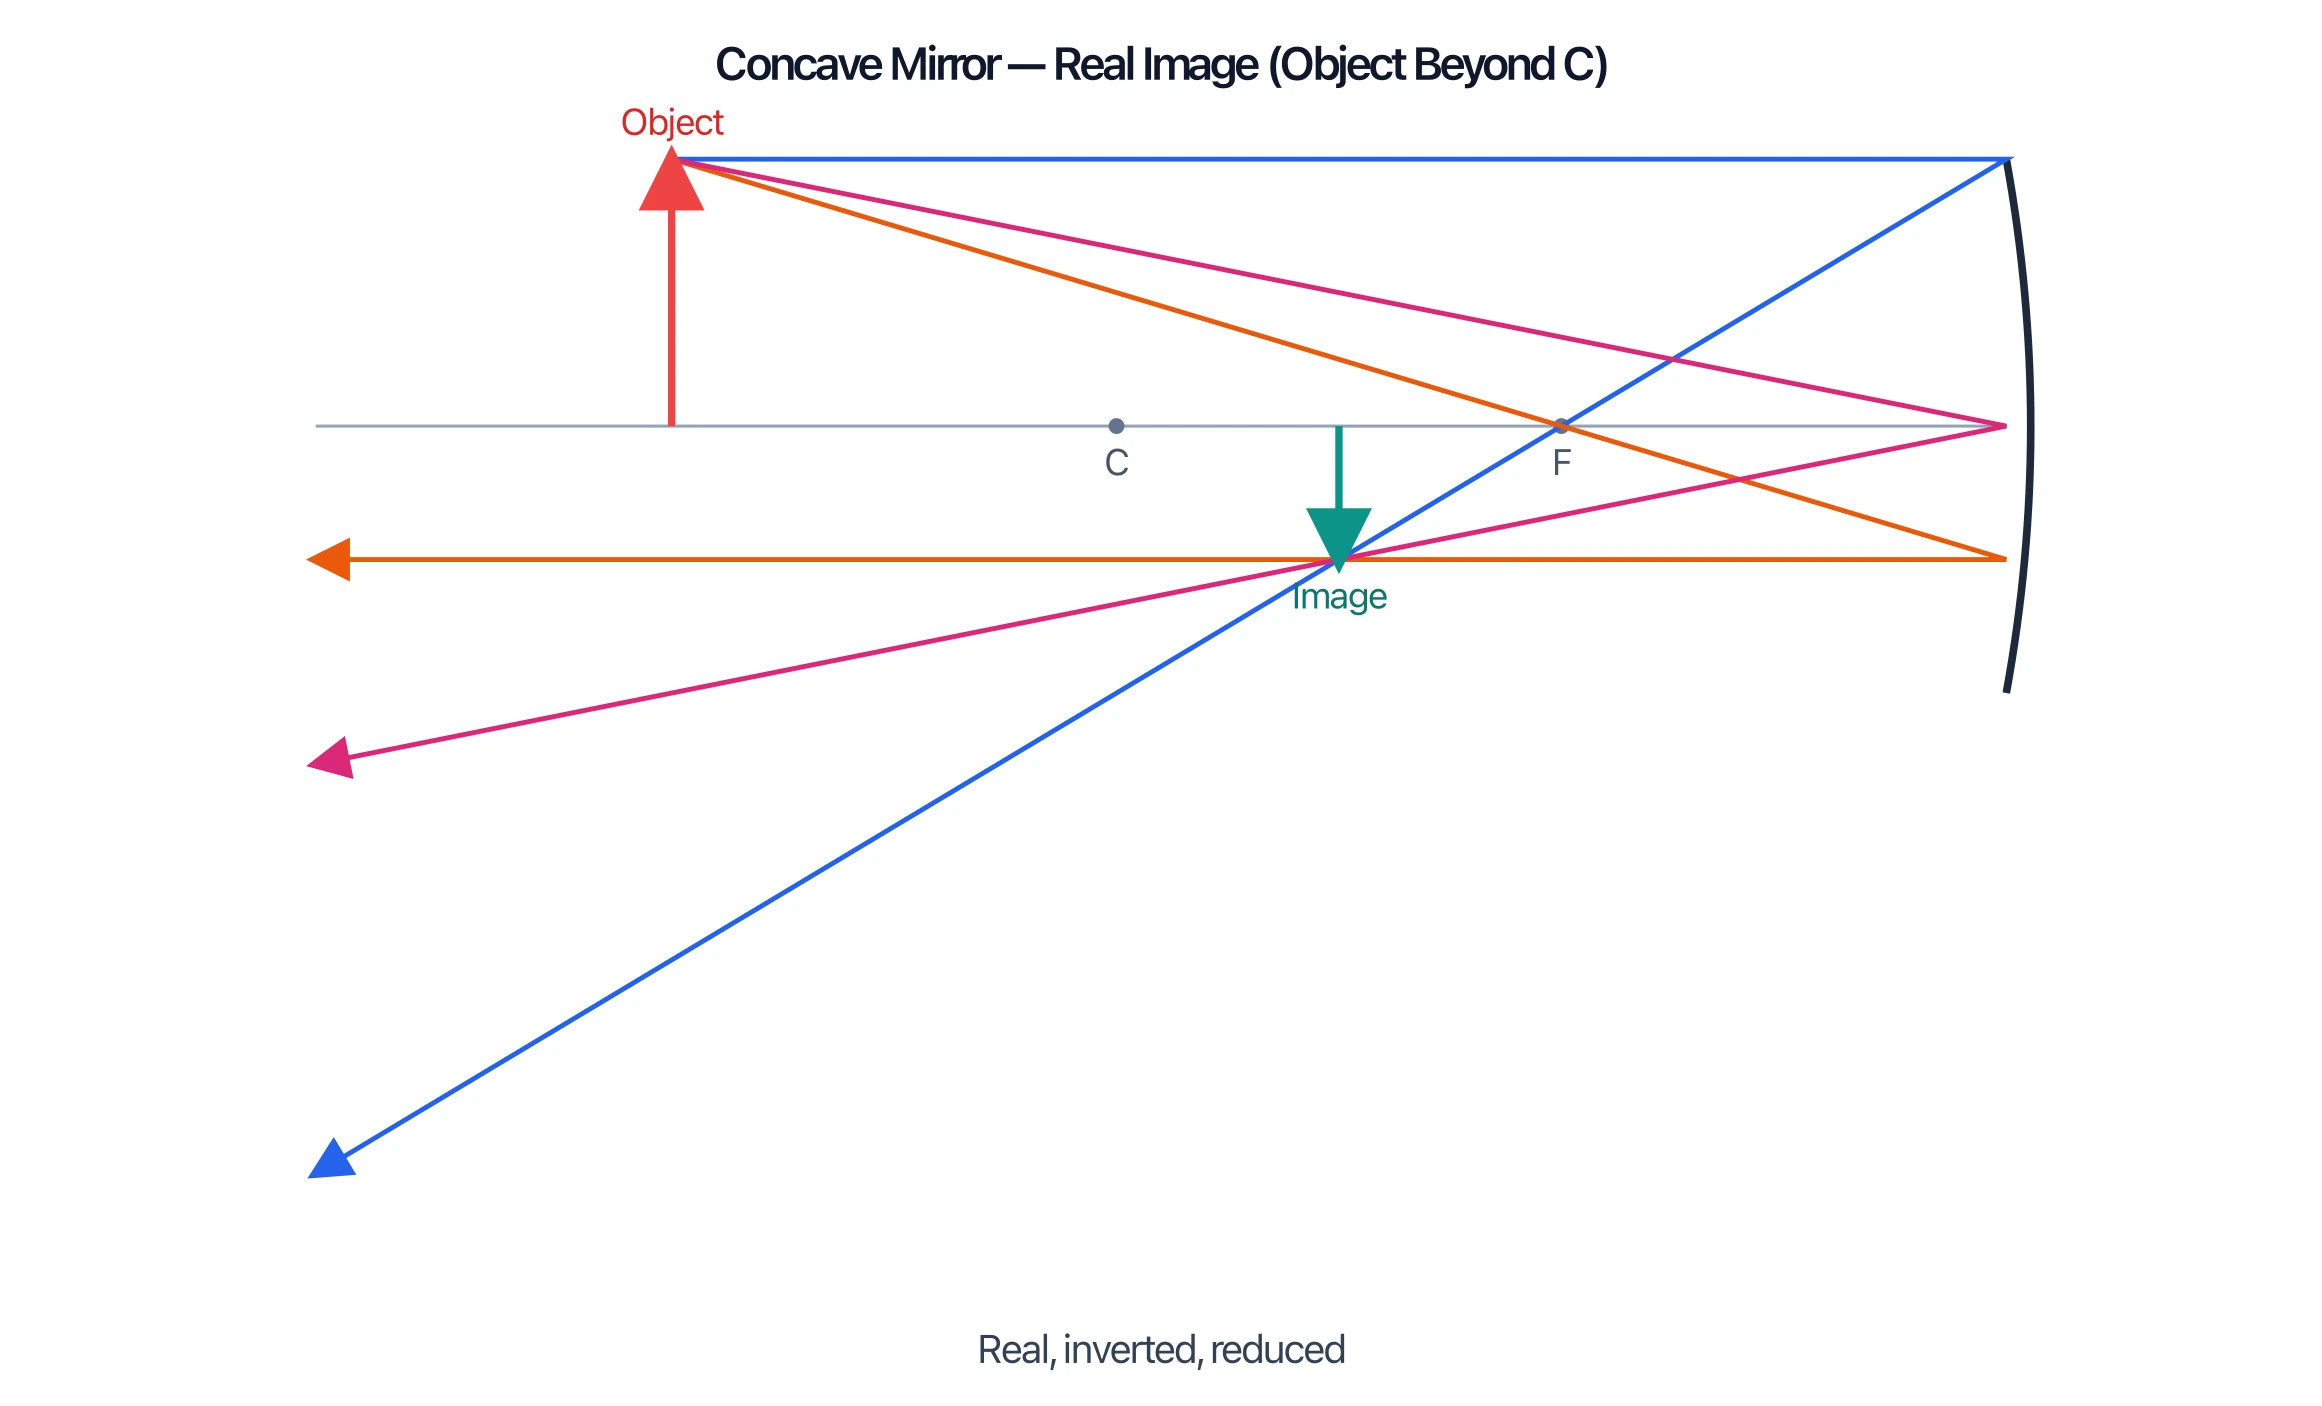
Mirrors follow the same idea, but rays reflect instead of refract. The three principal rays for a mirror are: a ray parallel to the axis reflects through F; a ray through F reflects parallel to the axis; and a ray hitting the pole reflects symmetrically about the axis.
A concave (converging) mirror curves inward. When the object is beyond the focal point it forms a real, inverted image in front of the mirror (the principle behind reflecting telescopes); when the object is inside F it forms a magnified upright image, like a shaving or makeup mirror.
A convex (diverging) mirror curves outward and always forms a virtual, upright, reduced image behind the mirror. Its wide field of view is why it is used for car side mirrors and shop security mirrors.
Real vs Virtual Images
This distinction trips up most students:
- A real image forms where the refracted or reflected rays actually cross. It can be projected onto a screen and is always inverted. Draw it with solid rays.
- A virtual image forms where the rays only appear to come from when you extend them backward. It cannot be projected and is always upright. Draw the back-extensions as dashed lines.
Rule of thumb: if you have to extend rays backward (with dashes) to make them meet, the image is virtual.
How to Draw a Ray Diagram Step by Step
- Draw the principal axis as a horizontal line and place the lens or mirror on it.
- Mark F and 2F (or F and C for a mirror) on both sides at the correct scale.
- Draw the object as an upright arrow standing on the axis at its distance.
- Trace ray 1 from the top of the object parallel to the axis, then through (or apparently from) the focal point.
- Trace ray 2 through the optical centre or pole.
- Trace ray 3 (optional check) through the near focal point.
- Find the intersection. Where the rays meet is the top of the image; if they diverge, extend them backward with dashed lines to find a virtual image.
- Draw the image arrow from the axis up or down to that point, and describe it: real/virtual, upright/inverted, magnified/reduced.
Ray Diagram Generator
Generate an accurate lens or mirror ray diagram with the principal rays and image labelled for you.
Common Mistakes to Avoid
- Bending rays at the lens surfaces. For a thin lens, bend each ray once at the centre line of the lens, not at the curved glass edges.
- Forgetting the dashed back-extensions. Virtual images only appear when you extend rays backward — those lines must be dashed.
- Mislabelling real vs virtual. Real images are inverted and projectable; virtual images are upright and cannot be projected.
- Putting F at the wrong distance. 2F (or C for mirrors) sits at exactly twice the focal length — keep the scale consistent.
- Drawing only one ray. You need at least two principal rays to fix the image point.
FAQ
What is a ray diagram in physics?
A ray diagram is a scale drawing that traces a few predictable light rays from an object through a lens or off a mirror to show where the image forms and what it looks like.
How many rays do you need to draw a ray diagram?
Two principal rays are enough to locate the image, because their intersection fixes the image point. A third ray is often drawn as a check that the diagram is accurate.
What is the difference between a real and a virtual image?
A real image forms where rays actually cross and can be projected on a screen (always inverted). A virtual image forms where rays only appear to come from and cannot be projected (always upright).
What are the three rays used in a lens ray diagram?
A ray parallel to the axis (refracts through the far focal point), a ray through the optical centre (goes straight), and a ray through the near focal point (emerges parallel to the axis).
Does a diverging lens or convex mirror ever make a real image?
No. A diverging (concave) lens and a convex mirror always form virtual, upright, reduced images, regardless of where the object is placed.
Further Reading
Categorías
Más Publicaciones
")
How to Draw a Volcano: Step-by-Step (Easy Labeled Diagram)
Learn how to draw a volcano step by step — an easy labeled cross-section for science class. Simple shapes for the cone, magma chamber, conduit, vent, and erupting ash cloud, plus a free instant generator.
")
8 Mejores Programas para Diagramas Electricos en 2026 (Gratis y de Pago)
Compara los mejores programas para diagramas electricos, cableado y esquemas en 2026. Opciones gratis y de pago para uso residencial, automotriz e industrial.

How to Present References in a Scientific Poster: Complete Citation Guide
Learn the best practices for formatting and presenting references on scientific posters. Includes citation styles, font sizes, placement tips, and real examples.